1. Contact
Contact
To learn more about Intella Connect™, please contact us using the contact information below, or contact an Intella Channel Partner.
Vound
Office Phone
+1 888-291-7201
Email
sales@vound-software.com
Postal Address
10643 N Frank Lloyd Wright Blvd, Suite 101 Scottsdale, AZ 85259 U.S.A.
Sales Contacts
https://www.vound-software.com/about-us#partners
We will be pleased to provide additional information concerning Intella Connect and schedule a demonstration at your convenience.
To become an Intella Connect reseller, please contact us!
For user and technical support please visit our website: http://www.vound-software.com.
Vound Colorado (“Vound”).
© 2023 Vound. All rights reserved.
The information in this User Manual is subject to change without notice. Every effort has been made to ensure that the information in this manual is accurate. Vound is not responsible for printing or clerical errors.
VOUND PROVIDES THIS DOCUMENT “AS IS” WITHOUT WARRANTY OF ANY KIND, EITHER EXPRESS OR IMPLIED AND SHALL NOT BE LIABLE FOR TECHNICAL OR EDITORIAL ERRORS OR OMISSIONS CONTAINED HEREIN; NOR FOR INCIDENTAL OR CONSEQUENTIAL DAMAGES RESULTING FROM THE FURNISHING, PERFORMANCE, OR USE OF THIS MATERIAL.
Other company and product names mentioned herein are trademarks of their respective companies. It is the responsibility of the user to comply with all applicable copyright laws. Mention of third-party products is for informational purposes only and constitutes neither an endorsement nor a recommendation. Vound assumes no responsibility with regard to the performance or use of these products. Under the copyright laws, this manual may not be copied, in whole or in part, without the written consent of Vound. Your rights to the software are governed by the accompanying software license agreement. The Vound logo is a trademark of Vound. Use of the Vound logo for commercial purposes without the prior written consent of Vound may constitute trademark infringement and unfair competition in violation of federal and state laws.
All rights reserved by Vound. Intella and Intella Connect are trademarks of Vound.
2. An introduction to Intella Connect
Intella Connect is a web-based investigation and eDiscovery tool. It is ideally suited for use by enterprise, law enforcement and regulatory agencies in civil, criminal or policy-related investigations. It allows you to share any case that has been made with Intella 100, Intella 250, Intella Professional (Pro) or previous version of Intella TEAM Manager. The case can then be reviewed using any of the supported web browsers.
Cases can also be created directly in Intella Connect and its sources can be indexed using Intella Node. If a case already exists, it is however not required to have Intella Node in order to share such case.
Intella Connect’s unique visual presentation will let you quickly and easily search and review email and electronically stored information to find critical evidence and visualize relevant relationships. The birds-eye view helps you gain insight in information that is available on combinations of keywords. In each step of your search it shows the number of emails or files that match your search (and of course a link to the e-mails and files themselves) so that you can effectively zoom in to find what you are looking for.
With Intella Connect, you can…
-
Gain deeper insight through visualizations.
-
Search email, attachments, archives, headers, and metadata.
-
Drill deeply into the data using Intella Connect’s unique facets.
-
Group and trace email conversations.
-
Preview, cull, and deduplicate email and data.
-
Export results.
2.1. Supported web browsers
-
Google Chrome (most recent version)
-
Mozilla Firefox (most recent version)
-
Microsoft Edge
|
As Microsoft has officially announced ending support for Internet Explorer, we are no longer supporting it as well. |
|
Warning
Google Chrome and MS Edge will not delete session cookies after they are closed. That means that logged in user will not be logged out. With this in mind it’s always best to log out manually when you finish using Intella Connect. |
2.2. Feedback
We take great care in providing our customers with a pleasant experience, and therefore greatly value your feedback. You can contact us through the form on http://support.vound-software.com/ or by mailing to one of the email addresses on the Contact page.
3. Working with Intella Connect
3.1. Getting started
In order to start the review of a case, the first step is to visit the User Dashboard. The link and user credentials to access the dashboard should be provided to you by the Intella Connect administrator.
After logging in, the following screen will be shown:

For a better user experience it is suggested to change the default profile image with a custom image.
This image will be displayed in the Activity Streams, Comments and User Management pages.
The default profile image can be changed by selecting the Change avatar picture option available in the menu located in the upper right corner.
Currently supported image formats are PNG and JPG.
The recommended minimum size of a profile image is 128 by 128 pixels.
If the ratio of the uploaded image is not 1:1, it is cropped as showed on the figure below:
![]()
Under the profile image, there is a list of cases which are currently assigned to you and available for review. Click on a desired case to access the Intella Connect case reviewing interface.
- The options icon
 allows user to change
 -
-
the avatar picture
-
the password
-
two-factor authentication settings
-
or log out from Intella Connect:
![]()
Change avatar picture
Changing the avatar Image is straightforward - select Change avatar picture from the menu.
After dialog is shown press Browse button and select the picture (png/jpg) you want to use as your avatar.
Change password
To change password, select Change password from the menu.
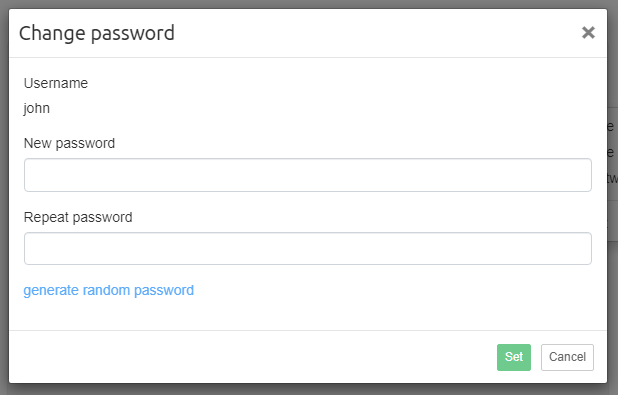
Once the password fields are filled in, click on the Set button to change the user’s password.
After changing the password, you will be asked to log in again with a new password.
|
Passwords can be generated by clicking on the |
Setup two-factor authentication
The feature of two-factor authentication (2FA) for local Intella Connect users has been added in version 2.4.2.
With 2FA, an extra security layer is added to the user account. After setting it up correctly, when logging in to Intella Connect , then the user will be asked to login in two steps:
-
first with username and password
-
second with time-based one-time password (TOTP) generated on phone or another device
Due to the second step being time-based, it is required for the server on which Intella Connect is running as well as a device on which authenticator is running to have system clocks synchronized.
Please make sure to enable "Set time automatically" option on Windows so that the system clock is synchronized with the internet time server.
The same applies to phones and other devices on which authenticator is running.
To set up two-factor authentication, select Setup two-factor authentication from the menu.
This will open a modal window which shows the current status of 2FA and allows to enable or disable it.
By default, the 2FA is disabled as is shown when opening the modal window for the first time:

To start the process of enabling the 2FA, click on Enable 2FA button. This will activate TOTP generation on Intella
Connect
side for the user.
At this point, 2FA is still disabled and further steps are required:

To finish 2FA setup, do the following:
-
If authenticator is not installed on device, then install authenticator application on device using built-in application store (Google Play for Android devices and App Store for Apple devices). Google Authenticator or Microsoft Authenticator are recommended. In the authenticator application on phone, add a new entry in one of two ways:
-
Choose to scan the QR code with your device’s camera to add the entry automatically.
-
Enter the details provided to add the entry manually.
-
-
Enter the six digit number from your device to the field in modal window and click
Verify credentialsbutton.
If the six digit number from your device will match the six digit number generated in Intella Connect , then 2FA will be enabled for this user.

The modal window can now be closed. When logging in, you will be prompted to enter username and password as well as a six digit number generated by your authenticator.
It is recommended to use 2FA to strengthen security of all local user accounts.
To disable 2FA, enter current password and the six digit number from your device and then click on Disable 2FA button.
If there are unexpected issues with 2FA and it cannot be disabled by the user, then it is suggested to contact Intella Connect administrator, who can follow troubleshooting steps in administrator’s section of this user manual.
3.2. Overview of the case reviewing interface
The first page that will be shown to user, which has successfully logged in and has been granted access to this case is the Dashboard view.

4. Views
The case review interface consists of five primary views that the user can choose between:
-
Dashboard view (default) - allows user to get an overview of the case.
-
Search view - used for searching, exploring, investigating data and reviewing results.
-
Review view - allows for a simplified, cost-effective review of grouped items.
-
Exports view - for managing exported results.
-
Report view - used for generating reports, such as detailed statistics about the keywords in a keyword list or user activity on a case.
The primary view can be selected in the top bar:
![]()
|
Views are shown based on whether the current user has sufficient permissions, so it might happen that not all of them will be shown. |
The top bar also shows the name of the currently logged user along with his avatar. The available dropdown menu allows going back to the user dashboard, or signing out of Intella Connect.
The lower bar represents Secondary Navigation and is split into two parts. Tabs on the left allow getting into a more detailed sub-view of the main view.

Action icons on the right allow for access to:

Dashboard view
The Dashboard view is the default view that Intella Connect will display when the case is opened. It allows the user to see an overview of the case, particularly the kinds of data which are contained in it, overall progress of the investigation as well as individual activities of other investigators.
Dashboard view interface consists of the following widgets:
-
Data overview - shows data sources that have been indexed, types of items and top 10 email addresses in this case.
-
Tags - shows all tags that have been applied to items or, when a particular tag is selected, the items tagged per user.
-
Progress - shows how many items have been previewed, tagged, redacted, flagged or exported.
-
Reviewers - shows reviewers that are participating in investigation of this case. Reviewers that are currently logged in are shown as active.
-
My Work - shows the actions performed by current user.
-
Activities - contains records related to user activities like viewed items, tagging, flagging, exporting, etc.
-
Alert box - shows notifications regarding the case and the data contained in it, such as exceptions or the existence of encrypted items.
|
Widgets can be reordered and resized to accommodate user’s needs. |
Search view
The Search view is usually the place where most of the work will commence. It allows users to search and explore items held in a case, find the ones matching user’s investigation needs and further review them. It offers a few different sub-views, each tailored to accommodate different kinds of investigation needs.
Insight sub-view
The Insight view shows notable aspects of the indexed evidence files and possible next steps to take. The overview given here can help an investigator get a grasp of the case’s contents, such as the encountered item types and their volumes, date ranges, web browser activity, etc. This will help formulate follow-up questions for further research. Most elements in this view can be clicked or double-clicked, which adds a search in the Search sub-view or opens the corresponding item in the Previewer.
|
Widgets can be reordered and resized to accommodate user’s needs. |
To learn more about this view please refer to the Insight view section.
Search sub-view
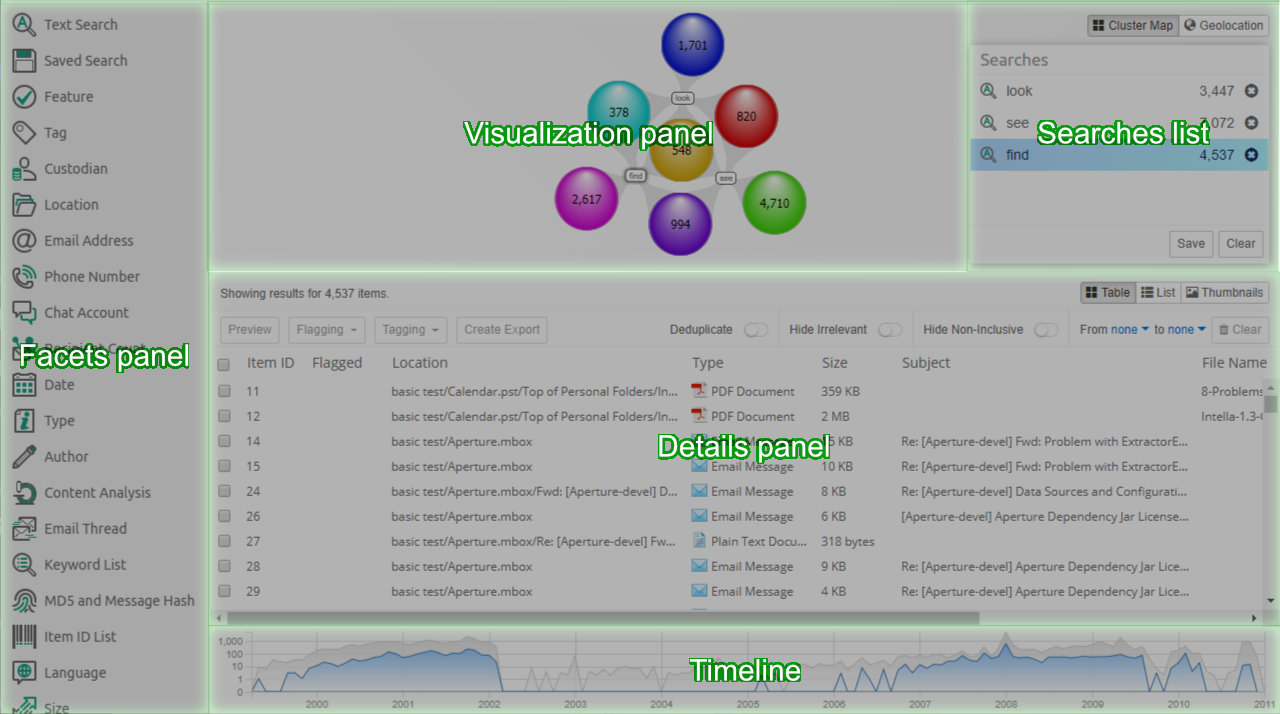
Search view interface consists of the following panels:
-
Facets panel - shows a list of facets for searching and filtering results.
-
Visualization panel - shows how search results are connected to parts of the query.
-
Searches list - shows user’s queries.
-
Details panel - shows a list, table or thumbnail view of the results in a selected cluster.
-
Timeline - Optionally, timeline depicting distribution of items over time is shown at the bottom, see Timeline section.
When Intella Connect opens the case for the first time, the Cluster Map, Selections and Details panels will all be empty. The investigative work can be started by using one of the available Facets.
|
Panel can be resized by dragging the edge between panels. This way users can adjust the sizes of panels the way that best suits their needs. |
The first facet is a text search facet which consists of:
-
Search text field - to search for text, enter a query in this text field and click the Search button.
-
Search button - to evaluate the currently entered query.
-
Search drop-down button - the text that is being searched for can also be required and excluded. This allows for filtering items on the text without these queries appearing as individual result sets in the Cluster Map visualization. Clicking on gear icon will show additional options which allow limiting keyword searching to specific item parts or attributes.
The right part of the Images view is basically a thumbnails view along with action options. Each item can be right-clicked to show a list of options.
Review view
Intella Connect 1.9.1 introduced the new concept of "Batching and Coding" which greatly aids the workflow of a linear review of documents, making it a very easy and effective process. Coding is a process of applying taggings to items, guarded by user defined rules. A batch is simply a set of items grouped together, supplemented with some additional metadata (like name and status), which makes it very easy for users to refer to a particular subset of items in a case. It also helps to track which items have been coded in a context of a given batch.
To learn more about these new features please refer to the Batching and Coding section.
Review View was designed to be a self-contained tool which allows users to stay focused while working on a linear review task. It consists of two kinds of subviews:
-
Batches List View
-
Coding View
Those subviews are accessible from the Secondary Navigation Bar as tabs (links) located on the left. The first tab is called "All batches" and it always points to the Batches List View. The presence of other tabs depends on the fact if currently logged in user has any batches assigned to him. If yes, then new tabs will be added to the Secondary Navigation Bar. In cases where large number of batches is assigned to the user some of tabs will be grouped together in a form of a drop-down list.
Batches List View
This subview offers a good overview of batches created in this case. It also the view selected by default when users clicks on the "Review" button in the main navigation.
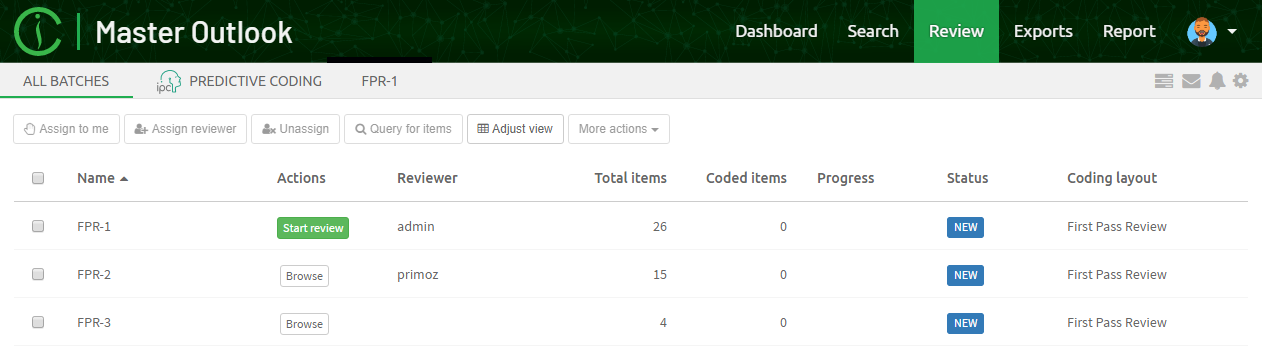
Batches are organized in a form of a table. Each column is sortable by clicking on its name. The first column allows user to select one or multiple rows. Please note that user may also use CTRL or SHIFT buttons while selecting more, to easily select more batches at once.
Please refer to the Batching and Coding section for more information about batches.
Coding View
The second subview of the Review UI is the Coding View presented below.
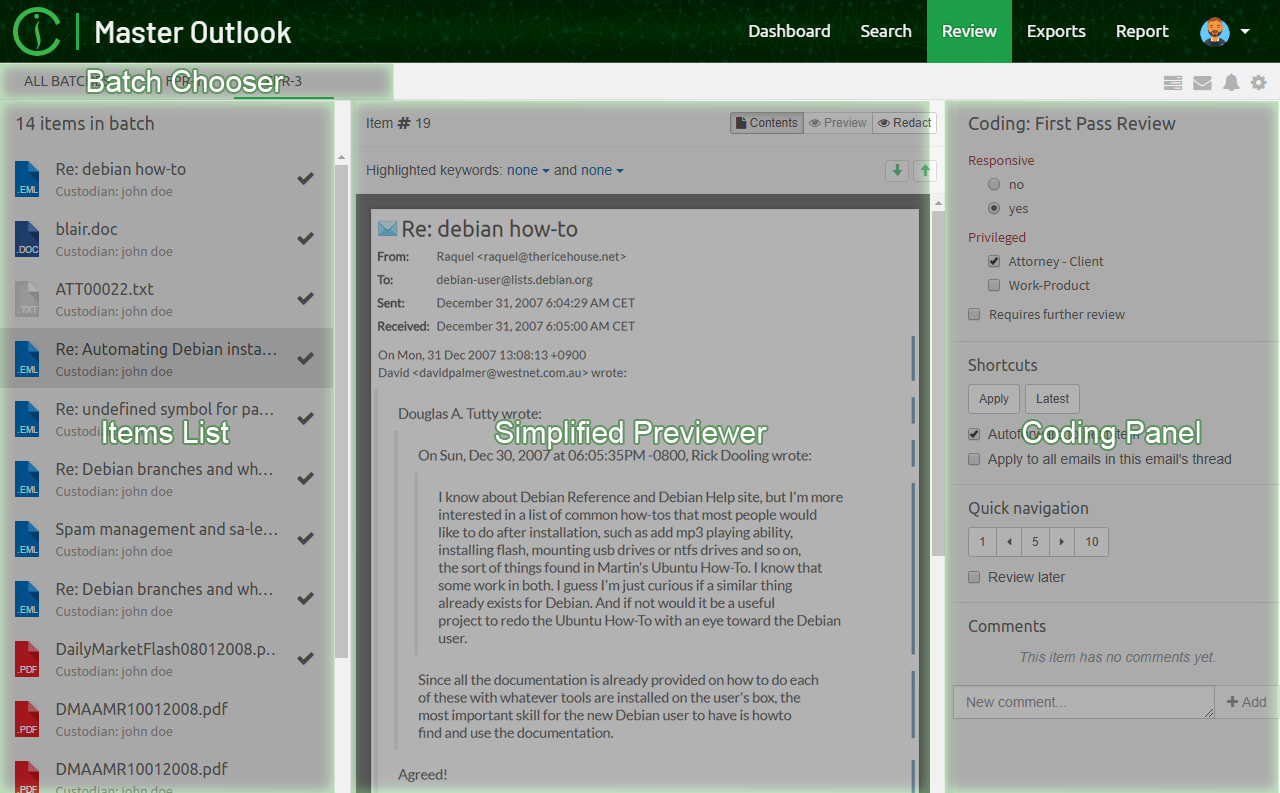
It consists of the three main UI parts:
-
Items List - which lists all items that are a part of the batch being currently browsed.
-
Simplified Previewer - which is a simplified counterpart of our standalone Previewer
-
Coding Panel - allowing users to apply a coding decision to the active item.
It’s important to understand that these tree components are closely tied together. The list on the left gives a nice overview of what kind of items this batch contains, and which one is currently reviewed (active). It also allows to quickly jump between items and it reflects the state of the coding for each item individually. Simplified Previewer makes it easy to evaluate the contents of the active item, see its native Preview (if the current item supports it) or redact it. The Coding Panel reflects the state of coding in the context of the active item.
Each of these components is described in more detail in the Batching and Coding section.
Exports view
Initially, the Export view does not have any export packages. After exporting a collection of search results, the export package will appear in the Export view.
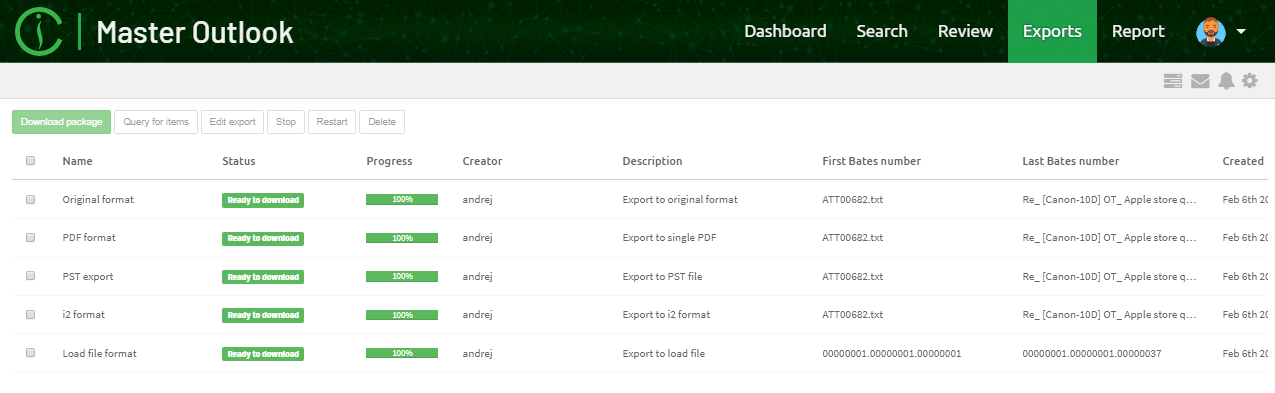
Selecting an export package shows the contents of the export package and additionally allows you to do the following actions:
-
Download package - downloads the export package as a ZIP file into your browser’s download folder.
-
Query for items - creates a query of all items contained in selected export package and adds it to searches list so that they can be reviewed in Search view.
-
Edit export - allows changing the export package name and description.
-
Stop - cancels creation of the export package.
-
Restart - restarts creation of the export package.
-
Delete - removes the export package.
Report view
The Report view is used for generating reports, such as detailed statistics about the keywords in a keyword list or user activity on a case.
It consists of the following subviews:
-
Keyword view, which gives detailed statistics about the keywords in a keyword list.
-
Volume view, which gives view about how tags relate to each other in a context of a case.
-
Activity view, which gives detailed view about the activities performed by users logged into a case.
Default subview is the Keywords view.
5. Insight view
The Insight tab contains a number of information panels that together give a concise overview of the information inside the case, revealing suspect behavior and giving rise to follow-up investigative questions.
The information is extracted from a variety of sources, such as emails and documents, web browser histories, Windows registries and more.
Clicking on entries like a document type or custodian name in the Insight tab will add a relevant search for that item category to the Cluster Map in the Search view. The main window will then automatically switch to the Search view as well.
|
The boxes in the Insight section and the Case section can now be reordered and resized to accommodate a user’s needs and display. |
5.1. Case info
Case info section shows the basic case information such as the case folder, case size, creation date, etc.
5.2. Evidence
The Evidence section shows important global statistics regarding your data. A detailed description of each category can be found in the Facet panel explaining the Features facet.
5.3. Types
The Types section shows a breakdown of the different types of files and other items in the case. It shows the same hierarchical structure as the Type facet described in Facet panel .
5.4. Custodians
The Custodians section shows the list of custodians in the case, if any, together with the number of items that are assigned to them. A pie chart showing these amounts is shown to the right of the table.
For detailed information on how to define custodians see the section titled "Custodians" in Facet panel .
5.5. GDPR
The GDPR section gives an overview of privacy-sensitive information encountered in the case. Examples of such information are person names, email addresses, phone numbers and other communication handles, credit card numbers, etc. Such information is important from a GDPR compliancy perspective, or similar legal frameworks in use around the world.
For each category of personally identifiable information (PII), the number of values found is listed. These values can be exported to a CSV file. Furthermore, the number of items that contain at least one of these values is listed. This amount is further split up in Documents, Emails, and Other categories.
The PII categories are split into two groups, based on whether the PII was found in the document/email body or in the metadata.
Click on a link in the first column to switch to the Search tab and see the items involved in that category.
Some categories are determined during indexing, yet some other categories may require Content Analysis to be run first.
5.6. Internet Artifacts
The Internet Artifacts section contains information about web browser activity, based on the browser histories detected in the evidence data.
All major browsers are supported: MS Internet Explorer/Edge, Mozilla Firefox, Google Chrome and Apple Safari.
The top chart shows the list of encountered browser histories, listing the following information:
-
The path of the browser history in the evidence data.
-
The type of browser, represented by the browser’s desktop icon.
-
The number of visited URLs in the browser history, both as a number and as a bar showing the amount relative to the total amount of visited URLs in the entire case.
-
The last used date of the browser history, i.e. the last time a new URL was added or a visit count was updated. Note that manual deletions of URLs in the history by the end user are not taken into account when determining the last used dates; it is merely indicative of when the regular day-to-day usage of that browser ended.
At the very top of this list is a row that represents the total amount of visited URLs in the case, regardless of location and web browser type.
Beneath the list of browser histories there is a breakdown of the visited URLs:
-
The "Top 100 visited URLs" table shows the most visited URLs, with for each URL the number of visits as indicated by the browser history.
-
The "Top 100 visited domains" table shows the most visited domains, together with the sum of the visit counts of all URLs in that domain. Subdomains are treated as independent domains.
-
The panels “Social media”, “Cloud storage”, “Webmail” and “Productivity” show the number of visits that belong to some commonly used websites, such as Facebook and Twitter for social media, DropBox and OneDrive for cloud storage, Gmail and Yahoo Mail for webmail, etc.
By default, this breakdown covers all visited URLs in the case. By clicking on a row in the list of browser histories one can narrow down on the visited URLs in that particular browser history. The selected browser is indicated by the blue URL count bar.
|
The categories and domains that are checked can be configured by editing the common-websites.xml file in the [CASEDIR]\prefs folder. |
|
During the development of this functionality we observed that the semantics of a “visited URL” may differ between browsers, possibly even between browser versions. In some cases it indicates that the user explicitly visited a URL by entering it in the browser’s address bar or by clicking a link. In other cases all resources loaded as a consequence of displaying that page may also be registered as “visited”, even resources from other domains, without making any distinction between the explicitly entered or clicked URLs on the one hand and the other resources on the other hand. One should therefore carefully look at the operation of a specific browser before drawing any final conclusions. |
5.7. Timeline
The Timeline shows the timestamps of all items in the case over the years of months. This not only gives a rough overview of events over time, but can also be used to find data anomalies, e.g. unexpected peaks or gaps in the volume of emails, which for example may be caused by an incomplete capture of evidence files, bugs in the custodian’s software, default values entered by client software and actions of malicious custodians (resetting date fields, deleting information).
To the right of the chart are all date fields that Intella currently supports. Each date field shows the number of items that have that date field set. Date fields that do not occur in this case are disabled. (De)selecting one of the checkboxes changes the Timeline to include or exclude the counts for that date field.
This update may take some time, depending on the case size and whether a local or remote case is used. The resulting counts are cached so that afterwards the user can toggle that checkbox and see the chart change instantly. The chart can alternatively show months or years.
|
The Timeline’s time axis only shows dates between January 1 1969 and two years from “now”. This is to prevent obviously incorrect dates that have been extracted from corrupt files from spoiling the graph. |
5.8. Identities
The Identities section consists of three tables with various types of identities, which may be representing users or other entities.
The User accounts table shows a list of user accounts extracted from the evidence data. These can be:
-
Windows user accounts, extracted from Windows registry hives.
-
Skype user accounts, extracted from Skype databases. These are the database’s local account, not the entire contacts list of that account.
-
Pidgin user accounts. Again these are the local accounts, not the entire contact list.
-
User accounts in cellphone reports as produced by Cellebrite UFED, Micro Systemation XRY and the Oxygen Forensic suite. See the documentation of the respective product for details on the correct interpretation of such information.
The “Origin” column in this table shows either a machine name extracted from a Windows registry or the location of the evidence file that the account was extracted from.
The Top 10 email addresses table shows the 10 email addresses with the highest number of emails in the case. Both the raw and deduplicated counts are shown. The top 10 is based on the raw counts.
The Top 10 host names table shows the host names that have the most emails associated with them. These are essentially the host names that show up when you expand the “All Senders and Receivers” branch in the Email Address facet. Both the raw and deduplicated counts are shown. The top 10 is based on the raw counts.
5.9. Notable Registry Artifacts
The Notable Registry Artifacts (NRA) section gives insight into the most important artifacts extracted from the Windows registry hives of the investigated machines/operating systems.
A case may contain evidence files (usually in the form of disk images) that relate to multiple operating systems (OSes), simply because multiple machines may be involved, but also because a machine may have multiple operating systems installed. Hence the artifacts are grouped by OS, labeled by the “Computer Name” that was extracted from the registry, and further subdivided in a number of categories.
The following artifact types are currently extracted and reported:
-
Basic OS information
-
OS time zones
-
OS user accounts
-
Network interfaces
-
Network connections
-
USB mass storage devices that have been connected
-
Recently used files
-
Shellbags
-
Typed URLs registered by web browsers using the registry
A “registry artifact” is a logical concept in Intella Connect that is modeled as an atomic item in the case and that holds important information typically used in digital forensic investigations. This information is specially selected for this purpose by experienced forensic experts. While the properties of a registry artifact may be scattered across different registry hives and backups of these hives, Intella Connect will unify them into a coherent item.
The NRA section is divided into two parts. On the left hand side, labeled “Overview”, the tree organizing the registry artifacts is shown. The first level nodes represent OSes labeled with the “Computer Name” extracted from the registry. One lever deeper we find sub-nodes for the various registry categories (e.g. “User Accounts”), followed by leaf nodes representing the actual artifacts (e.g. a specific User Account).
One can select a leaf node in this tree, which will show the properties of that registry artifact in the Details view on the right hand side. Clicking on button "Open in previewer" in the Details view opens the registry artifact item in the Previewer.
This shows additional information such as the location of the item and allows for browsing to nearby items in the item hierarchy using the Previewer’s Tree tab.
Besides the regular registry hives, the Windows registry maintains backup files in the form of so-called “RegBack” files. Intella Connect will process these files as well and display the extracted data in the NRA section. Values coming from such backup registry hives are marked with a “RegBack” label and are only displayed when they differ from the corresponding values in the current files. Not doing so would greatly increase the amount of redundant registry information.
5.9.1. Supported registry hives
Intella Connect will process the following registry hives:
| Registry Hive Name |
Location |
|---|---|
SYSTEM |
Windows/System32/config/SYSTEM |
SYSTEM (RegBack) |
Windows/System32/config/RegBack/SYSTEM Windows/repair/SYSTEM |
NTUSER.DAT |
Found under folder Users/<user id> or Documents and Settings |
SOFTWARE |
Windows/System32/config/SOFTWARE |
SOFTWARE (RegBack) |
Windows/System32/config/RegBack/SOFTWARE Windows/repair/SOFTWARE |
SAM |
Windows/System32/config/SAM |
SAM (RegBack) |
Windows/System32/config/RegBack/SAM Windows/repair/SAM |
|
Registry artifacts can be extracted from disk images and folders only if all relevant files are located in the proper folders, e.g. Windows\System32\config\SYSTEM. |
|
Support for Windows XP and older is limited. |
5.10. Devices
The Devices section contains a list of all USB mass storage devices that have been connected to the suspect machines. This information is taken from the Notable Registry Artifacts section. It provides the ability to quickly oversee and sort all devices found in the case.
5.11. Networks
The Networks section contains a list of wired and wireless networks that a suspect machine has been connected to. This information is taken from the Notable Registry Artifacts section and from cellphone reports. It provides the ability to quickly oversee and sort all networks found in the case.
5.12. Significant Words
The Significant Words panel visualizes important words encountered in the item texts in the case, based on a statistical model of term relevance. The bigger the font of a particular word, the higher the relevance that word may have for the data set at hand.
These results are purely suggestive: though they are based on commonly used information retrieval techniques, they only look at the evidence data. In particular, they do not take the investigative research questions into account, or any investigative results such as items tagged as “relevant”.
The Paragraphs section shows statistics on the paragraphs that Intella Connect has registered, when the Analyze Paragraphs setting was set on the source(s) in the case. It lists the number of unique and duplicate paragraphs, both as raw numbers and as percentages. Furthermore, the Paragraphs marked as Seen or Unseen are counted. Finally, the number of Documents, Emails and Other item types with unique content (i.e. a paragraph that does not occur in any other item) is listed. These groups can be clicked, which shows these item sets in the Search tab.
5.13. Workflow
The Workflow section lists additional tasks that one might consider after the initial indexing is done. These tasks can further refine the case index quality and kick-start the investigation and analysis phases.
Additional Processing category:
-
The Export encrypted items link opens up the Export wizard for all items that are encrypted but have not been decrypted.
Export encrypted items list exports the metadata of these items to a CSV file.
-
The Export unprocessed items link opens up the Export wizard for all items that fall into the “Extraction Unsupported” category in the Features facet.
Export unprocessed items list exports the metadata of these items to a CSV file.
-
The Export exception items link opens up the Export wizard for all items that fall into the “Exception Items” category in the Features facet.
Search & Analysis category:
-
The Run content analysis link initiates the content analysis procedure for all items in the case. This detects person, organization and location names used in the item texts and reports them in the Content Analysis facets.
-
Add keyword list adds a keyword list to the case, for use in the Keyword Lists facet or Keywords tab in the Statistics view.
-
Add MD5 list adds an MD5 or message hash list, for use in the MD5 and Message Hash facet.
-
Add saved search adds a saved search obtained from another case to this case, for use in the Saved Searches facet and Keywords tab in the Statistics view.
Report category:
There are currently no tasks available in this category.
6. Keyword search
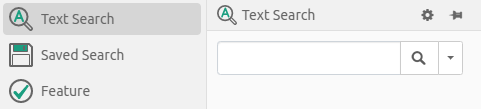
To search for some text, select "Text Search" facet, enter a query in the textbox and click the magnifier icon button.
|
If a query is more complex and takes more time to evaluate, then refreshing the page or closing the browser tab during this evaluation will cause the query to be cancelled and will disappear from results list. |
For query syntax rules, please see the Search query syntax section below.
6.1. Search options
Clicking on gear icon next to Text Search title will show the following options:
-
Fields scope
-
Enable paragraph exclusion

With search options you can limit keyword searching to specific item parts or attributes:
-
Text
-
Title / Subject
-
Summary & Description
-
Path (= folder and file name)
-
File name
-
Message Headers
-
Raw Data (e.g. low-level data from PST files, MS Office documents, vCards)
-
Comments
-
Authors & E-mail Addresses
-
Each of the From, Sender, To, Cc and Bcc fields separately
-
Export IDs (searches in the export IDs of the items that are part of any export set)
To see the search options, click on Fields scope option or gear icon next to it. The options box will be displayed as a popup window.
Select the properties that you want to include in your search and deselect those you want to exclude. Your selected search options will be stored and used for future searches until the time you change them again.
|
As a reminder, a warning label will be shown when not all options are selected. |
Enable paragraph exclusion switch is used to exclude paragraphs marked for exclusion as described in the
Previewing results
section.
6.2. Search query syntax
In the text field of the Search panel you can use a special query syntax to perform complex multi-term queries and use other advanced search features.
6.2.1. Use of multiple terms (AND/OR operators)
By default, a query containing multiple terms matches with items that contain all terms anywhere in the item. For example, searching for:
John Johnson
returns all items that contain both “John” and “Johnson.” There is no need to add an AND (or “&&”) as searches are performed as such already, however doing so will not negatively affect your search.
If you want to find items containing at least one term but not necessarily both, use one of the following queries:
John OR Johnson
John || Johnson
6.2.2. Minus sign (NOT operator)
The NOT operator excludes items that contain the term after NOT:
John NOT Johnson
John -Johnson
Both queries return items that contain the word “John” and not the word “Johnson.”
John -“John goes home”
This returns all items with “John” in it, excluding items that contain the phrase “John goes home.” The NOT operator cannot be used with a single term. For example, the following queries will return no results:
NOT John
NOT “John Johnson”
6.2.3. Phrase search
To search for a certain phrase (a list of words appearing right after each other and in that particular order), enter the phrase within full quotes in the search field:
“John goes home”
will match with the text “John goes home after work” but will not match the text “John goes back home after work.” Phrase searches also support the use of nested wildcards, e.g.
“John* goes home”
will match both “John goes home” and “Johnny goes home”.
6.2.4. Grouping
You can use parentheses to control how your Boolean queries are evaluated:
(desktop OR server) AND application
retrieves all items that contain “desktop” and/or “server,” as well as the term “application.”
6.2.5. Single and multiple character wildcard searches
To perform a single character wildcard search you can use the “?” symbol. To perform a multiple character wildcard search you can use the “*” symbol.
To search for “next” or “nest,” use:
ne?t
To search for “text”, “texts” or “texting” use:
text*
The “?” wildcard matches with exactly one character. The “*” wildcard matches zero or more characters.
6.2.6. Fuzzy search
Intella Connect supports fuzzy queries, i.e., queries that roughly match the entered terms. For a fuzzy search, you use the tilde (“~”) symbol at the end of a single term:
roam~
returns items containing terms like “foam,” “roams,” “room,” etc.
The required similarity can be controlled with an optional numeric parameter. The value is between 0 and 1, with a value closer to 1 resulting in only terms with a higher similarity matching the specified term. The parameter is specified like this:
roam~0.8
The default value of this parameter is 0.5.
6.2.7. Proximity search
Intella supports finding items based on words or phrases that are within a specified maximum distance from each other in the items text. This is a generalization of a phrase search.
To do a proximity search you place a tilde (“~”) symbol at the end of a phrase, followed by the maximum word distance:
"desktop application"~10
returns items with these two words in it at a maximum of 10 words distance.
It is possible to mix individual words, wildcards and phrases in proximity queries. The phrases must be enclosed in single quotes (' ') in this case:
"'desktop application' 'user manual'"~10
Nested proximity searches are also possible:
"'desktop application'~2 'user manual'~4"~10
| Nested phrase and proximity queries are always use single quotes. Using regular double quotes for them will cause a syntax error. Only one level of nesting is possible. |
6.2.8. Field-specific search
Intella’s Keyword Search searches in document texts, titles, paths, etc. By default, all these types of text are searched through. You can override this globally by deselecting some of the fields in the Options, or for an individual search by entering the field name in your search.
title:intella
returns all items that contain the word “intella” in their title.
The following field names are available:
-
text - searches in the item text
-
title - searches in titles and subjects
-
path - searches in file and folder names and locations
-
filename - searches in file names only
-
summary - searches in descriptions, metadata keywords, etc.
-
agent – searches in authors, contributors and email senders and receivers
-
from – searches in email From fields
-
sender – searches in email Sender fields
-
to – searches in email To fields
-
cc – searches in email Cc fields
-
bcc – searches in email Bcc fields
-
headers - searches in the raw email headers
-
rawdata - searches in raw document metadata
-
comment - searches in all comments made by reviewer(s)
-
export - searches in the export IDs of the items that are part of any export set
You can mix the use of various fields in a single query:
intella agent:john
searches for all items containing the word “intella” (in one of the fields selected in the Options) that have “john” in their author metadata or email senders and receivers.
6.2.9. Tokenization and Special characters
Tokenization underlies the keyword search functionality in Intella. It is the process of dividing texts into primitive searchable fragments, known as "tokens" or "terms". Each token makes a separate entry in the text index, pointing to all items containing this token. Keyword search works by finding matches between the tokens in the user’s query and in the index. Therefore, for effective keyword search, it is vital to have a basic understanding of how tokenization works in Intella.
Tokenization employs different algorithms, but in the most common case it is simply splitting the text around specific characters known as "token delimiters". These delimiters include spaces, punctuation symbols, and other non-alphabetic characters, to produce tokens close to the natural language words.
A side effect of this method is that it is impossible to search for words together with the token delimiters. If these characters are met in the user query, they play their delimiting role, thus being handled the same as simple spaces. This is rarely a problem, although it should be taken into account when doing a keyword search.
| To search for exact text fragments, including all punctuation and special characters, the Content Analysis functions can be used (see the section on the Content Analysis facet for details). |
| A list of all search tokens, generated for an item, can be seen in the "Words" tab of the Previewer window. |
There is no specific support for the handling of diacritics. E.g., characters like é and ç will be indexed and displayed, but these characters will not match with 'a' and 'c' in full-text queries. A workaround can be to replace such characters with the '?' wildcard.
The following characters have special meaning in the query syntax and may cause an error message if not used in accordance to the syntax rules:
+ - && || ! ( ) { } [ ] ^ " ~ * ? : / \
To prevent the syntax errors, these characters need to be escaped by the preceding \ character. Please note that if the character is classified as a token delimiter, then escaping it in the query will not make it searchable.
6.2.10. Regular Expressions
This release contains experimental support for searching with regular expressions. This may be extended, refined and documented in a future release. For now, please visit http://lucene.apache.org/core/4_3_0/queryparser/org/apache/lucene/queryparser/classic/package-summary.html#Regexp_Searches for more information.
Be aware that these regular expressions are evaluated on the terms index, not on the entire document text as a single string of characters! Your search expressions should therefore take the tokenization of the text into account.
7. Using facets
Besides keyword searching, the indexed items can be browsed using facets, which represent specific item properties.
Every facet organizes the items into groups (possibly hierarchical) depending on a specific item property.
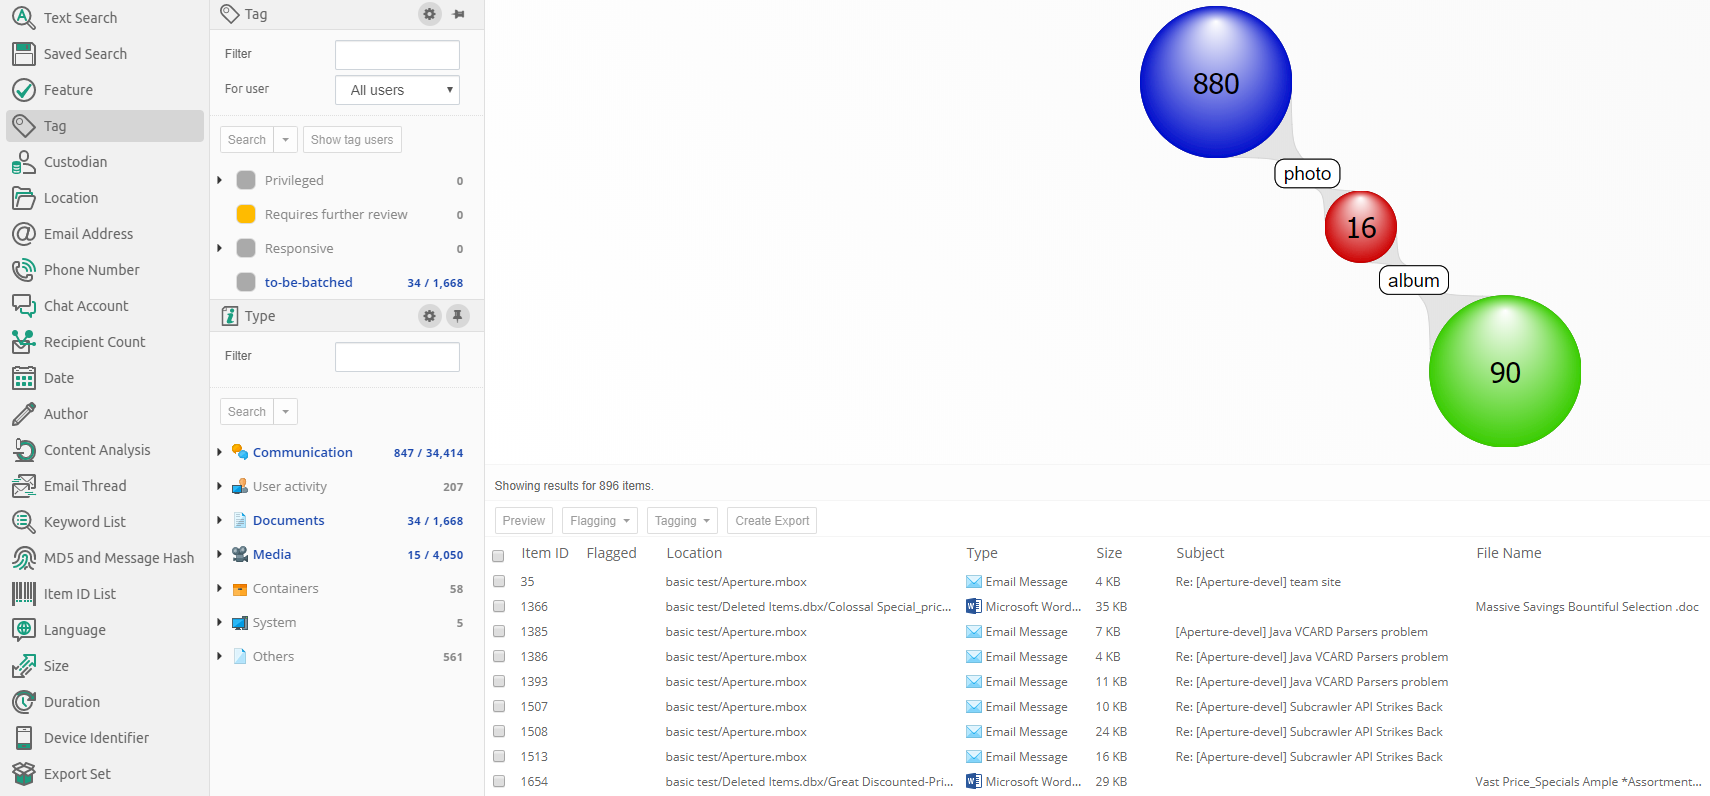
Clicking on a facet in the facets panel will open a list of all values of the selected facet on the right side, next to the list and it will overlay portion of cluster map / geolocation view and table view. In the example below, the Type facet has a list of file types as values.
If a query is selected in searches panel or cluster map and items corresponding to that query are present in facet entry within facet list, then that facet entry will be highlighted in blue and the amount shown in that facet entry will be two numbers separated by slash. The first number is amount of items in selected query and second number is total amount of items in case for given entry of facet. For example, below screenshot shows that in selected query there are 34 documents out of 1,668 documents present in case.

If a faced is overlayed, then clicking elsewhere than on facet list or facet itself will cause the overlayed facet to hide. To ensure that a facet is displayed at all times, you can click on pin button which will cause it to no longer overlay portion of cluster map / geolocation view and table view, but will instead take up the space and shift cluster map / geolocation view and table view to the remaining space. Pinning first facet will also cause it to stay in place and clicking on any other facet will open the clicked facet on top and move the pinned facet below the clicked facet.
To search for items that match a facet value, select the value and click the Search button on top of the values.
The facet panels can be resized and reordered, to better accommodate the user’s workflow.
| It is possible to select more than one facet value at a time by holding down the Ctrl key when clicking on the facet values. |
| Some facets have additional options which can by hidden or shown by clicking on the gear icon next to the pin icon. |
7.1. Available facets
7.1.1. Saved Searches
The Saved Searches is a list of previous sets of searches that the user has stored.
When search results are displayed in the Cluster Map and the Searches list, the Save button beneath the Searches list will be shown.
When the user clicks this button, a dialog opens that lets the user enter a name for the saved search. After clicking on the OK button, the chosen name will appear in the list in the Saved Searches facet.
| Predefined Saved Search called 'Possible spam' is added to every newly created case. It can be found under "Default searches" branch. |
Click on the name of the saved search and then on the Restore button to bring the Cluster Map and the Searches list back into the state it had when the Save option was used.
Additional options are shown or hidden when using the gear icon:
The "Replace current results" checkbox controls what happens with the currently displayed searches when you restore a saved search. When turned on, the Cluster Map and Searches list will be emptied first. When selected, the contents of the saved search will be appended to them.
When the 'Combine queries' checkbox is selected, searches contained in the selected saved search will be combined to search for items matching any of the contained searches (Boolean OR operator). The items will be returned as a single set of results (one cluster).
7.1.2. Features
The Features facet allows you to identify items that fall in certain special purpose categories:
-
Encrypted: all items that are encrypted. Example: password-protected PDF documents. When you select this category and click the Search button, you will be shown all items that are encrypted.
Sometimes files inside an encrypted ZIP file are visible without entering a password, but a password still needs to be entered to extract the file. Such files cannot be exported by Intella Connect if the password has not been provided prior to indexing. In this case both the ZIP file and its encrypted entries will be marked as Encrypted, so searching for all encrypted items and exporting those will capture the parent ZIP file as well. -
Decrypted: all items in the Encrypted category that Intella Connect was able to decrypt using the specified access credentials.
-
Unread: all emails, SMS/MMS, chat messages and conversations that are marked as "unread" in the source file. Note that this status is not related to previewing in Intella Connect.
This property is only available for PST and OST emails and some cellphone dumps. If the Unread property is not set, it could mean that either the item was not read or that the property is not available for this item. Some tools allow the user to reset a message’s unread status, so even when the flag is set, it cannot be said with certainty that the message has not been read. -
Empty documents: all items that have no text while text was expected. Example: a PDF file containing only images.
-
Has Duplicates: all items that have a copy in the case, i.e. an item with the same MD5 or message hash.
-
Has Shadow Copies: all items that have another version located in a shadow copy volume.
-
Has Geolocation: indicates whether a geolocation has been associated with the item, either as part of the original metadata or through an IP geolocation lookup.
-
Downloaded from Internet: indicates items that might have been downloaded from the Internet. Intella determines such items by looking at Zone.Identifier alternate stream in NTFS disk images. Where possible, Intella can extract the URL where the file was downloaded from. It can be found in Raw Data tab.
-
OCRed: indicates whether the item has been OCRed after indexing.
-
Has Imported Text: all items that have text imported using importText option in Intella Command-line interface.
-
Content Analyzed: all items for which the Content Analysis procedure has been applied.
-
Images Analyzed: all items for which the Image Analysis procedure has been applied.
-
Exception items: all items that experienced processing errors during indexing. This has six subcategories:
-
Unprocessable items: the data cannot be processed because it is corrupt, malformed or not understood by the processor. Retrying will most likely result in the same result.
-
I/O errors: the processing failed due to I/O errors. The processing might succeed in a repeated processing attempt.
-
Decryption failures: the data cannot be processed because it is encrypted and a matching decryption key is not available. The processing might succeed in a repeated processing attempt when the required decryption key is supplied.
-
Timeout errors: the processing took too long and was aborted. See more details on how to configure crawler timeout in "Memory, crawler count and timeout settings" chapter.
-
Truncated text: The document text was not fully processed due to one of the following reasons:
-
The document text was larger than the imposed document text limit and any additional text was ignored. See the Sources section for a description of this limit and how to alter it.
-
Binary content was removed from the document text. Intella will try to detect and remove so-called binary content from all processed text to reduce memory usage when processing corrupt or recovered files. It includes any control and non-printable characters that are not normally present in regular texts. Items with binary content removed will have error description: "Binary content detected".
-
Full item text could not be extracted because the format is not fully supported yet.
-
-
Out of memory errors: the processing failed due to a lack of memory.
-
Processing errors: the processing failed due to a problem/bug in the processor. The description should contain the stack trace.
-
Crawler crash errors: the processing failed due to a crawler crash. This is a more severe error compared to the Processing Error type. When it occurs, Intella will also reject all items that are related to crashed item (e.g. PST file and all of the emails that it contains). More details about why the crawler crashed can usually be found in a hs_err_pid_XYZ.log file which is located in the case logs folder (one file per crash). Crawler crashes will not affect other items and the case integrity.
-
-
Extraction Unsupported: all items that are larger than zero bytes, whose type could be identified by Intella Connect, are not encrypted, but for which Intella Connect does not support content extraction. An example would be AutoCAD files: we detect this image type but do not support extraction any content out of it.
-
Text Fragments Extracted: indicates whether heuristic string extraction has been applied on a (typically unrecognized or unsupported) binary item.
-
Irrelevant: all items that fall into one of the categories below and that themselves are considered to be of little relevance to a review (as opposed to their child items):
-
Folders
-
Email containers (PST, NSF, Mbox, …)
-
Disk images (E01, L01, DD, …)
-
Cellphone reports (UFDR, XRY XML, …)
-
Archives (ZIP, RAR, …)
-
Executables (EXE, BAT, …)
-
Load files (DII, DAT, …)
-
Empty (zero byte) file
-
Embedded images - defined below
-
-
Threaded: all items that have been subjected to email threading processing and that were subsequently assigned to a thread (see the Email Thread facet). Subtypes:
-
Inclusive: all email items marked as inclusive.
-
Non-Inclusive: all email items marked as non-inclusive.
-
Missing Email Referent: Indicates that the threading process has detected that the email item is a reply to another email or a forwarded email, but the email that was replied to or that has been forwarded is not available in the case.
-
-
Recovered: all items that were deleted from a PST, NSF, EDB, disk image, cellphone report or cloud source or volume shadow copy and that Intella Connect could still (partially) recover. The items recovered from PST, NSF and EDB files are the items that appear in the artificial "<RECOVERED>" and "<ORPHAN ITEMS>" folders of these files in the Location facet. The items recovered from volume shadow copies are located in the artificial "<Volume Shadow Copies>" folder of the parent volume in the Location facet. The Recovered branch in the Features facet has the following sub-branches, based on the recovery type and the container type:
-
Recovered from PST.
-
Orphan from EDB.
-
Orphan from NSF.
-
Orphan from PST.
-
Recovered from cellphone.
-
Recovered file metadata from disk image.
-
Recovered entire file content from disk image.
-
Recovered partial file content from disk image.
-
Recovered from cloud source.
-
Recovered from volume shadow copy.
-
-
Attached: all items that are attached to an email. Only the direct attachments are reported; any items nested in these attachments are not classified as Attachment.
-
Has attachments: all emails, documents and user activities that have other items attached to it. Note that it does NOT include embedded images.
-
Embedded Images: all items that have been extracted from a document, spreadsheet or presentation.
-
Tagged: all items that are tagged.
-
Flagged: all items that are flagged.
-
Batched: all items that are assigned to at least one batch
-
Commented: all items that have a comment made by a reviewer.
-
Previewed: all items that have been opened in Intella’s Previewer.
-
Opened: all items that have been opened in their native application.
-
Exported: all items that have been exported.
-
Redaction: all items that have been subject to one of the redaction procedures. See the section on Redaction for more information.
-
Redacted: all items that have one or more parts blacked out due to redactions. Items on which the Redact function has been used but in which no parts have actually been marked as redacted are not included in this category.
-
Queued for Redaction: all items that have their Queued for Redaction checkbox selected. These will turn to Redacted once the user performs the Process Redaction Queue function on them.
-
Missing keyword hits: all items that had a redaction issue when Process Redaction Queue was invoked.
-
-
Top-Level Parent: all items that are the top-level parent. Top-level parents are determined per the Show Parents settings, configurable with desktop versions of Intella.
-
W4 Delta: new items found by Intella in imported W4 cases.
-
All items: all items (non-deduplicated) in the entire case.
Additional option is shown or hidden when using the gear icon:
Filter can be used to quickly find relevant feature entry from the list by a potion of feature name.
| In cases in which multiple reviewers have been active, i.e. shared cases or cases with imported Work Reports, the Previewed, Opened, Exported, Commented, Tagged, Flagged and Redacted nodes shown in the Facet panel will have sub-nodes, one node for each user. |
7.1.3. Tags
Tags are labels defined by the user to group individual items. Typically
used tags in an example are for example "relevant", "not relevant" and
"legally privileged". Tags are added to items by right-clicking in the
Details panel and choosing the Add or edit tags… menu option. Tags
can also be added in the Previewer or by applying a Coding decision to
an item via Coding Form.
To search for all items with a certain tag, select the tag from the Tags list and click the Search button above the list.
When clicking on options button (gear icon), then the Tags facet panel will have the following options:
-
filter which allows the user to filter the tags list by a potion of tag name.
-
a drop-down list at the top, listing the names of all reviewers that have been active in this case. You can use this list to filter the tags list for taggings made by a selected reviewer only. Note that tags with zero taggings from selected user will not be shown when using user filtering.
Select the "All users" option to show taggings from all users as well as tags with zero taggings.
If the same tag has been used by different reviewers, their names and the numbers of tagged items are displayed in modal which shows tagging breakdown per user when clicked on "Show user tags" button.
The tags can be organized into a hierarchical system by the creation of sub-tags within an existing (parent) tag group. You can create a sub-tag, from "Add or edit tags…" dialog by specifying a parent tag in a drop down list.
To rename a tag or change the tag description, select the tag in the facet and choose "Edit…" in the context menu which appears after clicking on more options icon (3 dots icon).
|
When a tag is renamed, all items associated with this tag will be assigned the new tag name automatically. However, some operations that depend on specific tag names (such as indexing tasks with the Tag condition) may need to be corrected manually. |
To delete a tag, select it in the facet and choose "Delete…" in the context menu which appears after clicking on more options icon (3 dots icon). This might require a special permission being assigned to your user.
To see a pivot report showing how many items were tagged by each user,
select some tags and click on the Show tag users button. A modal dialog
will appear showing selected tags in separate rows and users contributing
to particular tag in columns.
|
This feature is disabled if you select a tag coming from a sub-case. |
7.1.4. Identities
The Identities facet makes it possible to query for all items linked to an identity. An identity query combines the results of the queries for the individual email addresses, phone numbers and chat accounts into a single item set. The result is a holistic view of the communication of that person, regardless of the media and aliases used for that communication.
In case of email addresses, an Identity query also finds items where the email address occurs in the item text. It therefore casts a wider net than merely looking at senders and receivers.
7.1.5. Custodians
Custodians are assigned to items to indicate the owner from whom an evidence item was obtained. The "Custodians" facet lists all custodian names in the current case and allows searching for all items with a certain attribute value. Custodian name attributes are assigned to items either automatically (as part of post-processing) or manually in the Details panel. To assign a custodian to items selected in the Details panel, use the "Set Custodian…" option in the right-click menu.
To remove custodian information from selected items, choose the "Clear Custodian…" option.
To delete a custodian name from the case and clear the custodian attribute in all associated items, select the value in the facet panel and choose "Delete" in the context menu which appears after clicking on more options icon (3 dots icon).
7.1.6. Location
This facet represents the folder structure inside your sources. Select a folder and click Search to find all items in that folder.
Additional options are shown or hidden when using the gear icon:
-
Sorting - allows to sort the root entries either by name or by date when the source containing that root entry was added.
-
Search subfolders - the selected folder, all items in that folder, and all items nested in subfolders will be returned, i.e. all items in that entire sub-tree.
When "Search subfolders" is not selected, only the items nested in that folder will be returned. Items nested in subfolders will not be returned, nor will the selected folder itself be returned.
When your case consists of a single indexed folder, then the Location tree will show a single root representing this folder. Selecting this root node and clicking Search with "Search subfolders" switched on will therefore return all items in your case.
When your case consists of multiple mail files that have been added separately, e.g. by using the PST and NSF source types in the New Source wizard, then each of these files will be represented by a separate top-level node in the Location tree.
By default Location facet will expand all root sources so that their children are immediately visible. This behavior can be changed using Facets .
7.1.7. Email Address
This facet represents the names of persons involved in sending and receiving emails. The names are grouped in ten categories:
-
From
-
Sender
-
To
-
Cc
-
Bcc
-
Addresses in Text
-
All Senders (From, Sender)
-
All Receivers (To, Cc, Bcc)
-
All Senders and Receivers
-
All Addresses
When clicking on options button (gear icon), then the facet provides filtering option by above mentioned categories.
Most emails typically only have a From header, not a Sender. The Sender header is often used in the context of mailing lists. When a list server forwards a mail sent to a mailing list to all subscribers of that mailing list, the message send out to the subscribers usually has a From header representing the conceptual sender (the author of the message) and a Sender header representing the list server sending the message to the subscriber on behalf of the author.
7.1.8. Phone Number
This facet lists phone numbers observed in phone calls from cellphone reports as well as phone numbers listed in PST contacts and vCard files.
The "incoming" and "outgoing" branches are specific to phone calls. The "All Phone Numbers" branch combines all of the above contexts.
When clicking on options button (gear icon), then the facet provides filtering option by above mentioned categories.
7.1.9. Chat Account
This facet lists chat accounts used to send or receive chat messages, such as Skype and WhatsApp account IDs. Phone numbers used for SMS and MMS messages are also included in this facet.
When clicking on options button (gear icon), then the facet provides filtering option by above mentioned categories.
7.1.10. Recipient Count
This facet lets the user search on recipient count ranges by entering the type and the number of recipients (minimum and maximum). The following recipient types are supported:
-
All Recipients: all email, chat, and cellphone recipients.
-
Visible Recipients: visible email, chat, and cellphone recipients (To, Cc).
-
Blind Recipients: blind carbon copy email recipients (Bcc).
When clicking on options button (gear icon), then the facet provides filtering option by above mentioned categories.
7.1.11. Date
This facet lets the user search on date ranges by entering a From and To date. Please note that the date entered in the To field is considered part of the date range.
Besides start and end dates, Intella Connect lets the user control which date attribute(s) are used:
-
Sent (e.g. all e-mail items)
-
Received (e.g. all e-mail items)
-
File Last Modified (e.g. file items)
-
File Last Accessed (e.g. file items)
-
File Created (e.g. file items)
-
Content Created (e.g. file items and e-mail items from PST files)
-
Content Last Modified (e.g. file items and e-mail items from PST files)
-
Primary Date
-
Family Date
-
Last Printed (e.g. documents)
-
Called (e.g. phone calls)
-
Start Date (e.g. meetings)
-
End Date (e.g. meetings)
-
Due Date (e.g. tasks)
All fields can be de/selected with "Check / uncheck all" checkbox.
The Date facet will only show the types of dates that actually occur in the evidence data of the current case.
Furthermore it is possible to narrow the search to only specific days or specific hours. This makes it possible to e.g. search for items sent outside of regular office hours.
Primary and Family dates
While processing the dates of all items, Intella Connect will try to pick a matching date rule based on the item’s type and use it to determine the Primary Date attribute for that item. The rules affecting this process are configurable with desktop versions of Intella and currently cannot be changed in Intella Connect. Reindexing the case or modifying rules used to compute Primary Dates may also affect values of Family Date attribute for items, as those two attributes are tightly related. To learn more about those attributes please refer to Details panel section of the manual.
7.1.12. Type
This facet represents the file types (Microsoft Word, PDF, JPEG, etc.), organized into categories (Communication, Documents, Media etc.) and in some cases further into subcategories. To refine your query with a specific file type, select a type from the list and click the Search button.
Note that you can search for both specific document types like PNG Images, but also for the entire Image category.
Empty (zero byte) files are classified as "Empty files" in the "Others branch".
Additional option is shown or hidden when using the gear icon:
Filter can be used to quickly find relevant type entry from the list by a potion of type name.
7.1.13. Author
This facet represents the name(s) of the person(s) involved in the creation of documents. The names are grouped into two categories:
-
Creator
-
Contributor
When clicking on options button (gear icon), then the facet provides filtering option by above mentioned categories.
To refine your query by a specific creator or contributor name, select the name and click the Search button.
7.1.14. Content Analysis
The Content Analysis facet allows you to search items based on specific types of entities that have been found in the textual content of these items. Three of the categories in this facet are populated automatically during indexing and are available immediately afterwards. These are:
-
Credit card numbers
-
Social security numbers (SSNs)
-
Phone numbers
The other categories are more computationally expensive to calculate and therefore require an explicitly triggered post-processing step. These categories are:
-
Person names
-
Organizations (e.g. company names)
-
Locations (e.g. city and country names)
-
Monetary amounts
-
Time (words and phrases related to the hours, minutes, weekdays, dates, etc.)
-
Sentiment analysis (sub-categories such as Negative, Neutral and Positive based on the text in documents or messages)
-
Custom regular expressions (for searching e.g. bank account numbers, patent numbers and other types of codes that can be formally described as a regular expression)
When opening the facet you will be presented with all available Content Analysis categories. After clicking on a category, the panel will slide and values matching this category will be presented in a form of a table. You can query for a specific value using the Search button at the top, or by double clicking on one of the rows. Clicking on the Back button will present a list of categories again.
To learn more about how to conduct Content Analysis please refer to section Content Analysis .
7.1.15. Email Thread
In the Email Thread facet you can search for emails based on the email thread identified by the email threading procedure. To populate this facet, a user needs to perform the email threading procedure on a selected set of items. Please see the Email Threading section for instructions.
Additional options are shown or hidden when using the gear icon:
Be default, all threads containing only a single email are hidden from view, as they can greatly increase the length of the list and are typically of little use. To include these threads in the list, disable the “Hide threads with one email” switch.
Email threads shown in this facet can be sorted by name, item count or node count. The difference between item and node is that items can be counted in details table and nodes are counted in email thread tab in previewer. Thread can have different item and node count if some items are duplicated in that thread.
7.1.16. Near-duplicates
This facet lists all item groups identified by the last near-duplicates analysis. To populate this facet, a user needs to perform the near-duplicates analysis procedure on a selected set of items. Please see the Administrator’s manual > Near-duplicates Analysis section for instructions.
The names of near-duplicate groups are derived from titles of their master items. Searching for a group produces a set of items which include a master item and its near-duplicates with similarity scores within the threshold specified for near-duplicates analysis. Additionally, after expanding facet options you can sort near-duplicate groups either by the name (default) or the group size.
7.1.17. Keyword Lists
In the Keyword Lists facet you can load a keyword list, to automate the searching with sets of previously determined search terms.
A keyword list is a text file in UTF-8 encoding that contains one search term per line. Note that a search term can also be a combination of search terms, like "Paris AND Lyon".
Once loaded, all available keywords lists are shown in the Keyword Lists
facet. They are now available for search. You can also explore searches
defined in each list by hovering the mouse over it and selecting Explore…
from the contextual menu.
Additional options are shown or hidden when using the gear icon:
When the 'Combine queries' checkbox is selected, multiple keywords selected from a specific keyword list will be combined to search for items matching any of the selected terms (Boolean OR operator). The items will be returned as a single set of results (one cluster). If the checkbox is not selected, the selected terms will be searched separately, resulting in as many result sets as there are selected queries in the list.
The other two options displayed here are working the same as in context of a regular Text Search and are used to limit the scope of your query to selected fields or to enable paragraphs exclusion.
|
Selected options are affecting searches triggered from this facet as well as item counts displayed when exploring contents of a list. |
|
Keyword lists can be used to share search terms between investigators. |
7.1.18. MD5 and Message Hash
Intella can calculate MD5 and message hashes to check the uniqueness of files and messages. If two files have the same MD5 hash, Intella considers them to be duplicates. Similarly, two emails or SMS messages with the same message hash are considered to be duplicates. With the MD5 and Message Hash facet you can:
-
Find items with a specific MD5 or message hash and
-
Find items that match with a list of MD5 and message hashes.
Specific MD5 or message hash
You can use Intella Connect to search for files that have a specific MD5 or message hash. To do so, enter the hash (32 hexadecimal digits) in the field and click the Search button.
List of MD5 or message hashes
The hash list feature allows you to search the entire case for MD5 and message hash values from an imported list. Create a text file (.txt) with one hash value per line. Use the Add… button in the MD5 Hash facet to add the list. Select the imported text file in the panel and click the Search button below the panel. The items that match with the MD5 or message hashes in the imported list will be returned as a single set of results (one cluster).
Structured vs Legacy message hash
In Intella 2.2.2 a more flexible algorithm for calculating message hashes has been introduced: structured message hashes. Cases that have been created with Intella 2.2.2 or newer will use the structured message hashes by default. Cases that have been created with older versions will keep using the old algorithm until the case is fully re-indexed. That re-index is required to calculate the Body Hash, one of the four components of structured message hashes, for applicable items. The algorithm for message hashes cannot be configured in Intella Connect - this needs to be done in desktop version of Intella.
Structured message hash
The structured message hash exists of four components: Header, Recipients, Body, and Attachments. By default, the calculated message hash will be based on all four components, but you can deselect any of these to make deduplication of message items less strict. For example, when the Recipients component is deselected, an email with a Bcc header will be considered as a duplicate of an email without that header (assuming all other components are equal).
For email items, the following data is included in the four components of a structured message hash:
-
Header – The sender, subject and sent date.
-
Recipients – The To, Cc and Bcc header values.
-
Body – The email’s text body.
-
Attachments – The combined MD5 hashes of all email attachments.
All upper case/lower case differences of textual data is ignored, and for the email body all whitespace and formatting characters (Unicode categories C and Z) are ignored too. The sent date is rounded down to full minutes. For attachments that are embedded emails, the structured message hash of that email is used, instead of the MD5 hash.
|
When deduplicating a set of items, Intella Connect will select the item that has the lowest item ID for each set of duplicates. This item may be missing specific details that are present in duplicates. This effect becomes more likely when a less strict message hash configuration is used. |
Legacy message hash
The message hash is calculated by calculating the MD5 hash of a list of concatenated item properties. For emails the following properties are used:
-
From, Sender, To, Cc and Bcc headers.
-
Subject header.
-
Date header.
-
Email body.
-
All other MIME parts (attachments, nested messages, signatures, etc.).
For SMS, MMS, and other types of chat messages such as Skype and WhatsApp messages, the following parts are used:
-
The sender information.
-
The receiver information.
-
The textual content of the message.
When certain headers/properties occur multiple times, all occurrences are used.
A difference between email message hashes and chat message hashes is that the hashing procedure for emails will simply skip missing values, whereas for chat messages all fields need to be present to calculate a hash.
These message hash computation methods have the benefit that they are source-agnostic: a specific email message always gets the same message hash, regardless of whether it is stored in e.g. a PST, NSF, Mbox or EML file. Message hashes can therefore find duplicates across a variety of mail formats and be used to deduplicate such a diverse set of mail formats.
When one of the copies has a minor difference, the email will get a different hash and be treated as different from the other occurrences. A good example is a bcc-ed email, as the bcc is only known by the sender and the recipient listed in the Bcc header. Therefore, these two copies will be seen as identical to each other but different from the copies received by the recipients listed in the To and Cc headers. Another example is an archived email which has one or more attachments removed: it will be seen as different from all copies that still have the full list of attachments.
List missing on server
Intella stores processed MD5 list files in hash-lists subfolder of case folder.
Due to factors external to Intella Connect if these files will be lost, then such list will be marked as such with label "List missing on server".
The missing files can be restored from a backup of the case - contact IT administrator to resolve this issue.
|
Install a free tool such as MD5 Calculator by BullZip to calculate the MD5 hash of a file. You can then search for this calculated hash in Intella Connect to determine if duplicate files have been indexed. |
|
Use the “Export table as CSV” option in the Details table to export all MD5 and message hashes of a selected set of results to a CSV file. |
7.1.19. Item ID Lists
In the Item ID Lists facet you can load a list of item IDs, to automate the searching with sets of previously determined item IDs.
An item ID list is a text file in UTF-8 encoding that contains one item ID per line.
Once loaded into the case, you can select the list name and click Search. The result will be a single result set consisting of the items with the specified IDs. Invalid item IDs will be ignored.
7.1.20. Language
This facet shows a list of languages that are automatically detected in your item texts.
To refine your query with a specific language, select the language from the list and click the Search button.
|
If Intella cannot determine the language of an item, e.g. because the text is too short or mixes multiple languages, then the item will be classified as "Unidentified". |
|
When language detection is not applicable to the item’s file type, e.g. images, then the item is classified as "Not Applicable". |
7.1.21. Size
This facet groups items based on their size in bytes.
To refine your query with a specific size range, select a value from the list and click the Search button.
7.1.22. Duration
This facet reflects the duration of phone calls listed in a cellphone report, grouped into meaningful categories.
7.1.23. Device Identifier
This facet groups items from cellphones by the IMEI and IMSI identifiers associated with these items. Please consult the documentation of the forensic cellphone toolkit provider for more information on what these numbers mean.
When clicking on options button (gear icon), then the facet provides filtering option by above mentioned categories.
7.1.24. Export Sets
All export sets that have been defined during exporting are listed in this facet. Searching for the set returns all items that have been exported as part of that export set.
7.2. Requiring and excluding facet values
Facet values can be required and excluded. This enables filtering items on facet values without these values appearing as individual result sets in the Cluster Map visualization.
To require or exclude items based on a facet value, select the value and click on the arrow in the facet’s Search button. This will reveal a drop-down menu with the Require and Exclude options.
7.2.1. Requiring a facet value
Requiring a facet value means that only those search results will be shown that also match with the chosen required facet value.
Example
The user selects the facet value "PDF Document" and includes this facet value with the drop-down menu of the Search button in the facet panel. The Searches list shows that "PDF Document" is now a required term. This means that from now on all result sets and clusters will only hold PDF Documents. Empty clusters will be filtered out.
See the image below for an example: the "letter" search term resulted in 2,132 items, but after applying the PDF Documents category with its 466 items as a require filter, only 214 items remain.
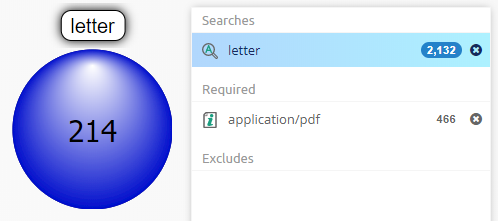
When multiple required are used, additional option will be available in Searches list:
Depending on require option selected, the results can differ.
-
require any - the results belong to at least one of the require sets - filtering with the union of all requires.
-
require all - the results belong to all of the require sets - filtering with the intersection of all requires.
For example, the above image with require any filter shows items, which contain the "letter" search term and they are either PDF documents or they have had OCR done on them. Looking at results - first item is a PDF document with "letter" in the content and second item is a PNG image that had OCR done and contains "letter" in properties.
Below image is an example of require all filter showing items, which contain the "letter" search term and they are a PDF document and have had OCR done on them. Looking at results - first item is a PDF document with "letter" in the content and second item is also a PDF document with "letter" in the content. Images are not present in the results.
7.2.2. Excluding a facet value
Excluding a facet value means that only those search results will be shown that do not match with the chosen excluded facet value.
Example
The user selects the facet value "PDF Document" and excludes this facet value with the drop-down menu of the Search button in the facet panel. The searches panel in the Cluster Map shows that "PDF Document" is excluded. As long as this exclusion remains, all result sets and clusters will not hold any PDF Documents. Empty clusters will be filtered out.
|
Excludes are often used to filter out privileged items before exporting a set of items, e.g. by tagging items that match the privilege criteria with a tag called "privileged". |
In this scenario it is important to realize that when exporting an email to e.g. Original Format or PST format, it is exported with all its attachments embedded in it. The same applies to a Word document: it is exported intact, i.e. with all embedded items. Therefore, when an attachment is tagged as "privileged" and "privileged" is excluded from all results, but the email holding the attachment is in the set of items to export, the privileged attachment will still end up in the exported items.
The solution is to also tag both the parent email and its attachment as "privileged". The tagging preferences can be configured so that all parent items and the items nested in them automatically inherit a tag when a tag is applied to a set of items. When filtering privileged information with the intent to export the remaining information, we recommend that you verify the results by indexing the exported results as a separate case and checking that there are no items matching your criteria for privileged items.
8. Cluster map
The Cluster Map shows search results in a graphical manner, grouping items by the queries that they match. This chapter will help you understand how this visualization works.
8.1. Understanding a Cluster Map
The figure above shows a graph with two labels and three clusters. The larger, colored spheres are called clusters. They represent groups of items such as emails and files. The queries entered by the user are shown as labels and are used to organize the map.
Every cluster is connected to one or more labels. In this Cluster Map, we see that the user has evaluated two keyword searches: one for the word “buy” and one for the word “sell”. The Cluster Map shows these two result sets, using the search terms as their labels:
-
“buy” returned 61 items and is represented by the “buy” label.
-
“sell” returned 25 items and is represented by the “sell” label.
The colored edges connect the clusters of items to their search terms, indicating that these items are returned by that search term. For example, this Cluster Map shows that there are 19 items that were returned by both the “sell” and “buy” queries, 6 items that contain “sell” but not “buy”, and 42 items that contain “buy” but not “sell”.
It is important to understand that the set of results for “buy” are split across two clusters: one that also matches “sell” and another that only matches “buy”. The same split happens for the “sell” results.
When a third keyword search for “money” is added, the graph changes as follows on our data set:
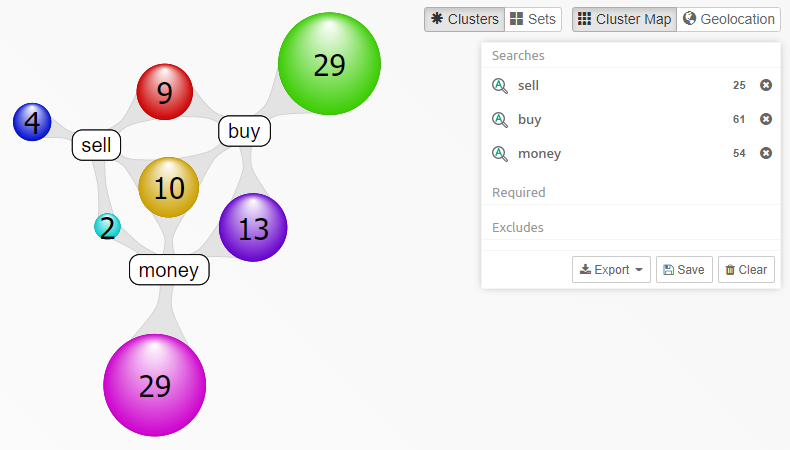
In the middle is a single cluster of 10 items that is connected to all three labels. This represents the 10 items that match all three search terms. There are three clusters of 2, 9 and 13 items, each connecting to two labels but not a third. They represent the items that match two out of the three search terms. Finally, three large clusters at the periphery represent all items that only match the search term that it is connected to.
A Cluster Map can always draw a reasonable picture of up to three search terms: the above map shows the maximum complexity that such a graph may have. Beyond three search terms the graph may become too complex and cluttered to be meaningful. That is why the Cluster Map has a second visualization mode called Sets. This mode can be chosen by clicking on the Sets mode in the toolbar. When the user enters more than seven queries, the Cluster Map will automatically switch to that mode.
In Sets mode, the three result sets are visualized like this:
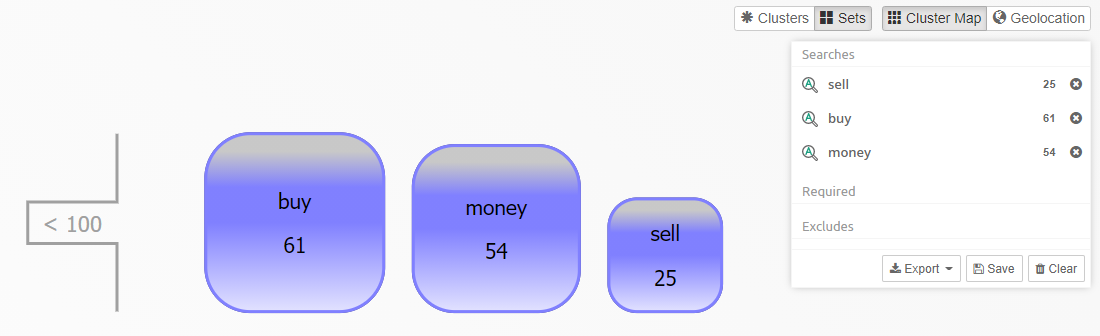
Here, each result set is depicted as a single rounded square shape with the label and number of items on top. The size of the square is related to the number of items in the set: bigger means more items. Furthermore, all sets are grouped by their order of magnitude indicated on the left – in this case all result sets are of the same order of magnitude. The overlap between sets is no longer visualized until the user selects one of the sets.
Sets mode can scale to a much larger amount of result sets. The following image is a visualization of 16 result sets, divided among four different orders of magnitude. Adjacent groups get alternating colors for better separation. Note that the visual size of the result sets, indicating the number of items in each set, is only comparable within the group.
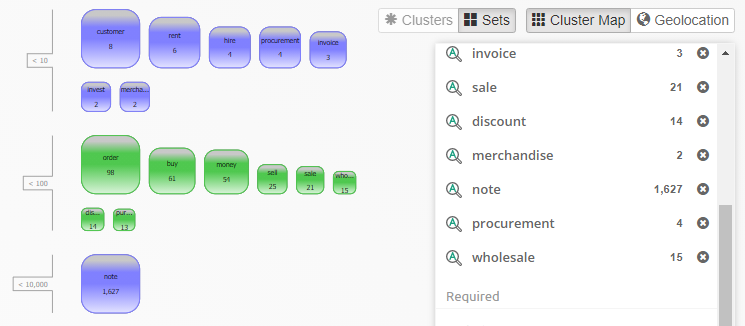
8.2. Working with the Cluster Map
The actions that can be performed on a Cluster Map are:
-
Panning - by clicking and holding down the left mouse button and then moving the mouse to move the whole Cluster Map.
-
Zooming - by scrolling with the mouse scroll button.
-
Selecting particular cluster - by clicking/tapping on a cluster.
-
Selecting multiple clusters - cluster can be added to selection by holding CTRL key and clicking a cluster.
-
Selecting particular result set - by clicking/tapping on a label.
8.2.1. Removing result sets
The result sets created with the current query are listed in the Results panel.
-
To remove a result set from the Cluster Map, click on the remove icon (black circle with white X) in the Searches list.
-
To clear the Cluster Map (remove all result sets) and start a new search, click the
Clear allbutton in the terms list.
9. Geolocation
The Geolocation view shows the (estimated) locations of all search results that have geolocation information on the world map.
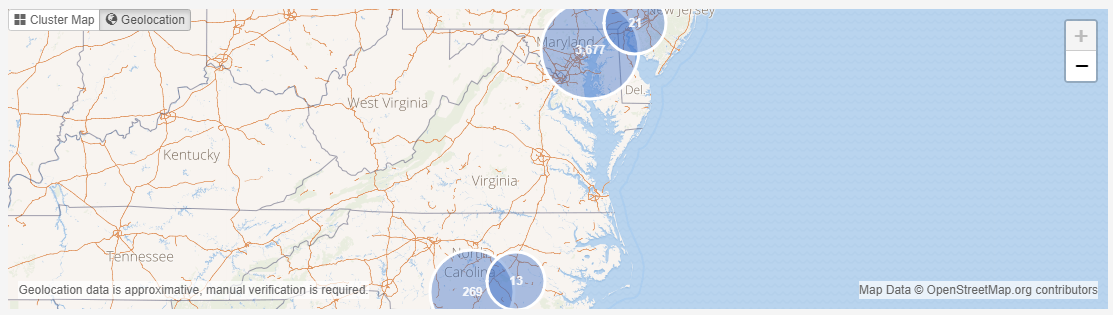
This chapter will help you understand how this visualization works.
9.1. Basics
Geolocation data is extracted from the following sources:
-
Images – GPS coordinates in the EXIF metadata.
-
Cellphone reports – available information depending on the device model, extraction utility and extraction method.
-
Emails – through geolocation lookup of the sender IP.
-
Google Maps URLs – e.g. from browser histories and bookmarks.
Using this information, a set of search results can be mapped to a set of geographic coordinates, roughly representing the “where” of the found items.
Any items that do not have any geolocation information associated with them are omitted in this view.
Showing each item’s estimated location on the map would make the view very cluttered. Items laying in the same area are therefore grouped into clusters, shown as a blue circle in the screenshot above. The number in a cluster represents the number of items whose geolocation falls in that area.
When zooming in, the geographic size of what constitutes the “same area” will be reduced, resulting in clusters getting split up into smaller clusters. Zooming out of the map consolidates clusters into fewer and larger clusters again. This cluster management allows the user to inspect specific locations in detail.
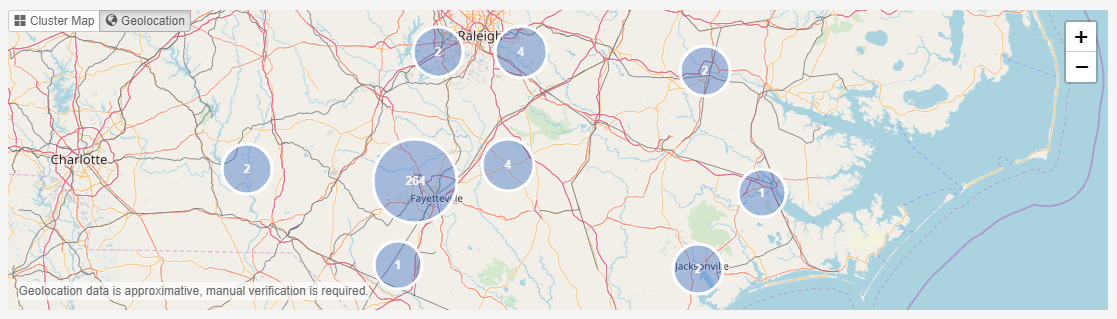
Zoom In

Zoom Out
The clustering is determined by imposing an invisible grid on the map and bundling all items in a grid cell into a cluster.
9.2. Interaction
Zooming can be done using the control buttons in the bottom-left toolbar or by using the mouse wheel.
To pan (move sideways) in a zoomed map, move the mouse while holding down the left mouse button.
To inspect the content of clusters, the user can select a single cluster, by clicking on it.
The contents of the selected cluster will be displayed in the Details view below the Geolocation view.
9.3. Resources
Intella Connect may need two resources to make the most out of the Geolocation visualization.
9.3.1. Tile server
By default, Intella Connect uses tiles (images containing parts of the map) that are embedded in Intella Connect to construct the world map. This makes it possible to use the Geolocation view without any configuration and without requiring an Internet connection to download these tiles.
Due to the enormous size of a complete tile set covering all zoom levels of the entire world map, the embedded tile set is limited to the first 6 zoom levels. As a rule of thumb, this usually shows the major cities in most countries, but it will not let you zoom in to see where in the city an item is located.
To zoom in beyond that zoom level, a connection to a tile server is needed. This can be a public tile server or one located in your network. An administrator of Intella Connect can configure a tile server and the configuration steps are described in Administrator manual.
|
Note that a tile server may not only let you zoom in and create more fine-grained maps, it can also let you apply a different map rendering, e.g. a map containing elevation data, infrastructural information, etc. |
9.3.2. IP geolocation database
To determine the geolocation of emails, Intella Connect uses the chronologically first IP address in the Received email headers (i.e. the one nearest to the bottom of the SMTP headers). Next, a geolocation lookup of that IP address is done using MaxMind’s GeoIP2 or GeoLite2 database. These databases are not distributed with Intella and therefore one needs to be installed manually.
An administrator of Intella Connect can acquire and install an IP Geolocation database. The configuration steps are described in Administrator manual.
9.4. Caveats
While the Geolocation view can quickly give a unique and insightful overview of a data set, there are some aspects of geolocation visualization to be aware of. Geolocation data is approximated by nature and manual verification of the findings will always be required. This is not an Intella limitation; it is inherent to the complexity and unreliability of the systems producing the geolocation information. Make sure that you are fully aware of these aspects and their consequences before relying on the findings.
9.4.1. GPS coordinates
GPS coordinates, such as obtained from the EXIF metadata of images or location-bound items extracted from cellphones, are usually quite accurate. However, they are subject to the limitations of GPS:
-
In the best-case scenario, the accuracy is typically in the range of several meters. The accuracy can be lower or coordinates can even be completely wrong when the GPS hardware cannot receive a good signal (e.g. in the direct vicinity of buildings), due to hardware limitations of the GPS device (the theoretical maximum precision possible varies between devices) or simply due to bugs and hardware faults in the device.
-
The same applies to comparable satellite-based navigation systems such as GLONASS.
-
Geolocation coordinates may also have been determined using other techniques, e.g. based on geolocation information about nearby Wi-Fi networks and cell towers.
-
Some devices combine several of these techniques to improve accuracy and coverage. Therefore, what is commonly referred to as “GPS coordinates” may not have been established through GPS at all.
-
Coordinates may have been edited after the fact by a custodian using an image metadata editor. A set of different images with the precise same coordinates may point in that direction. This may be harmless, e.g. to fill in the coordinates of images taken with a camera that does not have GPS functionality.
9.4.2. IP geolocation
The determination of an email’s geolocation by using its sender’s IP address is imprecise by nature, typically even more so than GPS coordinates. First, the determined Source IP address may be incorrect due to several reasons:
-
Some email servers mask such IP addresses. Instead, it may in fact be the second IP address of the transport path that is being used.
-
A web email client (e.g. Gmail used through a web browser) may have been used to send the email.
-
The IP address may have been spoofed.
-
The IP address may not reflect the sender’s location due to the use of a VPN, Tor, etc.
Second, IP geolocation databases are typically never 100% accurate and the accuracy varies by region. See MaxMind’s website for statistical information on their accuracy. Reasons for this imprecision are:
-
The geolocation of an IP address may change over time.
|
Note: take this into account when indexing an older data set! |
-
Some IP addresses may only be linked to a larger area like a city or even a complete country, yet the precise coordinates may give a false sense of GPS-style precision.
-
The techniques behind the collection process for creating this database introduces a certain amount of imprecision.
9.4.3. Tile servers
Using a public tile server may reveal the locations that are being investigated to the tile server provider and anyone monitoring the traffic to that server, based on the tile requests embedded in the retrieved URLs.
|
Note that to use a public tile server, you need to ensure that you comply with the tile server’s usage policy. This is your responsibility, not Vound’s. |
9.5. Attribution
We are grateful for obtaining the data we have used for the embedded tiles generation from the OpenStreetMap project, © OpenStreetMap contributors. See http://www.openstreetmap.org/copyright for more information on this project.
The tile set is made available under the Open Database License: http://opendatacommons.org/licenses/odbl/1.0/. Any rights in individual contents of the database are licensed under the Database Contents License: http://opendatacommons.org/licenses/dbcl/1.0/.
10. Timeline
The Timeline shows how a set of search results is spread over time. This tells the user when certain communications or other activities took place.
Another important use case of this visualization is to find anomalies in the data. Any gaps in the chart may indicate shortcomings in the data collection process, e.g. due to a device or disk that should have been included. However, it can also indicate custodians intentionally or unintentionally withholding data, e.g. by deleting emails prior to the collection.

The date range that Intella Connect looks for ranges from 1990 to the
current year plus two years. This will filter out bogus dates that are
far in the past or future. Large, real-life data sets will often show
items on specific dates like January 1st, 1970, January 1st, 1980 or
similar “round” dates. These are typically caused by default date values
used in some applications. The range can be adjusted by adding or
changing following two properties inside [CASE]/prefs/case.prefs
properties file:
-
TimelineStartFilter - specifies the start year of the timeline range.
-
TimelineEndFilter - specifies the end year of the timeline range.
The X axis shows time and Y axis shows the amount of items in given month on a logarithmic scale. The gray graph line represents all items and blue graph line represents items of the selected query from the searches list, cluster from cluster map or from geolocation map.
For example, selecting a query for all emails from an email address will show these emails in time as the blue graph line.
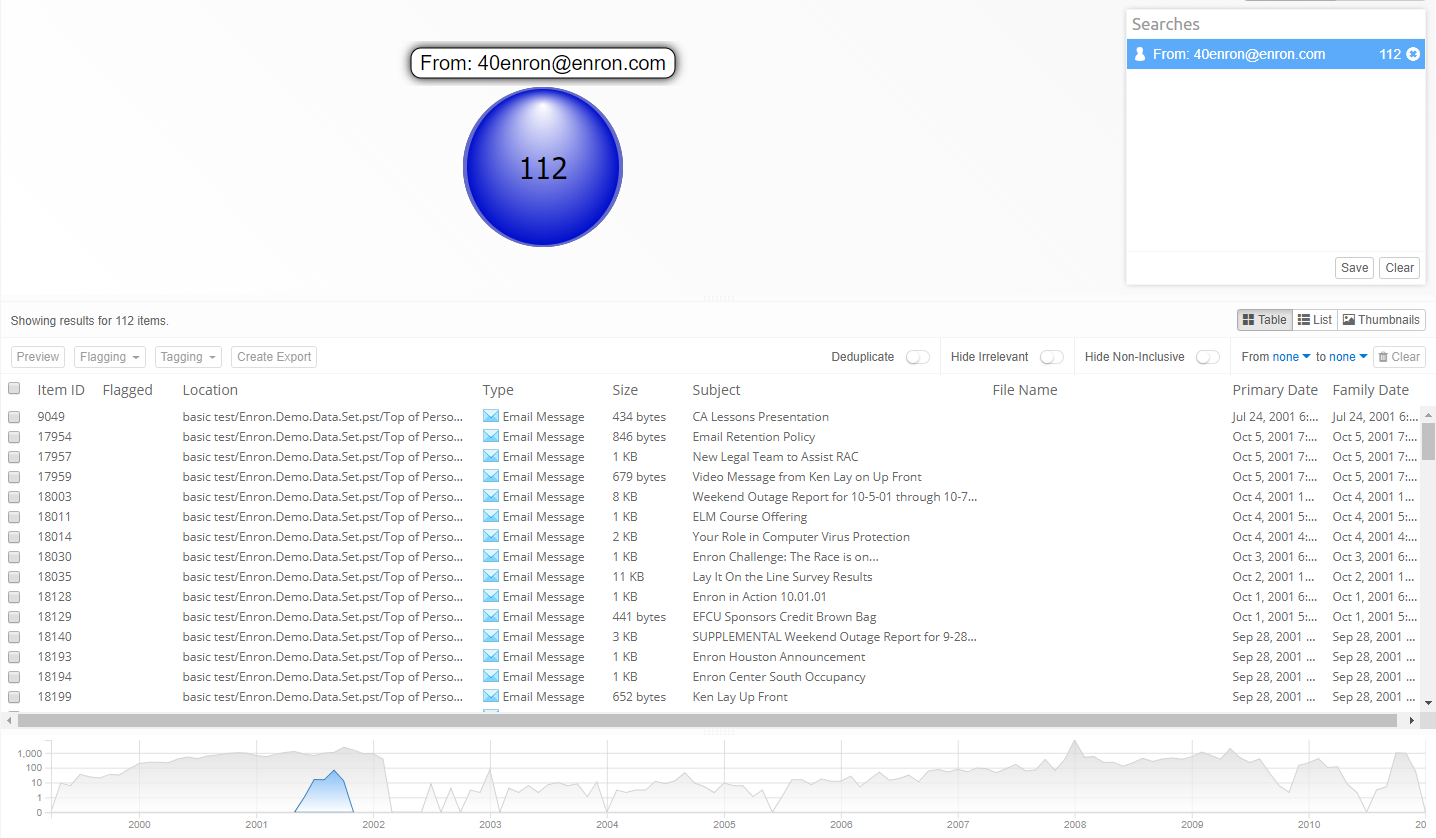
Timeline can be hidden in the Preferences window. Hiding timeline will let the details table take it’s space and show more rows.
10.1. Date attributes
The date attribute used to create the chart is the Family Date. This typically gives a good sense of the “when” of an evidence set, without dates in older email attachments and files giving a warped sense of the relevant dates.
10.2. Selections
The Timeline can filter items shown in the details panel. To see items in a range of years or months, drag the mouse cursor across the chart. This will show a marker in the background, indicating the selected date range.
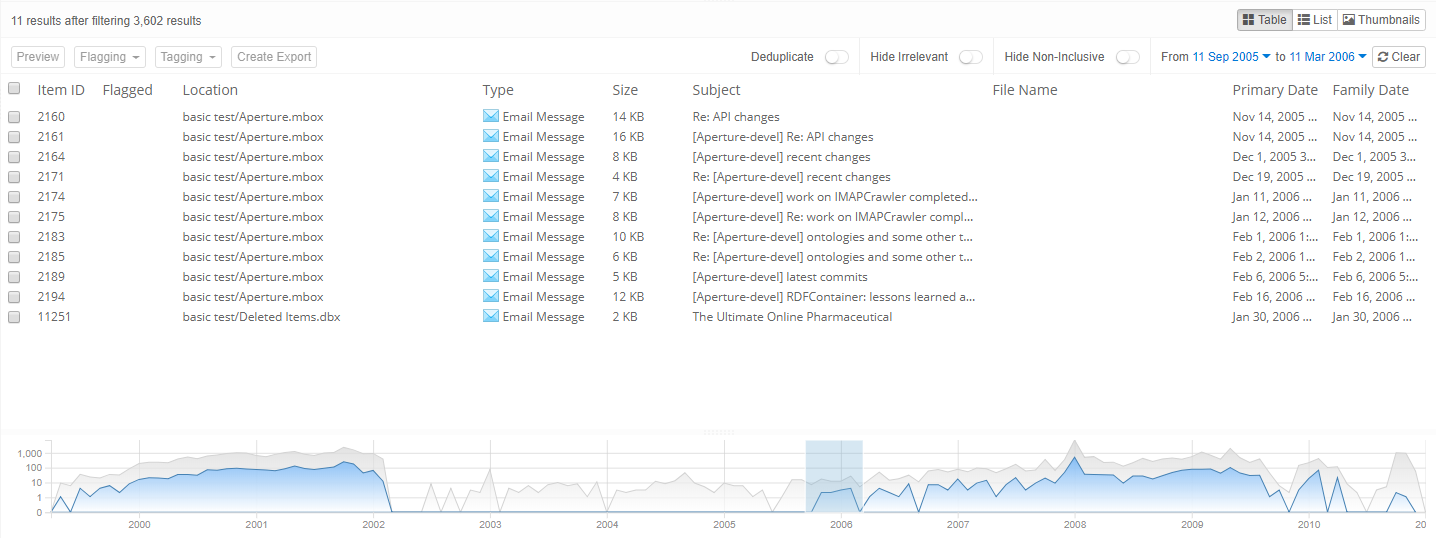
Additionally, the selected date range in timeline graph is shown above details table in textual form. Clicking on date shown next to "From" and "to" will show calendar on which the date and time can be specified precisely. Changing the date and time in calendars will update the selection in timeline graph.
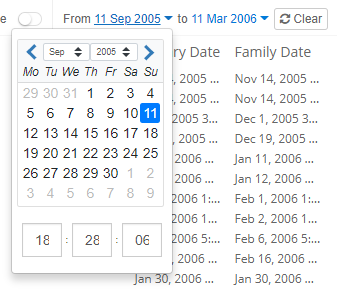
10.3. Limitations
Current granularity of the timeline is that for each month, amount of items is displayed on 1st day of the month, i.e. each point on timeline shows amount of items for given month. Having only a few items within a month or spread across a few months would show such a disparity, because of low and static granularity as opposed to having a larger amount of items spread across months and years. Future versions may make it possible to have higher granularity, e.g. weeks, days, hours or dynamic granularity, e.g. division into 50 time intervals of equal duration.
11. Details panel
In order to inspect the contents of the Cluster Map visualization, the user can select a cluster or result set by clicking on it. Its contents will then be displayed in the Details panel below the map.
The Details panel contains a list of the items that can be presented in three modes:
-
List view - can be selected by clicking on the list tab.
-
Table view - can be selected by clicking on the table tab.
-
Thumbnails view - can be selected by clicking on the thumbnails tab.
|
Use |
Actions that can be performed in all three views are:
-
Deduplicate the results in the selected view by clicking on the deduplication icon.

-
Removes all items marked as Irrelevant during indexing.

-
Removes all items marked as Non-Inclusive during Email Threading.

-
Removes all items which are images embedded in other items.

-
Double-click on the item to open it up in the previewer.
-
Filter items by selecting portion of Timeline. For more information on Timeline, see section Timeline .
-
Right-click on the selected item(s) to show a pop-up window with additional actions:
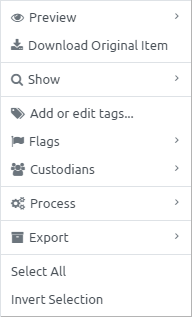
- For more information on
-
-
Create Batches action, see section Batching and Coding.
-
Content Analysis action, see section Content analysis
-
Email Threading action, see section Email Threading.
-
11.1. Showing a conversation
Right-clicking a message item and selecting the Show > Conversation option will display a new result set in the Cluster Map, showing all messages that are part of the conversation. This includes replies and forwarded messages.
The messages in a conversation set are determined by matching keywords in their subject lines and by inspecting values in the “In-Reply-To” and “References” email headers. More specifically:
-
The algorithm takes the item’s subject and reduces this to the “base subject” by stripping all prefixes like “Re:”, “Fwd:”. It supports common prefixes for several languages.
-
Next, it determines the set of Message IDs mentioned in the item’s “Message-ID”, “In-Reply-To” and “References” email headers.
-
It does a Boolean AND query for the words in the base subject, restricting the search to the “title” field.
-
It narrows this set down to all items that have at least one of the Message IDs in the determined set in their headers, i.e. regardless of the specific header name it is associated with.
Due to how this method is implemented, Show Conversation may find a different set of items than the Email threading method. For example, single thread emails that have the same subject are typically returned using Show Conversation. A future Intella Connect release may unify these two functionalities.
11.2. Showing the family items
To determine all family items of a set of selected items, select all relevant items in the Details table, right-click on one of them and click the Show > Family menu item.
This will add a new result set in the Searches panel containing all family items of the selected items.
The family of an item is defined as its top-level parent and all descendants of that parent in the item hierarchy, including folders. The definition of a family used by the “Show family” option is the same as used in the Report > Keywords tab and the Family Date attribute.
11.3. Showing the unique families
This operation finds the families which have their top-level items deduplicated.
To determine all items belonging to unique families of selected items, select two or more items in the Details table, right-click on one of them and click the Show > Unique Families menu item.
In the dialog box, you can configure the following options:
-
Deduplicate by custodian: If selected, the top-level parents of families are deduplicated for each custodian separately, thus allowing duplicates in different custodian sets.
-
Include folders: If selected, folder items are included in the produced families.
Clicking on the OK button will add a new result set in the Searches panel.
11.4. Showing the child items
To determine all items nested in an item, double click on the item. Next, switch to the Tree tab to see the full hierarchy, including all child items.
To determine the children of a set of selected items, select all relevant items in the Details table, right-click on one of them and click the Show > Children option.
This will open a dialog that asks you what children to put in the result set, as child items may also again contain child items.
11.5. Showing the parent items
Right‑click an email attachment and select the option Preview > Parent E-mail to view the email message that contains the selected item. This feature looks up the parent item recursively until it reaches an email item.
To determine the parent of a set of selected items, select all relevant items in the Details table, right-click on one of them and click the Show > Parents option.
This will open a dialog that asks you whether to produce the top-level or direct parents, and what to do with items that have no parent.
11.6. Showing native ID duplicates
To determine all items that have the same Native ID as a specific item, right-click on the item and select Show > Native ID Duplicates.
11.7. Showing shadow copies
To determine all items that are other versions of a specific item extracted from volume shadow copies, right-click on the item and select Show > Shadow Copies.
11.8. Caching of result sets
As query evaluation is processing intensive task all result sets shown in any of the result views are cached. Because memory space is limited, the number of cached entries is limited so they might be evicted in some point in time - in that case user will be presented with such message: The results you have just seen here are no longer valid, therefore page refresh is needed. Please click here to refresh your results.
|
Up to 1500 result sets can be cached by default - when this limit is exceeded the oldest result sets will be evicted and the user will be presented with the message above. |
Cache eviction policy can be tuned by changing following two properties
inside [CASE]/prefs/case.prefs properties file:
-
IdSnapshotsCacheSize - specifies the maximum number of result set entries the cache may contain (default: 1500)
-
IdSnapshotsCacheMaxAgeInHours - specifies that each result set entry should be automatically removed from the cache once a fixed duration has elapsed after the entry’s was accessed last. (default: not set)
|
If above two properties are not present, append them to the end of the case.prefs properties file. |
11.9. List view
The List view displays the results as a typical search engine-like list:
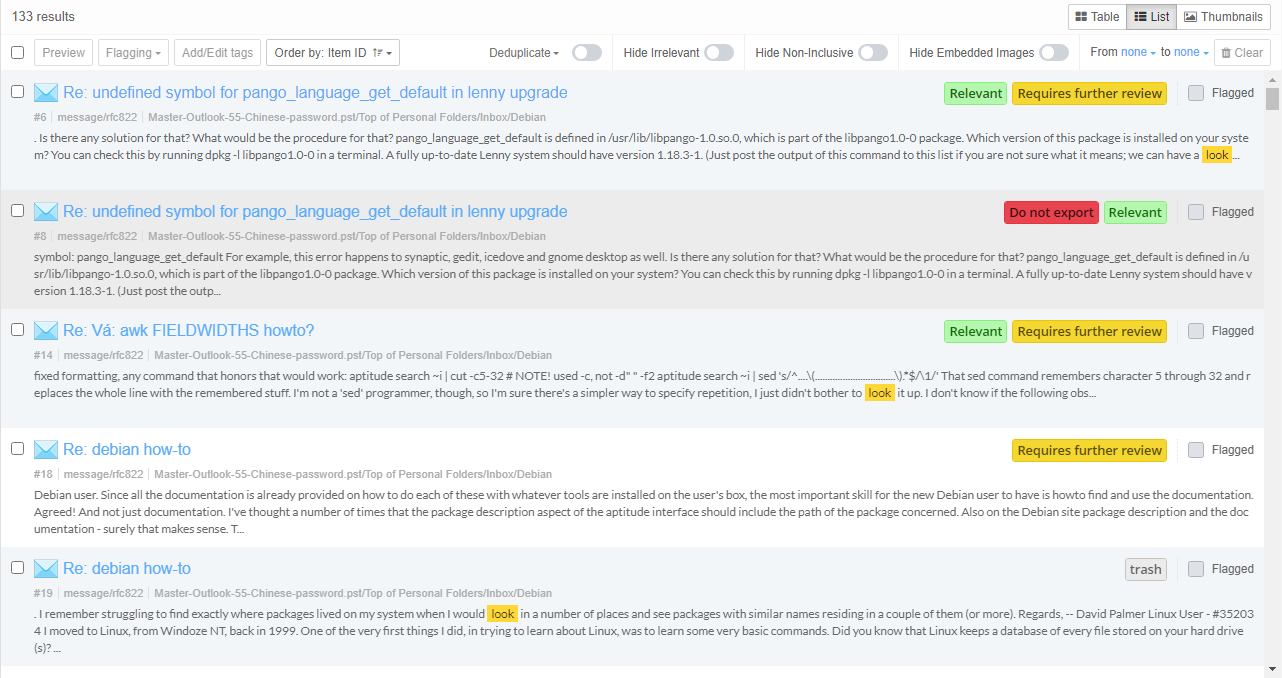
Each row represents a single item:

- This view shows basic information about the item
-
-
Type icon of item.
-
Title or subject of item.
-
Item ID.
-
Mime-type of item.
-
Location of item.
-
Tags, if any.
-
Flagging status.
-
Textual content summary, including text fragments surrounding the first encountered highlighted hit. If the item happens to be an image, a small thumbnail will be shown instead.
-
- Buttons available in the toolbar are
-
-
Select-all checkbox - Select all items in list view.
-
Preview - Preview the currently selected item.
-
Flagging - Add/remove flags of the selected items.
-
Add/Edit tags - Add/remove tags of the selected items.
-
Order by [item attribute] - Order the list by a specific item attribute (ascending or descending).
-

11.9.1. Hit Highlighting performance with List View
- Foreword
-
Hit Highlighting is a very complex operation which can take considerable amount of hardware resources. It highly depends on following factors:
-
The amount of text associated with an Item.
-
The amount and complexity of keyword searches.
Intella Connect always puts feature richness and stability of a review on the pedestal, so that is why we have introduced Hit Highlighting into List View component. It allows quickly seeing the first occurrence of a hit accompanied with the nearest text, which gives a reviewer an additional context and often is enough to determine if an item is important or not. However, in few rare cases Hit Highlighting can have considerable and undesired influence on the server which can impact negatively the reviewing experience. Therefore we added a simple way to turn off Hit Highlighting in List View, which should relieve the server from additional workload and improve the reviewing speed.
- Turning off Hit Highlighting completely
-
By default Hit Highlighting will only work for items of less than 10MBs in size. Depending on the nature of your data (especially when dealing with large files), you might want to turn it off entirely. To do that, please follow those simple steps:
-
Click on the Settings gearbox icon placed in the Secondary Navigation Bar to open the Preferences window.
![]()
-
Make sure to select the appropriate option to never show Hit Highlighting.

-
Click OK to save your settings.
11.10. Table view
The Table view displays the results as a table in which each row represents a single item and the columns represent selected attributes such as title, date, location etc.
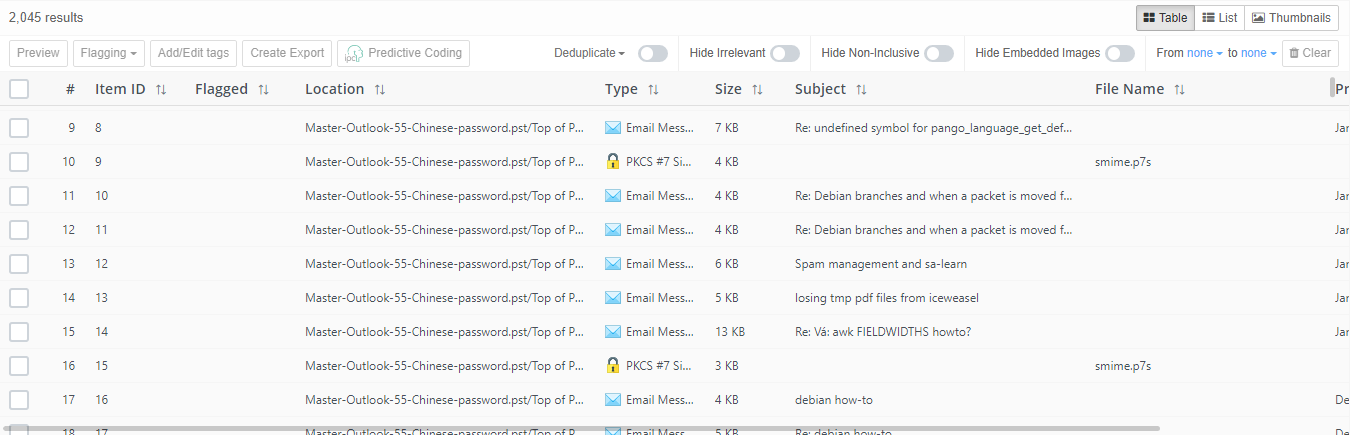
The set of attributes to display can be customized in Preferences which can be accessed by clicking on the gear icon in the Secondary Navigation Bar.
![]()
Actions that can be performed in the Table view are:
-
Click on a table column header to sort the table by that item attribute. Sorting by multiple columns can be achieved by holding the Ctrl button while clicking on the column names. Any additional clicked column will be added to the list of sorting criteria. When two items cannot be sorted using the values from the first column (because the values are identical), the second column will be used, and so on.
-
Reorder table columns by clicking the column title and dragging it left or right.
-
Resize column header by clicking on the column header separator.
-
The first column is used for items selection.
-
Select one item to preview it by clicking on the preview button.

-
Select one or more items to flag, tag or export the items.

-
11.10.1. Adding and removing columns
It’s possible to toggle visible table columns in Preferences Table view section by (de)selecting column names. The selected columns are stored: every time you connect to the case, these columns will be shown until you select a different set of columns.
This option is only available for the Table view. The following columns are available:
General columns:
-
All Locations: The locations of all duplicate items in the case (including this item).
-
Certificate: The certificate with which an encrypted item could be decrypted.
-
Contact name: The name of a contact encountered in a PST file or in a vCard file.
-
Content Analyzed: all items for which the Content Analysis procedure has been applied.
-
Custom Family ID: The custom family ID of the item assigned by user via Generate Custom IDs task.
-
Custom ID: The custom ID of the item assigned by user via Generate Custom IDs task.
-
Decrypted: Shows if an item is encrypted and Intella Connect was able to decrypt it.
-
Direct Child IDs: The item IDs of the direct children of this item.
-
Direct Parent ID: The ID of the item’s direct parent item.
-
Document ID: The ID as imported from a load file. This ID is maintained for cross-reference purposes.
-
Duplicate Locations: The locations of all duplicate items in the case (excluding this item).
-
Duplicates: Shows the number of duplicates of an item within the case.
-
Embedded image:reviewer_images/ Indicates whether the item is an embedded image extracted from an email, Microsoft Office, XPS or PDF document. See the Features facet section for a precise definition of this category.
-
Encrypted: Shows if an item is encrypted.
-
Exception: Shows if an item had one or more issues indexing properly.
-
File Name: The name of a file in the file system, in an archive or used as an attachment name.
-
Geolocation: The geolocation (longitude, latitude) of an item, if any.
-
Has Geolocation: Indicates whether the item has geolocation information associated with it.
-
Item ID: The ID used internally in Intella’s database to refer to this item.
-
Language: The language of the item’s text. The language field is left blank when the language cannot be detected automatically. When the language could not be determined, e.g. because the text is too short or mixes various languages, the value shown will be “unidentified”. Item types that inherently do not have a language, e.g. images or archives, show the “not applicable” value.
-
Location: Name of the location in the original evidence data where the item is stored. For example, an email in a PST file would have a location that would start with the folder and file name of the PST file, followed by the mail folder path inside that PST file.
-
MIME type: The type of an item according to the MIME standard.
-
Native ID: The native ID of the item. Currently only HCL/IBM Notes UNID (Universal Notes ID) are listed here. This column may be used for other native ID types in the future.
-
Near-Duplicate Group: The name of a near-duplicate group the item belongs to.
-
Near-Duplicate Master Item: The ID of a master item of a near-duplicate group the item belongs to.
-
Near-Duplicate Score: The similarity score of the item in a near-duplicate group.
-
Near-Duplicates: The number of near-duplicates of this item (other items in the near-duplicate group that the item belongs to).
-
BegAttach / Parent ID: The ID of a parent document (or first ID in the family) as imported from a load file. This ID is maintained for cross-reference purposes.
-
EndAttach: The last ID in the family as imported from a load file. This ID is maintained for cross-reference purposes.
-
Password: The password with which an encrypted item could be decrypted.
-
Recovered: Indicates whether the item has been recovered. See the Features facet section for the definition of the Recovered status.
-
Size: The item’s size in bytes.
-
Source: The name of the Intella Connect source that holds the item. Typically this is the root folder name or the name of the mail container file (e.g. PST or NSF file).
-
Source Path: The path to the evidence, e.g. the PST or NSF file, or the root folder of a Folder source. This helps reviewing items when dealing with a lot of evidence files – the name of the evidence file and the derived source name may not hold enough information to easily discern the origin of the information.
-
Subject: The subject of an email or document item – note that some document formats can have both a title and a subject.
-
Title: The title of a document item.
-
Text Snippet: Text summary containing at max first 1000 characters of item’s content. This column is especially usable for reviewing Chat message item types as it makes it possible to examine communication from different channels side by side in the Details view.
-
Top-Level Parent: Indicates whether the item is a top-level parent. Top-level parents are determined per the Show Parents settings, configurable with desktop versions of Intella.
-
Type: The item’s human-readable type, e.g. "MS PowerPoint Document" or "Email Message".
-
URI: Uniform Resource Identifier, the identifier used internally by Intella Connect for the item in addition to the Item ID.
Email-specific columns:
-
All Receivers: The combined list of To, Cc and Bcc agents.
-
All Senders: The combined list of From and Sender agents.
-
Attached: Whether or not this item is an attachment to an email, conversation or document.
-
Attachments: Shows the file names of an email’s attachments.
-
Bcc: The addresses in the Bcc header.
-
Bcc Count: The total number of unique blind carbon copy email recipients (Bcc).
-
Cc: The addresses in the Cc header.
-
Conversation Index: The conversation index of the email extracted either from Thread-Index header or PR_CONVERSATION_INDEX property.
-
Email Thread ID: When the item has been subjected to email thread analysis, this shows the ID assigned to the email thread in which the item has been placed.
-
Email Thread Name: When the item has been subjected to email thread analysis, this shows the thread name assigned to the email thread in which the item has been placed. Often this is the “root” of the subject line that is common between the emails in the thread.
-
Email Thread Node Count: When the item has been subjected to email thread analysis, this shows the number of nodes in the email thread in which the item has been placed.
-
From: The addressed in the From header.
-
Has Attachments: Emails that are marked as having attachments.
-
Has Internet Headers: Emails that have regular SMTP headers. When this is not the case, information about e.g. the sender, receiver and dates may still be obtained from other fields, depending on the source format.
-
Inclusive: When the item has been subjected to email thread analysis, this shows whether the item has been marked as inclusive.
-
Message Hash: Shows the Message Hash for emails and SMS messages. This hash is used for deduplicating emails and SMS messages in a manner that works across different mail formats and phone data source types.
-
Message ID: Shows the Message ID extracted from email messages.
-
Missing Email Referent: When the item has been subjected to email thread analysis, this flag indicates that the threading process has detected that the email item is a reply to another email or a forwarded email, but the email that was replied to or that has been forwarded is not available in the case.
-
Non-Inclusive: When the item has been subjected to email thread analysis, this shows whether the item has been marked as non-inclusive.
-
Recipient Count: The total number of unique email, chat and cellphone recipients.
-
Sender: The addresses in the Sender header.
-
Source IP: the determined source IP of the email.
-
Threaded: Shows whether the item has been subjected to email thread analysis.
-
To: The addresses in the To header.
-
Unread: Shows if an email item was unread at the time of indexing.
-
Visible Recipient Count: The total number of unique visible email, chat and cellphone recipients (To, Cc).
Cellphone-specific columns:
-
All Phone Numbers: phone numbers relevant to a phone call, regardless of whether it is an incoming or outgoing call, combined with phone numbers found in contacts.
-
Chat Accounts: all instant messaging accounts (Skype, WhatsApp, but also SMS and MMS phone numbers) that have been used to send or receive a chat message.
-
Chat Receivers: all instant messaging accounts used to receive a chat message.
-
Chat Senders: all instant messaging accounts used to send a chat message.
-
Conversation ID: ID associated with conversation as found in the evidence data.
-
Duration: how long the phone call took.
-
IMEI: The International Mobile Station Equipment Identity (IMEI) number of the phone from which the item was obtained.
-
IMSI: The International Mobile Subscriber Identity (IMSI) associated with the item.
-
Incoming Phone Numbers: phone numbers used for incoming phone calls.
-
Intella Conversation ID: Uniquely generated Conversation ID (changes on each indexing attempt)
-
Message Count: The number of messages in the chat conversation.
-
Outgoing Phone Numbers: phone numbers used for outgoing phone calls.
-
Phone Call Type: the type or direction of the phone call item. Examples: Incoming, Outgoing, Missed, Rejected.
File and document-specific columns:
-
Contributor: The name(s) of the contributor(s) of a document. These are typically authors that edited exiting documents.
-
Creator: The name(s) of the creator(s) of a document item. These are typically the initial authors of a document.
-
Empty document: Shows that the item has no text while text was expected. Example: a PDF file that contains only images.
-
File extension: the file extension of a file, e.g. “doc”, “pdf”.
-
Irrelevant: Indicates an item classified as "Irrelevant".
-
MD5 Hash: The MD5 hash that uniquely identifies the item.
-
OCRed: Shows whether an OCR method has been applied on this file.
-
Page Count: The number of pages of the items as reported by the metadata present in the original evidence item. I.e., this is not a verified and is only possible for certain document formats that support such a metadata attribute.
-
Shadow Copies: The number of volume shadow copies of the item
Columns containing dates:
-
Called: The date a phone call was made.
-
Content Created: The date that the content was created, according to the document metadata.
-
Content Last Modified: The date that the content of the item was last modified, according to the document-internal last modified date.
-
Due: The due date of a task.
-
Ended: The end date of an appointment, task or journal item.
-
Family Date: The family date of the item. Family dates build on primary dates and also take the item hierarchy into account. The family date of an item is defined as the primary date of its top-level parent, i.e. all items in an item family have the same family date. Sorting on Family Date sorts by this date, but also puts attachments and nested items right behind their parent. This is strictly enforced, i.e. two item families with the same family date are not intertwined. This makes it possible to review items in chronological order while maintaining a sense of their context. Certain types of items are skipped when determining the family root, namely all folders, mail containers, disk images, load files and cellphone reports.
-
File Created: The date a file was made, according to the file system.
-
File Last Accessed: The date a file was last accessed, according to the file system.
-
File Last Modified: The date of the last time the file was modified, according to the file system.
-
Last Printed: The date a document was last printed, according to the document-internal metadata.
-
Primary Date: The date that is the best match for the given item. Default or user-defined rules are used to pick the most appropriate date attribute based on the item’s type.
-
Received: The date the item was received.
-
Sent: The date the item was sent.
-
Started: the start date of an appointment, task or journal item.
-
Visited: The last visited date of an item obtained from a browser history or Windows registry.
Review-specific columns:
-
All Custodians: The custodians of all duplicate items in the case (including this item).
-
Batches: The batches which the item is assigned to.
-
Coded: The batches in which the item was coded.
-
Comments: Shows if an item has reviewer comments. When this is the case, a yellow note icon is shown in the table. Hover over the icon to see a tooltip with the comments attached to the item.
-
Custodian: The custodian associated with the item.
-
Duplicate Custodians: The custodians of all duplicate items in the case (excluding this item).
-
Exported: Shows if an item has been exported.
-
Flagged: Shows a column at the left side of the table that indicates if an item is flagged. Click the checkbox if you want to flag an item.
-
Opened: Shows if an item has been opened in its native application.
-
Previewed: Shows if an item has been opened in the previewer.
-
Queued for Redaction: Indicates whether the item has been queued for redaction.
-
Redacted: Indicates whether the item has been redacted.
-
Tag Colors: Shows the colors of tags connected to an item.
-
Tags: Shows the tags connected to an item.
Analysis-specific columns:
The columns in this group represent built-in and custom Content Analysis categories. See the “Content analysis” section for more information on their meaning.
By default, these include:
-
Credit card numbers
-
Social security numbers (SSNs)
-
Phone numbers
-
Person names
-
Organizations (e.g. company names)
-
Locations (e.g. city and country names)
-
Monetary amounts
-
Time (words and phrases related to the hours, minutes, weekdays, dates, etc.)
-
Sentiment (sub-categorized as Negative, Neutral and Positive based on the text in documents or messages)
-
column for each Custom regular expression
Tag groups (optional) - These columns are created for every top-level tag with sub-tags. If selected, the corresponding column shows the tags within that part of the tag tree. The column will be named after the top-level tag.
Export (optional) - When items have been exported using the export set functionality, a column will be made available for every export set, holding the export IDs within that export set.
Custom Columns (optional) - The custom columns are created during the load file import.
11.11. Thumbnails view
The Thumbnails view displays the thumbnails of the images detected within a selected cluster. This includes images embedded in e-mail attachments and images inside documents.

Actions that can be performed in the Thumbnails view are:
-
Hover over the thumbnails with your mouse pointer to see a sliding menu allowing to
-
(un)flag the item
-
add it to selection
-
toggle Zooming feature
-
-
When you double-click a thumbnail, the image will be opened in the previewer.
11.12. Content analysis
To start the content analysis procedure, select one or more items in the
Details view and select Process > Content Analysis in the context menu. This
will open a dialog like the one below:
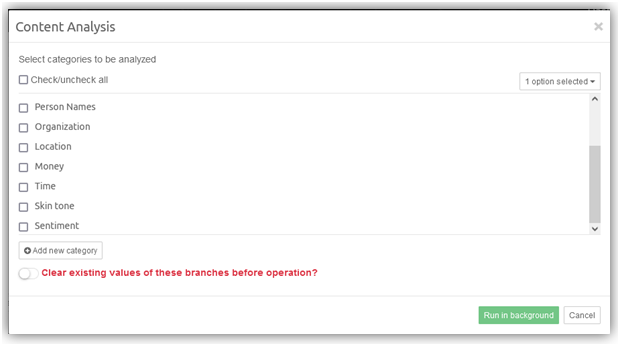
Select the desired categories of entities in the list by clicking the checkboxes.
By default, only the document text is analyzed for entities. To change which item field(s) are subjected to content analysis, e.g. to include the title or email headers, click the drop-down button on the right labeled "1 option selected" and choose the desired fields.
Next, click the Run in background button. This will start the
process as a Background Task. Once it is done, results of the analysis will
appear in the Content Analysis facet. If you are interested in tracking
the progress of the analysis, navigate to the Background Tasks panel in
Preferences.
Check the Replace existing facet values option selected if you want to
clear the results of the previous analysis or keep it unselected to add
new results to the existing content of the selected categories.
The items that have been analyzed can be found by using the “Content Analyzed” category in the Features facet.
There are some important caveats and disclaimers concerning Content Analysis:
-
Content analysis is a heuristic procedure based on typical patterns and correlations that occur in natural language texts. Therefore, the quality of the output may vary within a broad probability range.
-
Content analysis works best on English texts. The quality of the output may be poor on texts in other languages.
-
Content analysis works best on texts containing properly formulated natural language sentences. Unstructured texts (e.g. spreadsheets) usually lead to poor quality of the output.
-
Content analysis is both CPU- and memory-intensive. For adequate performance, please make sure that your computer meets the system requirements and that no other processes are taxing your system at the same time. In our experiments the amount of time needed for processing an entire case was roughly similar to the amount of time it took to index the case.
-
Sentiment analysis generates a sentiment score for a text and subsequently categorizes items into Positive, Negative or Neutral categories. It is based on a dictionary analysis text method that focuses on extracted emotional words. Currently, Sentiment Analysis is an experimental function that only supports texts written in English. The best analysis results are usually obtained for e-mails, chat messages and short documents. This may be extended to other languages and a wider array of document types in a future release.
Custom Content Analysis categories and Regular Expression search
Along with the predefined categories for built-in entity types such as Person names, Organizations, etc., it is possible to define custom Content Analysis categories populated by scanning the text of selected items for specific text patterns. The text patterns are defined using IEEE POSIX regular expressions syntax. See http://pubs.opengroup.org/onlinepubs/9699919799/basedefs/V1_chap09.html for documentation on this syntax. This provides an effective and versatile mechanism for extracting user-defined entities, such as national passport numbers, bank account information etc.
To create a new custom category, click the Add new category button in
the Content Analysis window. In the dialog that opens, enter name of the
new category and a regular expression that defines the pattern to search
for. Click the Regex Assistant button to open the Regular Expression
Assistant window. This is where you can test your expression on a custom
text fragment, choose one from the examples library and get quick help
on the regular expression syntax.
The Import keywords from file button will add regular expression that will match all keywords from loaded file. The Load from file… button will load text from file for testing of regular expression.
The Load item content… button will load text from case item for testing of regular expression.
Once the new custom category has been created, it can be selected in the Content Analysis dialog and populated by analysis of the selected item set, just like the other (predefined) categories.
To edit a custom category, hover the mouse pointer over it and click the
Edit button. In the dialog that appears, edit the name and/or the
regular expression of the category.
To delete a custom category, hover mouse pointer over it and click the Delete button.
11.13. Deduplication, irrelevant and non-inclusive items
With the Deduplicate button, duplicates are removed from the search results. This is based on the MD5 and message hashes of the results: when two items have an MD5 or message hash in common, only one of them is shown.
If one or more custodians are defined in the current case, the Deduplicate button has two deduplication options:
-
Global: Default behaviour; all items in the case are deduplicated against each other.
-
By Custodian: Deduplicate each custodian’s item set separately. Duplicate items belonging to different custodian sets will all be shown.
| When deduplicating a set of items, Intella Connect will select the item that has the lowest item ID for each set of duplicates. This item may be missing specific details that are present in duplicates. This effect becomes more likely when a less strict message hash configuration is used. |
Similarly, the Hide Irrelevant button removes all items marked as Irrelevant during indexing. See the Preferences section for information on the Irrelevant Items category.
Finally, the Hide Non-Inclusive button filters out items marked as non-inclusive by the email thread analysis.
When used in the Thumbnails view, which shows both the images in the selected results as well as any images nested in those results, the result is filtered. In other words: first the set of images in the item set is determined, then it is extended with the set of nested images, and finally the deduplication and irrelevant item filters are applied on this combined set.
12. Previewing results
When you double-click an item in the List, Table or Thumbnails view, it will open in the Previewer tab. This new browser tab allows you to inspect, flag, and tag the item, to explore its relations with other items, and to download the item for later use.
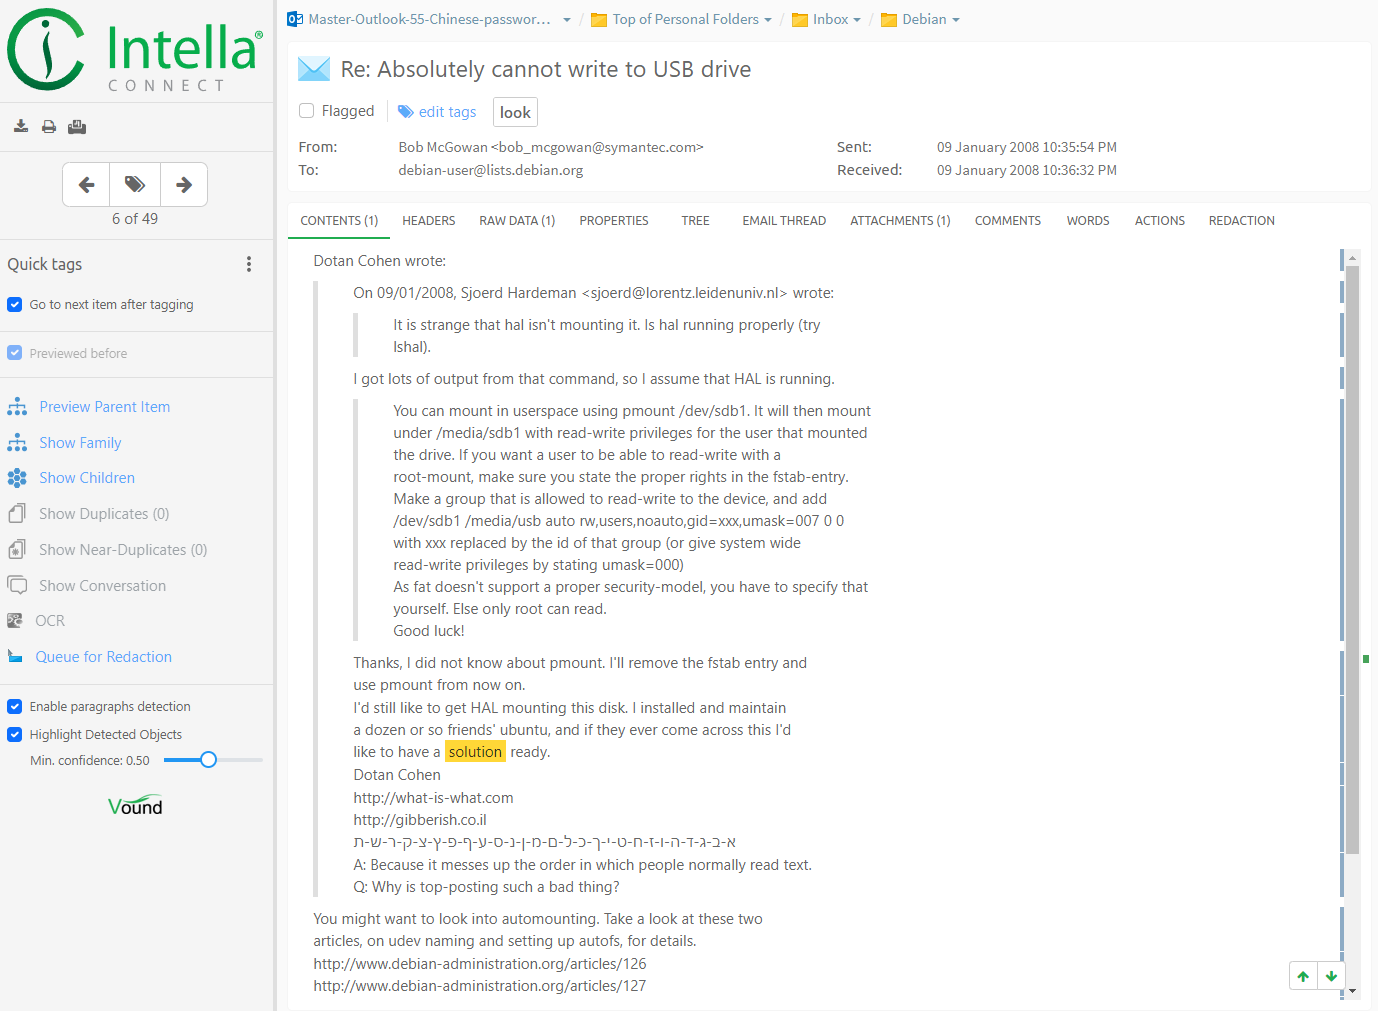
The Previewer will show a number of inner tabs, presenting different aspects of the item, such as Contents, Preview, Headers, Raw Data, Properties, Attachments, etc. The set of inner tabs will differ from item to item, depending on the type of item that you selected and what information is available for that particular item.
12.1. The Toolbar
The toolbar on the left of the Previewer contains options for producing and annotating the current item, as well as navigating to other items and starting new searches that use this item as a starting point.

At the top is a panel with buttons for producing the current item in a number of formats:
-
Download original item - This button will download the currently previewed item in its original format to the browser’s default download folder.
-
Print - This button opens the browser’s Print dialog. The printed output will show the contents of the currently selected tab (Contents, Headers, Thumbnails, etc.).
-
Print Report - This button opens a print dialog that shows the native rendering of the item with a minimal amount of metadata. If the item has attachments, you are asked if these should also be printed. The print output can also be saved as a PDF document.
-
Increase font size - This button increases the font size of the text in the inner Previewer tabs.
-
Decrease font size - This button decreases the font size of the text in the inner Previewer tabs.
The next panel lets one iterate over all items in the Details view from which the Previewer was launched and to add or remove tags:
-
Previous and Next buttons - Go to the next or previous item in the Details list. Alternatively, you can also use the keyboard shortcuts
Ctrl+right-arrowto go to the next item, andCtrl+left-arrowto go to the previous item.
|
This functionality is not available when the Previewer was launched by opening a single item from the Item ID Lists facet, from the Tree tab of another Previewer, etc. It is also not available if the current user has been inactive for a longer period of time. |
-
Add or remove tag button - Opens the tag space where you can add new tags to your case and select a tag from a list of existing tags.
|
Users with permission |
The next three panels are for annotating the current item:
-
Quick tag buttons - You can assign a tag to a quick tag button. Clicking the button tags the item and switches the previewer to the next untagged item in the list. If no tag is pinned to a Quick tag button, it is randomly associated with one of the recently used tags by default.
-
Quick tags configuration - You can select the number of quick tags available.
-
“Go to next item after tagging” check box - When this check box is selected, clicking the quick tag buttons will switch the Previewer to the next item in the list (if there is one).
-
Flagged - Select this check box to flag the previewed item. You might want to flag an item for organizational reasons. For example, to keep track of the items that you have reviewed in the case.
-
Previewed before - This check box is unchecked if this item was not previewed yet. It will be checked if this item was already previewed by any user.
|
The title of the item that is shown above tabs has green color if this item was not previewed yet. It will be black if this item was already previewed by any user. |
The next panel holds actions for navigating to and searching for related items:
-
Preview Parent Item- Use this button to open the parent item in a previewer window. A parent item contains one or more items. Example: Pictures found in a Microsoft Word document are separate items in Intella. The Word document is the parent item for these pictures. The same is true for items found in archive file, such as a ZIP file: The archive file is the parent item for these items. -
Preview Parent Mail- Use this button to open the parent email item in a previewer window. A parent email item contains one or more items. Example: A picture attached to an email is a separate item in Intella. The email is the parent for the picture. This button is visible only when one of the parents of previewed item is email. -
Preview Parent Conversation- Use this button to open the parent conversation item in a previewer window. A parent conversation contains one or more message. Example: A chat message which is part of conversation is a separate item in Intella. The conversation is the parent for the chat message. This button is visible only when one of the parents of previewed item is conversation. -
Show Family- Use this button to search for all items in the same family as the current item. -
Show Children- Use this button to search for and display the children associated with the item being viewed in the Previewer. When selected, a search result with the associated children of the currently viewed item will be available in the Cluster Map panel. The label of the cluster will be “Children of [file name]” or “Children of [subject]”. An example of a child item would be an attachment of an email. Intella Connect views emails and attachments as separate items. The attachment would be the child of the parent email. Child items can have child items of their own. Depending on the option that you select, the Show Children shows either only the directly nested children or all children in the tree. -
Show Duplicates- When an item has duplicates in the case, click Show duplicates to display these duplicates in the Cluster Map. The label of this cluster will be “Duplicates of [file name]” or “Duplicates of [subject]”. -
Show Conversation- Based on the subject of an email item and certain email headers, Intella can find items that are part of a conversation. Click the button Show Conversation to show all these items in the Cluster Map panel. The label of this cluster will be “Conv: [email subject].” The email subject is the email subject of the item in the previewer. -
OCR- When this button is clicked, OCR settings will be shown and after confirming, the current item will be OCRed. The result will be shown in OCR tab. See the section on Optical Character Recognition (OCR) for more details. -
Queue for Redaction- When clicked, the current item with its currently highlighted keyword search hits are stored in the redaction queue. This queue can be processed later, resulting in the redaction PDFs being generated and the visual areas where these hits appear in this PDF being determined. This allows for the quick review of keyword hits, without having to wait for the redaction PDFs to be generated on demand when one moves from item to item. See the section on Redaction for more details.
Finally, the last panel handles additional options:
-
Enable Paragraphs Detection - When this check box is checked, extra UI elements will be shown in the right margin. See the section on Contents for more details.
-
Highlight Detected Objects - Use this option to show or hide boxes depicting detected objects on images. If current item is not an image or Image Analysis was not performed on it, this option has no effect.
-
Min. confidenceslider - specifies the value of a threshold filter applied to the detected objects on the current image preview. The objects evaluated with lesser confidence scores than the current threshold will not be highlighted in the preview.
12.2. Tabs
The tabs show various aspects of the current item. The set of tabs shown for a particular item can differ from item to item, depending on the item type and which information that particular item holds.
When moving from one item to the next using the Next and Previous buttons, the current tab will stay selected – provided that that tab is also available for the next shown item.
Keyword matches
When the current item has any keyword matches, the tabs containing one or more of the keywords change their appearance:
-
The tab name will contain a number indicating the amount of hits.
-
When the tab contains text and has a scrollbar, the location of the keyword matches will be marked next to the scrollbar using yellow indicators and buttons to jump from one match to another will be shown in the right bottom corner.
Hit highlighting in the Preview and Redaction tabs may be overzealous in highlighting the matching terms when using phrase or proximity queries. Generally, all occurrences of the individual terms are highlighted, not just the text parts that resulted in these query matches. E.g. the query "big car" will result in all occurrences of "big" and "car" being highlighted. This is a limitation of the technologies used to render these tabs. This limitation is not present in the other tabs that support hit highlighting (Contents, Headers, Raw Data, Properties and Comments).
|
12.2.1. Contents
This tab shows the body of an item, e.g. the message in an email or the text inside a Word document. The Contents shows a limited set of stylistic elements such as bold, italic and underlined text, tables and lists. However, text is always drawn as black text on a white background, as to reveal all extracted text. For a native rendering of the item use the Preview tab (when available).
If the item text is too long, it is truncated in the previewer for performance purposes. Click on the here hyperlink to view the complete item text. Note though that there is also a limit on the maximum amount of text that is subjected to full-text indexing. See the note on the ItemTextMaxCharCount setting in the Source Types section.
When the item is an image, this tab will show the image’s content.
|
Only the following set of image types are supported: image/gif, image/jpeg, image/png, image/bmp, image/x-bmp, image/x-ms-bmp, image/webp, image/tiff, image/x-portable-bitmap, image/x-portable-pixmap, image/heic. If an image is of a different kind, a warning will be rendered instead. |
When the item is a video, this tab will show a video player allowing to watch the video inside a browser, without having to download it to a local disk.
|
Only the following set of video formats are supported: OGG, H.264 MP4, WebM, MOV. |
If the image has extracted text, it will be shown in a separate tab called "Extracted Text" next to the Contents tab.
Handling paragraphs
When the “Analyze paragraphs” option was selected during source creation, extra UI elements will be shown in the right margin. These UI elements indicate the start and end of the paragraphs that Intella Connect has detected. The UI elements are omitted for very short paragraphs (typically one-liners).

Furthermore a popup menu will be shown when the user hovers the mouse cursor on a paragraph, offering the following options:
-
Collapse and expand the paragraph.
-
Mark the paragraph as Seen, or back to Unseen. This grays out all occurrences of this paragraph in all items, facilitating the review of large amounts of long and overlapping documents such as email threads with lots of quoted paragraphs.
-
Mark all paragraphs above or below the current paragraph as Seen or Unseen.
-
Search for all items in which this paragraph occurs. All items that contain the selected paragraph will be returned, ignoring small variances such as white spaces.
-
Mark the paragraph for exclusion from keyword search. This can be used to suppress information present in lots of items but with little relevance to the investigation, such as email signatures and legal disclaimers. Consequently, keyword queries containing terms such as “confidential” and “legal” are more likely to return meaningful results.
Detected Objects
When the "Image Analysis" was executed on this item, this item is an image and objects have been detected in it, then extra UI elements will be shown in the image itself. These UI elements indicate the detected objects in this image with a rectangle at coordinates where the object was found and a description of the object. Transparency of the rectangle and label depend on the detected object’s confidence score.
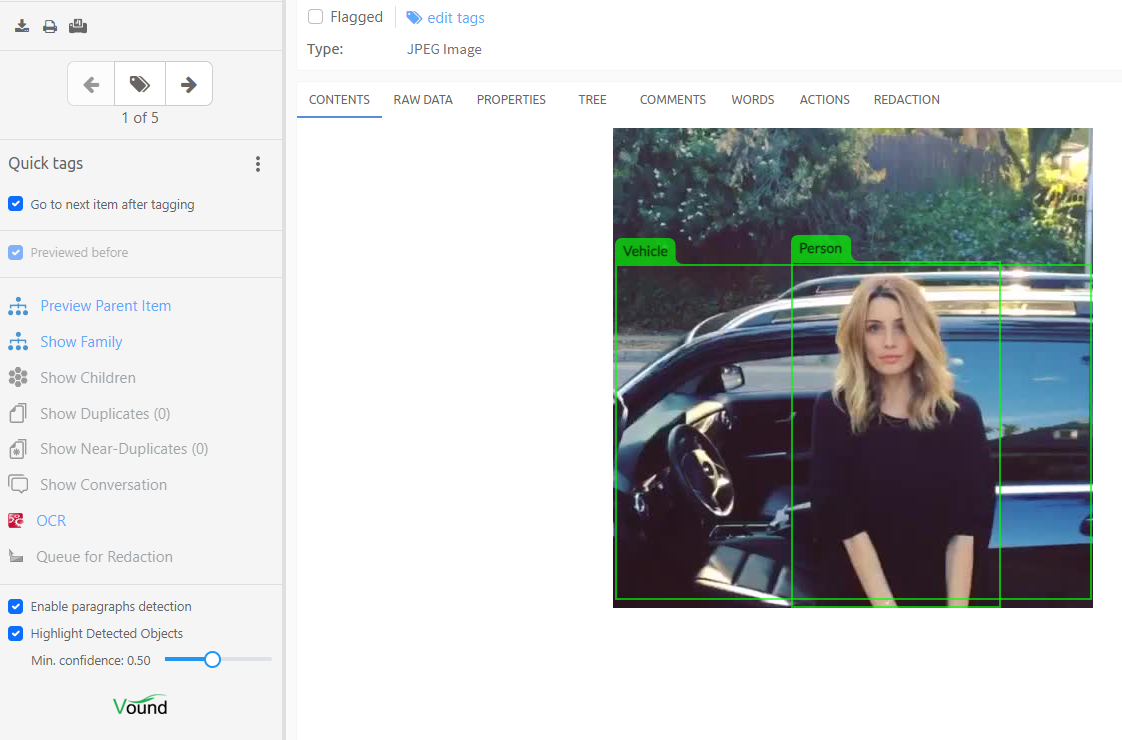
The objects that have been searched for in Search tab will be highlighted with different color.
Highlighting of detected objects can be turned off completely by unchecking the "Highlight Detected Objects" checkbox.
12.2.2. Imported text
Text that was imported using importText option in Intella Command-line interface can be viewed in this tab.
12.2.3. Image
Imported images from load files can be viewed in this tab.
12.2.4. OCR and OCR Preview
Shows the text extracted by running Optical Character Recognition on this item. The searchable version of the document will be shown in an OCR Preview tab.
12.2.5. Preview
This tab shows the item as if it was opened in its native application. The Preview tab is only shown when the format of the current item is supported and the Contents tab is not already showing it in its native form. The following file formats are supported:
-
Emails (when the email contains an HTML body)
-
Legacy MS Office formats (doc, xls, ppt)
-
New MS Office formats (docx, xlsx, pptx)
-
RTF
-
HTML
-
PDF
-
CSV and TSV files
-
WordPerfect
-
Open Office (Writer, Calc, Impress)
|
When previewing emails, only images that are already bundled with the email are shown. Any images that a mail client would have to load from a web server are shown as static icons. When there are any such missing images, a “Show external images” button appears. Clicking this button will load the images from the servers and show them embedded in the email representation. Note that loading these images may constitute a violation of investigation policies. |
Starting with Intella Connect 2.3, spreadsheets (MS Excel, Open Office Spreadsheet, CSV and TSV) will be shown in their native form by default. The native view closely resembles how it looks in native application. If you would like to see to see the PDF rendering of the spreadsheet instead, click on the PDF radio button. When previewing spreadsheets in native view, the sheets available for current item will be shown at the bottom. Clicking on sheet name will change the view to the selected sheet.
12.2.6. Headers
This tab shows the complete SMTP headers of an email item. This tab is only shown when you open an email item and it had any headers (e.g. drafts may not have any headers).
12.2.7. Raw Data
The content of this tab depends on the item type. For example, in case of PST emails the low-level information obtained from the PST is listed here. This typically includes the SMTP headers (shown in the Headers tab) and the email body, but also a lot more PST-specific properties.
All this information is also searched through when using a keyword search. This may lead to additional hits based on information in obscure areas that Intella Connect does not process any further.
12.2.8. Properties
This tab shows a list of properties connected to the item. Examples are Size, MIME Type, Creator and Character Set. The list of properties shown depends on the type of the item and what data is available in that particular item.
12.2.9. Attachments
This tab lists the attachments of an item.
When you click on the attachment title, it will be opened in a new browser tab.
| Attachments will be reported also in the case of conversations despite they are not representing direct children of Conversation item but are instead attachments of Message items consisting previewed conversation. |
12.2.10. Thumbnails
This tab shows thumbnails of the images (jpg, png, gif etc.) attached to an item or embedded in a document, e.g. the images embedded in a MS Word document.
When you click on a thumbnail, you will be able to open it in a new browser tab for full resolution of the image or open it in another Previewer tab.
| Thumbnails will be reported also in the case of conversations despite they are not representing direct children of Conversation item but are instead attachments of Message items consisting previewed conversation. |
12.2.11. Tree
This tab shows the location of the reviewed item in the item hierarchy (entire path from root to descendants), as well as all its child items.
The file names and subjects are clickable, which will open the item in a new browser tab.
12.2.12. Email Thread tab
This tab visualizes the email thread in which the currently previewed email is located. A blue border indicates the current email.
Each type of icon in this visualization has a special meaning. To see a basic explanation of the icons, click the Legend icon. The icons have the following meaning:
-
Inclusive Email – this email is part of the set of emails that a reviewer should read, in order to read everything in the thread.
-
Non-Inclusive Email – all content of this email is also present in at least one of the replies or forwards.
-
Missing Email – indicates that the existence of an email could be derived from references found in other emails, though the email itself could not be found in the case.
-
Duplicate Emails – indicates that one or more duplicates exist of this email.
-
Reply – indicates that the email was sent as a “Reply” to another email.
-
Reply All – indicates that the email was sent as a “Reply all” to another email.
-
Forward – indicates that the email contains a forwarded email.
-
Attachment – indicates that the email has one or more attachments.
The user can double-click on the nodes in the visualization. This opens that email in a separate Previewer. When the node represents a set of duplicates, one of these duplicates is opened.
To tag all items represented in the visualization, click the Tag Thread button.
12.2.13. Entries
This tab shows the list of items found in an archive file, e.g. a ZIP or RAR file.
When you click an item in the list, it will be opened in a new browser tab.
12.2.14. Comments
This tab lists the reviewer comments attached to the item. Every comment shows the reviewer name and time stamp, and the options to Edit or Delete the comment.
Multi-line comments can be written by using SHIFT+ENTER or CTRL+ENTER combination to add new line separator.
Note that this is not related to the comments such as found in the MS Word document metadata.
12.2.15. Words
The Words tab lists all words/terms extracted from this item, together with the following information:
-
The search field the term belongs to: text, title, path, etc.
-
The frequency of the word in this document and document field.
-
The number of documents having this term in the same field.
This list can be used to diagnose why a certain document is or is not returned by a certain query.
12.2.16. Actions
This tab shows the list of actions performed on the item. The action, the user that triggered the action and the time at which the action occurred are shown in the list.
Actions listed are:
-
Previewed – the item was opened in the previewer.
-
Opened – the item was opened in its native application.
-
Exported – the item was exported.
-
Tagged with – the item was tagged with the specified tag.
-
Flagged – the item was flagged.
-
Commented – the item was commented.
-
OCRed – the item has text content imported from OCR.
-
Redacted – the item was redacted.
|
Listed actions are ordered by the time. Oldest action is at the top and latest is at the bottom of the list. |
12.2.17. Redaction
See the Redaction section for a detailed explanation of the functionality in this tab.
12.2.18. Near-Duplicates
This tab is only visible for items included in a near-duplicate groups (see the Administrator’s manual > Near-duplicates Analysis section), except for the group’s master items and their exact duplicates in those groups.
The tab visualizes the differences between the text content of the current item and the master item in its near-duplicate group. Information about the near-duplicate group (name, master item ID, and the current item score) is visible on the top panel.
Different text blocks (paragraphs) are marked with red and green colors, indicating occurrences specific to the current and to the master items, respectively. Visibility of the different blocks is controlled with two checkboxes ("Occurs only in this item" and "Occurs only in the Master item"). The regular black-on-white text represents the text blocks that the two items have in common.
| The Near-Duplicates tab uses simplified text formatting with the most of the text styling stripped out. Therefore, the view may differ from what one can see in the Contents and Preview tabs. |
13. Chat messages
13.1. Overview
This section describes the processing and rendering of chat messages, and how it differs from the way other artifacts are handled.
Let’s look at an example of how chat conversations are processed. Suppose that we have a chat message database, holding a conversation called “Main Chat” that spans over three years. In such a case Intella Connect will create artificial Conversation items, based on the Indexing Options that control how such Conversation items are to be constructed. Let’s say that these were set like this:
-
Present chat messages as: Conversations and Messages
-
Split chat conversations: Per year
-
Limit number of messages per conversation: 100
Each of these three Conversations items will contain chat messages that were sent in the same calendar year. The start and end dates of conversations will be set to the sent date of the first and last chat messages respectively.
Furthermore, children Chat Message items will be produced for each individual chat message in this conversation. The conversation item will contain the message texts of all its child Chat Message items.
When the maximum number of messages per conversation item is reached, the conversation will be split further into additional conversation items.
Constructing conversations items out of the individual chat messages has following benefits:
-
The presentation of Conversation items inside the previewer makes reviewing chat data effective and efficient, as it mimics how a chat client will display the chat messages.
-
Having Conversation items make it possible to use AND and OR search operators and proximity queries when searching for text across chat message boundaries.
Producing separate Chat Message items has the following benefits:
-
Chat Message items can be individually tagged, flagged, and exported.
-
Chat Message items can be listed inside the Details view, making it possible to see how they relate to other item events in the case. For example, website visits, emails, phone calls, etc. that took place right before or after the moment that chat message was sent or received.
|
The Text snippet column can be especially useful when reviewing Chat Message items inside the Details view, as it shows the first 1,000 characters of each item. |
The Present chat messages as indexing option controls whether: 1. Both Conversation items and Chat message items will be produced 2. Only Conversation items will be produced 3. Only Chat message items will be produced
The Split chat conversation Indexing Option controls how chat messages are bundled into Conversation items:
-
Per Hour- conversations are split by calendar hour -
Per 12 Hours- conversations are split at noon and midnight -
Per Day- conversations are split by calendar day -
Per Week- conversations are split by calendar week -
Per Month- conversations are split by calendar month -
Per Year- conversations are split by calendar year
The maximum number of messages bundled in a single Conversation item can be controlled through the Limit the number of messages per conversation Indexing Option . The maximum value is 1,000 messages per conversation.
Altering these values will affect reviewing and exporting to PDF at the later stage. A reasonable default setting is “Per day” splitting, capped by a maximum of 100 chat messages per conversation item. When exporting such a Conversation item, the exported document will contain at most 100 chat messages, thereby not producing unnecessarily large PDF documents. Reviewing such Conversations in the Previewer is also more straightforward, as the reviewer is not overwhelmed with many messages inside the previewed conversation.
Note that (re-)indexing of the chat data is needed to let changes in these options take effect.
All attachments associated with Chat Message items will also be reported as attachments in the Conversation item. The number of attachments can thus be large if there are many Chat Message items with attachments present in the data.
|
The Number of recipients property of the Conversation item will be set as |
|
In chat conversations extracted from a Cellebrite phone dump, the amount of participants is derived from the entire conversation (all days) and then applied to all daily parts. This is different from Skype chat, which may have a different amount of participants per day. |
13.2. Previewing
One can preview both the Conversation items and the Chat Message items nested in them. In the case of previewing a Conversation item, the whole conversation thread will be rendered, with links to the preceding and succeeding Conversation items. When previewing a Chat Message item, only that single message will be rendered.
The Raw Data tab will contain the raw data based on which the conversation and message preview representation was constructed. The data that is shown here depends on the type of evidence data, e.g., a Skype SQLite database, a Cellebrite UFDR report, etc.
13.2.1. Previewing of Conversation items
When a Conversation item is opened in the Previewer, there are a number of differences with how other item types are displayed:
-
A checkbox is rendered in front of each chat message. This makes it possible to flag the corresponding Chat Message item straight from within the conversation view. This is useful if only specific messages in the conversation are to be exported.
-
Double-clicking on the Chat Message body (the gray area) will open the corresponding Chat Message item in a separate Previewer window.
-
The attachments of all Chat Message items contained in the conversation will be reported in the Attachment tab of the Conversation item as well.
-
Thumbnails of all Chat Message attachments contained in the conversation will be reported in the Thumbnails tab.
-
Additional info shown in the Contents tab:
-
Start Date: indicates the date of the first chat message covered in this Conversation item.
-
End Date: indicates the date of the last chat message covered in this Conversation item (i.e., not necessarily the end date of the entire conversation).
-
Chat Accounts: shows all chat account that were participating in this particular conversation
-
|
When an attachment is an image and its binary content is present, it will be rendered as an inline image in the Conversation item’s preview for easier review. |
There are a few additional conversation-related properties reported in the Properties tab: Number of recipients, Number of visible recipients, Protocol, Messages count
More information about these can be found by hovering the mouse over the question mark icon next to the property.
13.2.2. Previewing Chat Message items
The below image shows how a Chat Message item is previewed:
Note that there is no checkbox in front of the message text, as Chat Message items can be flagged by using the Flagged checkbox in the previewer’s toolbar on the left. Another reason for this is to make a visual distinction between Conversation items and Chat Message items.
If you want to preview the Conversation item that this Chat Message item corresponds to, you can use the “Preview Parent Conversation” action in Previewer, or navigate to it through the Tree tab.
In the case of Chat Messages items, the Properties tab contains the following chat message-related information: Recipients Count, Visible Recipient Count, Chat protocol
13.3. Exporting of Chat conversation and Chat Message items
One should be aware that there are two ways of exporting styled chat messages / conversations.
-
Export as PDF
-
Export as Report
13.3.1. Export as PDF
When exporting as PDF, the Conversation item or Chat Message item will be exported as it is rendered in the Previewer.
In the case of Conversation items, the whole conversation fragment covered by this Conversation item will be exported. There is no way to export only specific chat messages this way, but you will be able to redact it as you would with any other item.
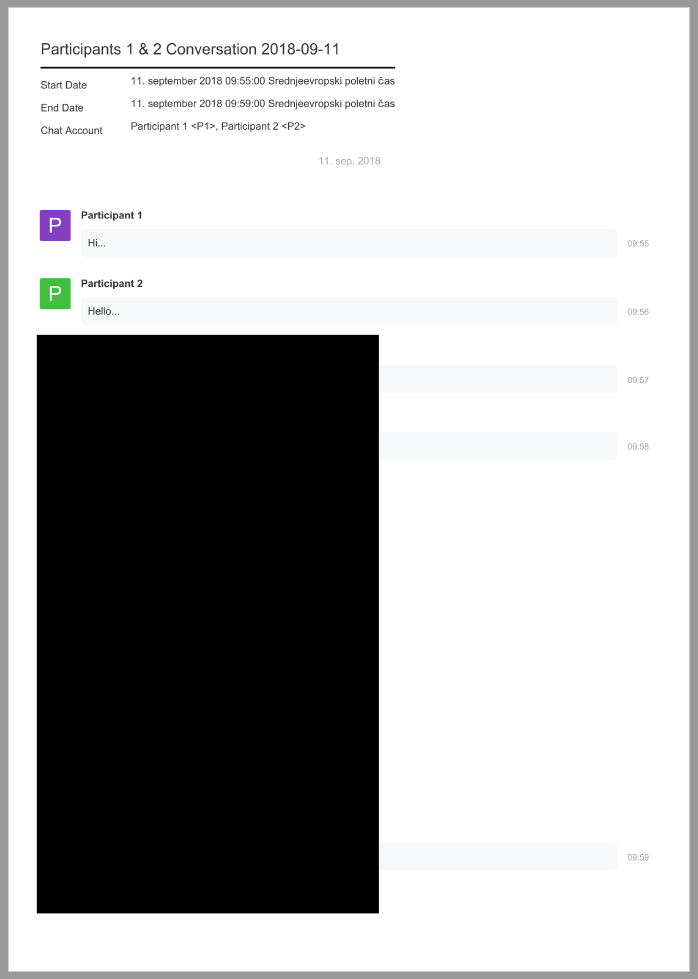
In the case of Chat Message items, each individual chat message gets exported as a PDF.

The overall process of exporting to PDF is not explained here, as it is identical to exporting any other type of item to PDF.
13.3.2. Export as Report
The main difference of exporting as an Item Report, compared to the PDF export type, is that one can export either the whole conversation or just particular chat messages in it.
To export all messages in a specific conversation, one needs to select the Conversation item and export it using
Report export type. Make sure that Display as: Conversation is used in the Report – Sections step. A report created this way will contain all messages in that conversation.
To export specific messages in a conversation, you just need to select the desired Chat Message items and use the same export options as above. Intella Connect will export the related conversation but restricted to the messages present in the export set:
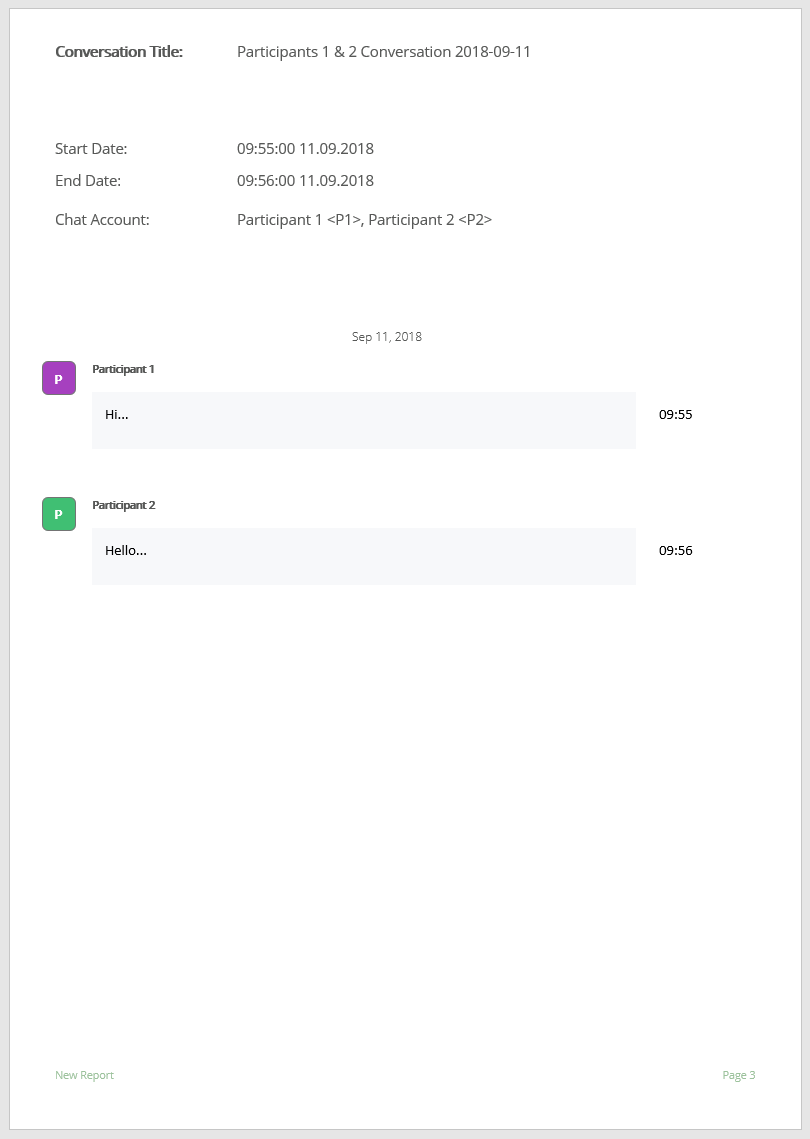
When Indicate gaps of omitted messages is checked at the Report-sections step, Intella will add the following information the Report:
-
[x skipped messages], inserted between two chat messages, and indicating how many messages are present in the conversation in between these two chat messages that were not included in the report. This message is omitted if there are no chat messages in between the two exported messages. -
[Total: y skipped messages], indicating the total number of skipped messages in the related conversation.
14. Tagging
Tagging is the process where you connect a descriptive word to an item or a group of items.
Example
One of your items is a PDF document that contains valuable information. You decide to tag the item with the word “important”. Tagging helps you to organize results, for example by separating important and unimportant information.
Tagging can be done in several ways in Intella Connect. This chapter gives you an overview of the possibilities:
-
Tagging in the main window
-
Tagging in the Previewer
-
Letting other items inherit tags automatically
-
Pin a tag to a button
-
See all tagged items
-
Searching with tags
-
Deleting a tag
14.1. Tagging in the main window
14.1.1. Tags editor
Creating and assigning tags in Intella Connect is bundled together into one visual component called Tags Editor. It allows to:
-
browse existing tags structure
-
create new tags
-
add existing tags to items
-
remove existing tags from items
-
change tagging scope and settings
-
list details about changes which are to be applied
-
switch between "Classic" and "Simple" modes
14.1.2. Invoking the tags editor
After desired items have been selected in the Details Panel, one can invoke the Tags Editor in one of two ways:
-
Open the context menu (right mouse click on one of the selected items) and select
Add or edit tags…. -
Click on
Add/Edit tags…button on the toolbar
This will cause the Tags Editor being shown in its default state illustrated below:
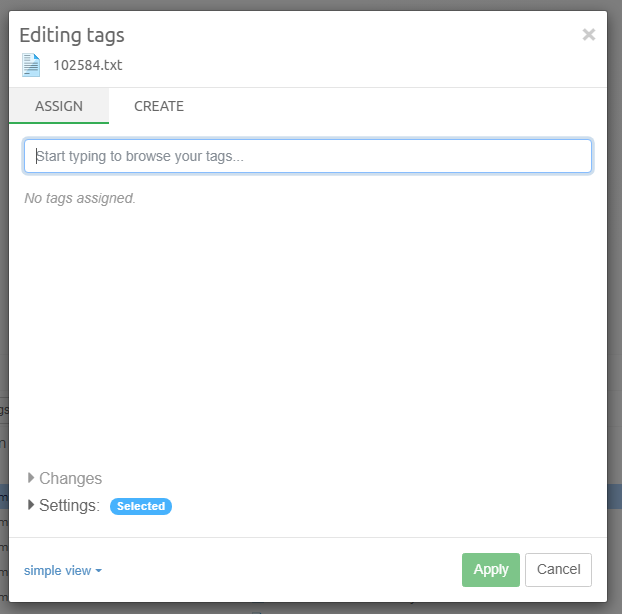
14.1.3. Browsing existing tags
To browse existing tags click on search box located underneath Assign tab. A dropdown
will appear allowing you to see a hierarchical structure of existing tags.
You can also start typing some search query in this box, allowing you to filter this structure in order to quickly find tags of your interest.
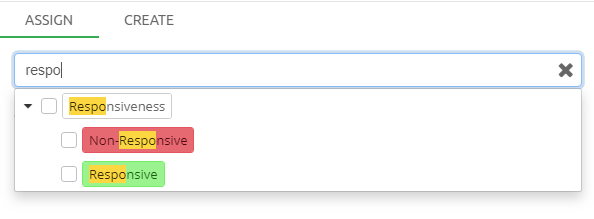
14.1.4. Adding tags to items
Once you find tags you’d like to be added to items you selected, click on checkbox next to the tag’s name. Then click anyway on the screen to dismiss the dropdown showing tags structure.
You will notice that the tag you selected appeared under the search box. This part of Tags Editor will always show you the final state of tags for selected items, including the changes that you are making at the moment. This is a convenient way of understanding what taggings are set for items as they are always in front of your eyes. It is also synchronized with checkboxes rendered next to each tag in the search box dropdown, so any changes you will make there will always be reflected here.
|
When removing a tag and |
14.1.5. Removing tags from items
Removing tags from items is very similar to the process of adding them. You can simply deselect tag in the tags structure dropdown. There is also a faster way to do it, though. If you hover your mouse over an existing tag additional icon will appear. Clicking on it has exactly the same effect as deselecting a tag would have.
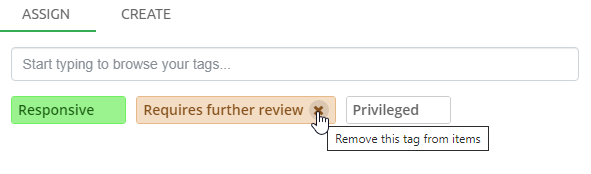
|
Intella Connect allows for the same tag to be applied by multiple users. So if two user were to add tag "X" to an item, but only one removes it afterwards, then the item is still considered as tagged with "X". You can force the deletion of tags created by other users in Settings, but user needs to have a "Can delete tags and taggings from other reviewers" permission to do so. We recommend to make use of this, as it simplifies the process of reasoning about tags. In future releases we will consider simplifying this. |
14.1.6. Creating tags
In order to create tags, you need to select Create tab in the top of the
Tags Editor. The view will be updated and the following tag creation form
will be shown:
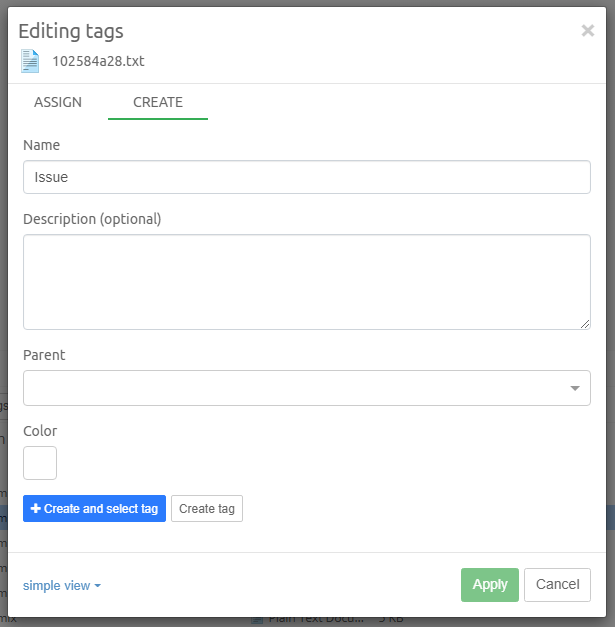
Fields:
-
Name - a short name of the tag. It must be unique on one level of tags' hierarchy. This field is required.
-
Description - an optional description giving you more context about how this tag should be interpreted.
-
Parent tag - an optional parent tag. Using this field allows to logically group tags, e.g. grouping custodian names, reviewers, locations or priorities. Parent tags can also be used to tag items. For example, when you have tags called Europe and Asia with sub-tags representing specific countries, you can choose whether to tag an item with a continent or a country.
-
Color - optionally, a color can be chosen for the new tag. Color coding can help with quickly decoding information being presented to user.
Below the form two buttons are rendered. THey have the following function:
-
Create and select tag- this will create a tag and assign it to selected items, automatically moving back to theAssigntab of Tags Editor. It’s a convenient way to quickly create one tag. -
Create tag- this will create a tag and clear the form. This allows for more tags to be created at once, without having to switch between tabs several times.
14.1.7. Applying your changes
We already explained that tags rendered underneath the search box will show you the state of the tags which will be committed after you apply your changes.
Besides that the Tags Editor will also render a detailed (collapsible) list
of changes which will be the result of your actions. The Apply button
will also change its label to reflect that. See the picture below:
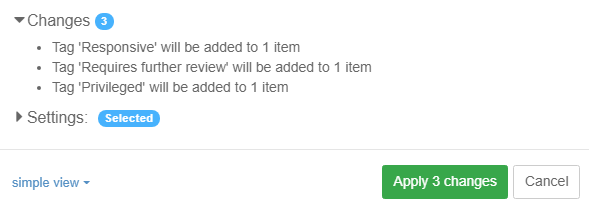
If you’d like to discard just a few changes, simply restore them in the
tags structure. You can also click on Cancel to dismiss them all and
close Tags Editor.
14.1.8. Working with larger items sets
Tags Editor can be invoked for a single item, as well as for the set of items. Doing the latter will cause it to analyze existing tags currently applied for selected items and extend the functionality of rendering current tags state with two features:
-
each tag is filled with color, proportionally to the amount of items being tagged with a particular tag to all selected items
-
when hovering over a tag, an extra icon button is shown allowing to tag "the rest" of items with a particular tag
This is best illustrated in a real life example. Say we have 10 items in our selection, with existing tags:
-
Responsive - 3 items
-
Non-Responsive - 2 items
-
Requires further review - 1 item
Invoking the Tags Editor on this selection will show the following state:

Say we decided that all 10 items are actually Responsive, so we remove Non-Responsive tag and then click on the 'tick' icon for Responsive tag.
This changes the state to the one illustrated on the following picture:
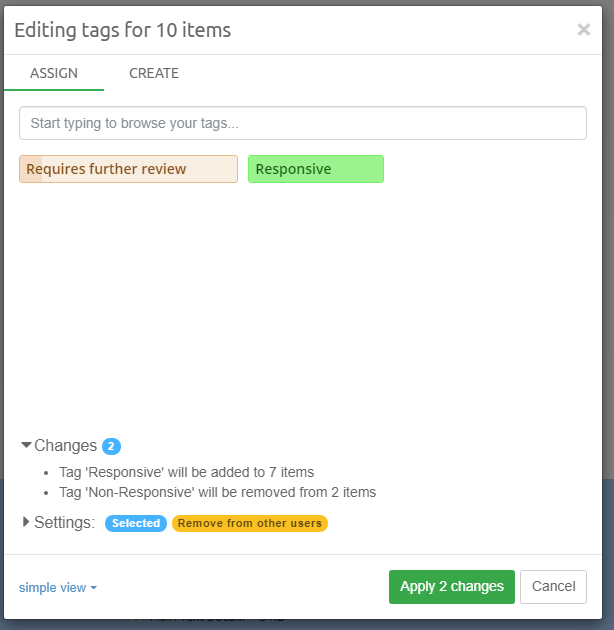
See how Responsive tag is now entirely filled with color because it was
added to 7 items. The Non-Responsive tag is fully gone because it was
removed from 2 items. Requires further review stays unchanged.
All those changes are listed in the Changes section and ready to be applied.
14.1.9. Changing settings
Tags Editor allows you to change a few settings controlling how tags
are being applied to items. These are affecting
tagging scope described in one of
the next sections.
Besides modifying the scope, privileged users can also select
Delete taggings from other reviewers option. This option affects
tags removal only and allows to cleanup tags created by other users.
14.2. Tagging in the Previewer
You can also use the same Tags Editor in the Previewer, using the Tag button

The Tags Editor works exactly the same as in the main Search view.
Previewer is equipped with another component which allows to quickly
add a tag to the current item. These are so called Quick Tags and they
are shown as dedicated buttons in the Previewer. It is enough to click
on one of those buttons for the tag to be added. You can also use
keyboard accelerators (Alt+1, Alt+2, Alt+3, etc.) to do the same. The
numbers correspond with the button positions. When the Auto-forward
checkbox is selected, the Previewer will automatically switch to the
next item in the list.
14.3. Classic mode
Older versions of Intella Connect used a slight different Tags Editor,
which is now called "Classic Mode". You can still switch to this mode
by selecting classic view from the view dropdown located in the
bottom left corner of the editor. Most of the features work in a
similar way and should be fairly intuitive. Full definition of its
features can be found in previous versions of Intella Connect
documentation available online.
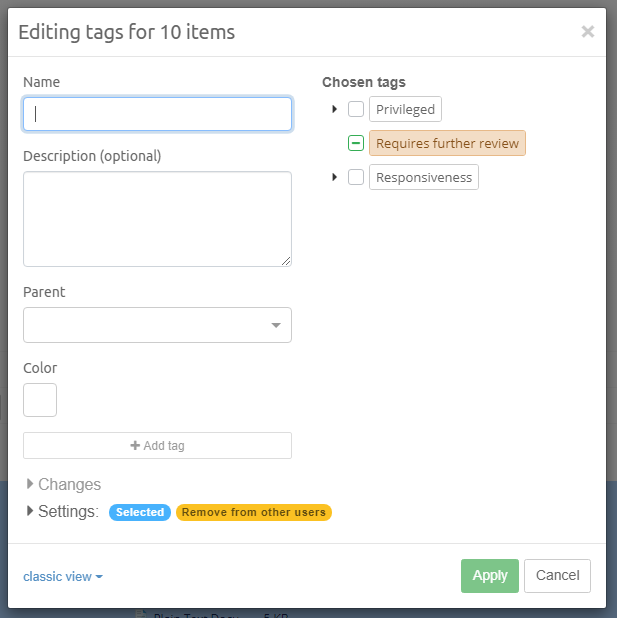
14.4. Automatic tag inheritance
When tagging items, the policy of your investigation may be that some related items should be tagged as well. One use case is when tagging items as irrelevant: all nested items may then be considered as irrelevant as well. Another use is tagging items as privileged; depending on your policy, this may then be extended to all other items within the same mail as well. Intella Connect offers mechanisms that let these additional tags to be set automatically.
The presented options specify how other items in the hierarchy need to be handled:
-
Only tag the selected item is self-explanatory.
-
Also tag all attached/nested items results in all attached or nested items being tagged with the same tag as well. This works recursively, i.e. all children in the hierarchy are tagged.
-
Also tag all other items nested in the same top-level item means that everything from the top-level mail down to the most deeply nested child gets the tag.
In addition to these three settings, you can specify that all duplicates should also be tagged. When this setting is switched on, all items in the case with the same MD5 or message hash will inherit the tag. Furthermore, their children or siblings may also be tagged automatically, based on the setting described above.
14.5. Pin a tag to a button
You can pin a tag to a button and keyboard shortcut (Alt+1, Alt+2, Alt+3) with the following steps:
-
Select Tags in the facet panel.
-
Click on more options icon (3 dots icon) next to a tag name in the list to open the context menu.
-
Select
Pin tag…and select a number from the sub-menu.
Now you can use the hyperlinks in the Previewer and the keyboard shortcuts to tag an item.
|
To unpin a tag from a button, select |
14.6. See all tagged items
To get an overview of all items that are tagged in your case, please take the following steps:
-
Select Features in the facet panel.
-
Select Tagged from the list and click
Search
Now you can see all the items that have a tag in the Cluster Map panel.
14.7. Searching with tags
To search with tags, please take the following steps:
-
Select Tags in the facet panel.
-
Select a tag and click
Search.
Now you can see the items that have the selected tag in the Cluster Map panel.
14.8. Deleting a tag
To delete a tag from your case, please take the following steps:
-
Select Tag in the facet panel.
-
Click on the menu icon and select
Deletefrom the dropdown. -
Click on
Yesto confirm.
Now this tag is no longer in your case.
|
To delete a tag which was not created by you, Can delete tags and taggings from other reviewers permission is required. |
14.9. Tagging in Compound cases
Tags assigned to items of Compound cases are stored separately from the sub-cases and do not affect their data. If a sub-case is shared as a single case, these tags will not be visible.
Tags, assigned to items of the sub-cases are available in the Compound case. They can be found in case-specific sections of the Tags facet panel below the local (Compound case-specific) tags. The sub-case tags are available read-only: you can view the tags and query items assigned to them in the sub-cases, but not edit or delete them. Tagging items in the Compound case with the sub-case tags is also not possible: the tags have to be imported to the Compound case before that.
| Queries made with the sub-case tags cannot be restored using the Saved Search mechanism. You can import the tags to the Compound case before using them in Saved Searches. |
| Queries made with the sub-case tags will render a sub-case name in parentheses, to make them easier distinguishable from local and imported tags. |
14.9.1. Importing sub-case tags
To import one or more sub-case tags to the Compound case:
-
Select Tags in the facet panel
-
Click on "Import sub-case tags" button
The tags are copied to the Compound case with their content, i.e. the associated items.
If a tag with an existing name is imported, you will see a dialog window to either create a new tag in the Compound case or merge the imported tag with the existing one:
-
Select the "Rename to" option to create a new tag with another name. Enter a new tag name in the text field.
-
Select the "Merge with existing tag" option if you want to merge the content of two tags, i.e. to assign the items associated with the sub-case tag to the Compound case tag of the same name. Click "Mark all as merged" to set this decision for all of the imported tags.
After selecting an option, press the "Import" button to proceed.
15. Batching and Coding
15.1. Background
Batching allows a large number of documents to be broken down into smaller (more manageable) groups called batches. Batches can be assigned to reviewers for a linear document review. The Coding feature allows the user to apply subjective coding (via a coding layout) to a document during the review of a batch.
Custom coding layouts containing the coding options can be created and applied to a batch when the batch is being created. This allows for coding layouts with different parameters to be created to match the data, type of investigation and workflow for a particular case. The coded data is added to the Details table and can be exported from the case in several formats (CSV file, load file etc.) if required.
15.2. Coding Layouts
Before we can batch documents and code them, we need to create a coding layout. Coding layout defines which tags and how can be applied to an item. Each layout consists of several elements called Coding Fields which are derived from tags existing in a case.
|
To be allowed to manage Coding Layouts, user has to be granted with 'Can manage coding layouts' permission. |
|
It’s of vital importance for case managers to understand how tags relate to Coding Fields. |
We would like to create a typical coding layout for a "First Pass Review". Before we start then, let’s look at what we would like to achieve:

This particular layout consists of three coding fields:
-
"Responsive"
-
"Privileged"
-
"Requires further review"
As you can see each one of them renders a bit differently. The first field is a classical Radio button field. It allows to select just one value from the provided set of options. These options are called Coding Options in Intella Connect. A Coding field can have zero, one or many Coding Options, depending on its type and the tag from which it was created. Note that this field is considered a mandatory (required) field. When coding an item using this coding layout, user would have to make a decision as to which Coding Option applies to this item (in this case either "yes" or "no").
The second field is also a required field, however of a different type. This time Coding Options are rendered as Checkboxes. This type of a Coding Field will allow user to select one or several Coding Options.
The last field is also a Checkbox, however this time it’s not required and have no Coding Options to choose from. Therefore is rendered as a standard Checkbox.
There is also a fourth type of a Coding Field called Multi Select. This type of field is rendered as a single dropdown element, but it allows to select several Coding Options. It makes it an ideal solution for cases where we have many options to choose from, but usually only few are applicable for each item.
To create such Coding Layout one must create appropriate tags structure beforehand, as in Intella Connect Coding Layouts are created based on tags. A typical tags structure that would allow us to create such a layout could look like this:
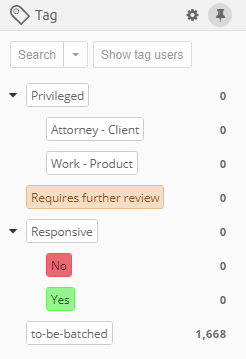
As you can see few of those tags are hierarchical tags. Several types of Coding Fields will require hierarchical tags in order to function properly: Radio, Dropdown and Multi select.
|
In Intella Connect each Coding Field and its Coding Options correspond to an existing Tags structure in a given Case. Coding Field color corresponds to Tag color. |
|
Only first level of hierarchical tags is supported in Coding Fields. Any subsequent levels will be ignored and not rendered. |
Now that we have a solid tags structure to base our Coding Layout upon, we can proceed to creating our layout.
15.3. Creating a Coding Layout
Coding Layouts are created, modified and imported via Preferences . When you try to create a new Coding Layout you must provide a unique name for it. If layout with the same name exists you won’t be able to add it. You have also an option to allow for this layout to be shared among other cases. This settings is switched off by default to prevent leaking of sensitive information (like custodian name) which might be used in a Coding Field. After new Coding Layout is created, you can start adding Coding Fields to it. This is rather simple task thanks to our visual builder. It allows you to add/remove and change properties of each Coding Field and immediately see results of this change in the Live Preview on the right. Coding Layout for tags structure from our example can be easily constructed by choosing the following options:
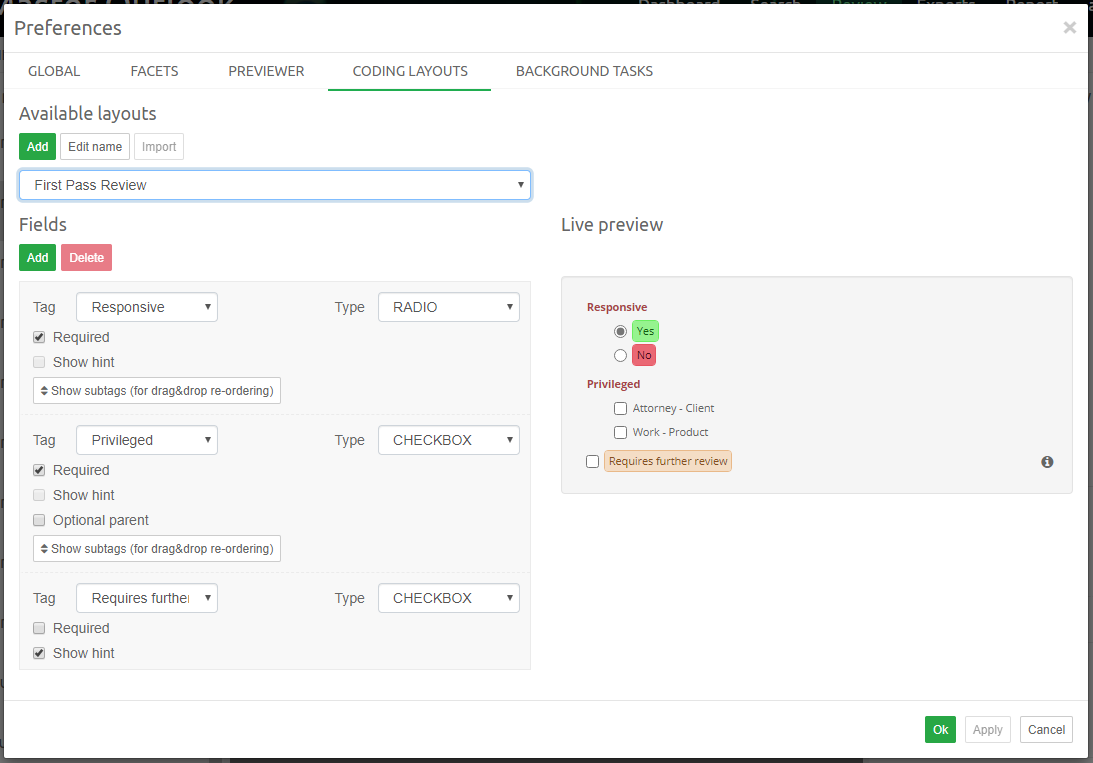
Now that our first Coding Layout is created, we can proceed to batches creation.
|
Tags can be reordered in Coding Layout by simply dragging and dropping them to desired position within the Coding Layout. This applies to both levels of hierarchy. |
15.4. Creating batches
Batches are created in the main Search View. It’s the job of a case manager to search and find any items that ought to be split into batches first. This step shouldn’t be taken lightly, as after batches are created one cannot add any more items to them. Therefore one should make sure if he wants to include duplicates, conversations, children and/or parents of resulting set prior to creating a batch.
|
Batch creation is governed by a 'Can create review batches' permission. Users who are not granted with it will not see the Create Batches action in the contextual menu. |
In the main Search View select all items that you want to include in batches and right click in Details Panel to bring up contextual menu, then select Create Batches.
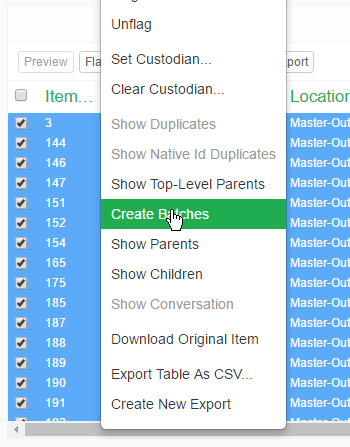
This will cause an additional modal dialog to appear:
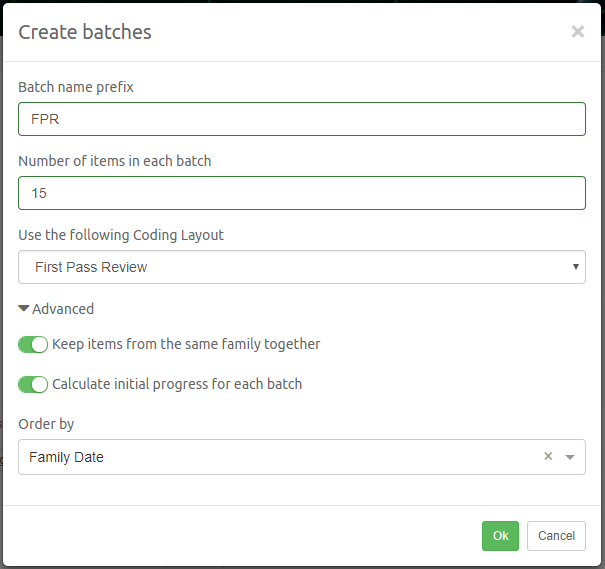
The options used here should be pretty straightforward. The only thing requiring attention is the Keep items from the same family together. This allows, for instance, to keep emails and their attachments in the same batch. Using this option can cause the total items count assigned to a batch to extend the count specified as the batch size.
The Order by field instructs how items should be sorted before they are split into batches. The default value of Family Date should be used in most cases as it will align items chronologically for a review. In some cases, though, (especially when dealing with load files) it may be required to specify a different ordering field.
|
The Order by field is taken into account when items are split into batches. During the review users are free to change how items in individual batches are sorted. See the section Items List. |
|
If certain family members were not added to the set of items from which the batches are being created, then those items won’t be automatically added to batches even if "Keep items from the same family together" option is turned ON. It’s always the job of the user creating batches to make sure that all items that he wishes to include are added to set before "Create Batches" action is called. |
|
Keep items from the same family together option will make Intella Connect assign each item to a Family. Items from the same family are guaranteed to be inside the same batch. Moreover, since items in batches are always sorted according to a Family Date, then batch can contain items from other families too. If this happens, the batch size can be increased. When determining Family root, these items will be skipped: folders, email containers (like PST and such), disk images, forensic containers, registry artifacts. |
|
Calculate initial progress for each batch option will let Intella Connect check which items in a batch have already been coded and set the progress accordingly. Skipping initial calculation of batch progress upon its creation will set progress to zero. This will allow for new batches to be created for the same set of items using the same coding layout as previously, without automatically marking the newly created batch as Completed, if all items within a batch have already been coded. |
After one presses the OK button it should be a matter of seconds before batches are created and appropriate notification is shown to the user. From this point forward reviewers can find new batches in the batches list view.
15.5. Batches List
All batches created in the case are listed on Batches List. This view allows you to see details for each batch, including its basic information along with current state of the review. You can select multiple batches by pressing a CTRL button on your keyboard and clicking on multiple rows. Use buttons in the menu ahead of the list to control the state of selected batches.
Depending on permissions of currently logged in user, you will see a subset of these buttons:
-
Assign to me - assigns batch to the current user (enabled only if selected batch is unassigned or if user has CAN_CHANGE_BATCH_ASSIGNEE permission)
-
Assign reviewer - assigns one or multiple batches to one or multiple reviewers (enabled only if user has CAN_CHANGE_BATCH_ASSIGNEE permission)
-
Unassign - removes the assignee from selected batch(es) (enabled only if user has CAN_CHANGE_BATCH_ASSIGNEE permission)
-
Query for items - queries for items contained in selected batch (results are opened in Search UI)
-
Adjust view - opens a panel where Batches List view can be customized
-
More Actions / Delete - permanently deletes all information associated with batch (enabled only if user has CAN_ARCHIVE_OR_DELETE_BATCH permission)
-
More Actions / Archive - changes the status of batch to Archived. Such batches can be hidden from view, but are not deleted from database (enabled only if user has CAN_ARCHIVE_OR_DELETE_BATCH permission)
-
More actions / Reopen - allows users to reopen batches which were previously marked as completed. Reviewers are allowed to alter coding decisions in reopened batches. Once batch is reopened it can only be marked as completed, archived or deleted. This action is available only for users with either CAN_REOPEN_AND_COMPLETE_OWN_BATCHES or CAN_REOPEN_AND_COMPLETE_OTHERS_BATCHES permission.
-
More actions / Mark as completed - allows batches with status REOPENED, IDLE or IN_PROGRESS to be marked as COMPLETED. This action is available only if user has one of the following permissions: CAN_REOPEN_AND_COMPLETE_OWN_BATCHES, CAN_REOPEN_AND_COMPLETE_OTHERS_BATCHES, CAN_COMPLETE_BATCHES.
-
More actions / Recalculate progress - enforces recalculation of a batch progress. It can be handy in situations where items were tagged (coded) outside of the Review UI or if user has skipped initial batch progress calculation. This action will verify if each item in batch is properly coded (i.e. all required fields have been set) and update the progress accordingly. This action is only available for users with CAN_RECALCULATE_BATCHES_PROGRESS permission.
Available columns in Batches List:
-
Name - the name of the batch including the auto-generated number suffix.
-
Actions - renders auxiliary buttons which can be used to open a batch for browsing or review.
-
Reviewer - the name of the user who is currently designated as batch reviewer. If empty, it means that no one is currently assigned to this batch.
-
Total items - number of items inside the batch (note: this number can be larger for some batches if Keep items from the same family together was selected).
-
Coded items - number of items for which a reviewer applied some coding decision.
-
Progress - ratio of coded to total items represented as a percentage.
-
Status - current status of batch. Available statuses are:
-
NEW - right after batch has been created.
-
IN_PROGRESS - when batch is assigned to a reviewer and hasn’t been completed.
-
IDLE - when batch was already IN_PROGRESS before, but later it became unassigned.
-
COMPLETED - when all items inside the batch have been coded.
-
ARCHIVED - when privileged user decided to archive it. Batches in Archived mode are not deleted, but they can’t be coded anymore.
-
REOPENED - if batch was already COMPLETED but for some reason it has been reopened for a review. That’s usually a sign that some coding decisions had to be changed.
-
-
Coding layout - the name of the Coding Layout used in this batch.
-
Created - the date of creation of this batch.
-
Completed - the date when the last item in this batch has been coded and batch changed the status to COMPLETED.
15.6. Adjusting the view
Clicking on the Adjust view button will toggle a panel offering additional customization of the Batches List view. It allows to:
-
filter batches depending on a keyword query - only batches matching the query will retain in the list and others will be hidden
-
filter out archived batches
-
select which columns should be rendered

15.7. Assigning batches
Depending on permissions assigned to your account, you may or may not have an option to freely reassign batches among reviewers. In most cases though reviewers will only have an option to assign a batch to themselves. Once the batch has been assigned, that user will see a link to the batch listed next to the All Batches link at the top. Batches List will also contain a column with action buttons, one of them being Start Review. This situation is illustrated on the picture in the previous section.
To start reviewing documents in the batch, simply click on the Start Review button.
15.8. Working with Coding View
15.8.1. Items List
As soon as the batch is opened the Items List will start populating with information about items inside current batch. On top it will render the total count of items inside this batch. Each item has an icon associated with it which changes it’s color based on the item’s type. It makes it easy to distinguish items of common file types. Each entry will also render item’s best title and an information about associated custodian, if available.
When the mouse icon hovers over an item then a menu icon will be shown on the right side of item’s list entry. When clicked it will open a menu allowing to:
-
download original item
-
open a standard Previewer for more in-depth investigation of this item
-
apply coding to all items within a family (enabled only when item belongs to a family)
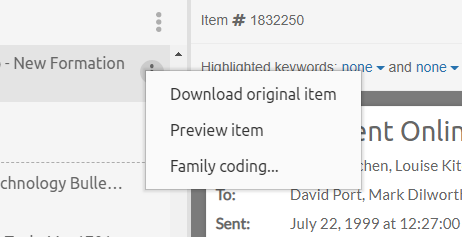
Items List keeps track of currently opened item. This active item entry will be highlighted with a darker gray. Also, if any coding errors will apply to an active item, then it will be highlighted with red color. This makes it easy for the user to notice that he must take additional actions in order to fix this problem.
The first item in the screenshot located above has also been coded in this batch. This can be easily noticed by a thick, gray check mark located on the right side. As soon as other items are properly coded similar check marks will be rendered for them too.
Clicking on any item in the list will cause Simplified Previewer to load item’s data and Coding Panel load taggings for given item. Based on those taggings Coding Panel will populate its fields. This will happen only if active item is properly coded. If user has CAN_SKIP_CODING_OF_ITEMS permission, then this validation is skipped and user can navigate between items freely.
If Custom IDs have been generated for items inside a batch, then it is possible to copy existing coding decision to the rest of items inside the same family in this batch. This helps to avoid inconsistencies in family coding, as well as speed up this process. When the scope of coding is expanded to cover duplicates, then duplicates within the same batch will be coded (duplicates outside of the batch are skipped).
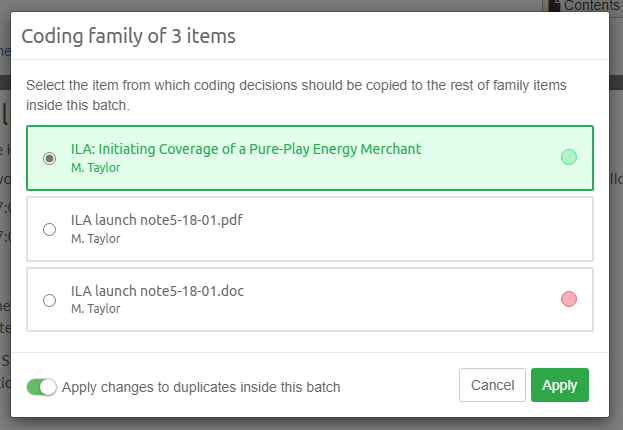
To further customize the appearance of this list, you can click on the menu icon (located on the right of label informing about the number of items in the batch). This will open a modal window with additional options:
-
selecting a sorting attribute for items in the list
-
choosing the auxiliary (secondary) field which is rendered beneath the name of the item (it defaults to custodian)
-
font size preference
-
whether or not show coding swatches. These are small, round icons rendered on the right side of each item in list. They represent tags present both for this item, as well as the current Coding Layout.
-
whether or not show numeric indices for rows in this list (note: those indices are to be used to enhance navigation in large batches, they don’t correlate to item’s properties)
-
should the numeric index also indicate parent items which are missing in this batch. Each missing parent will be replaced with a question mark.

Items list can also render family relationships between items. This is illustrated on the following picture:
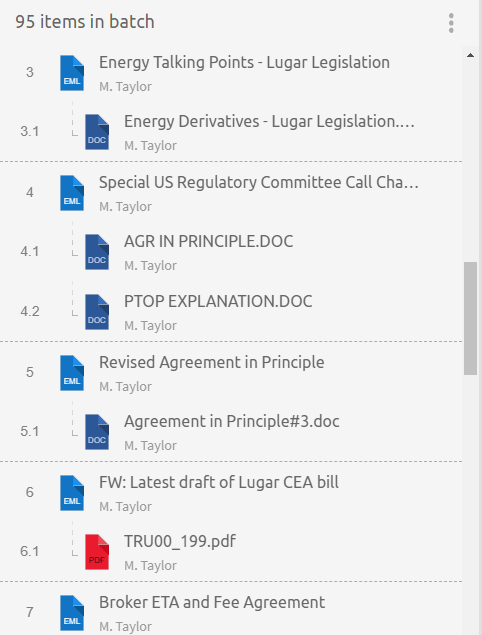
Note how each parent is represented by few visual cues:
-
numerical index represents the family level
-
each child is indented and has a small line pointing to its parent
-
a gray dashed divider is separating each family
|
In order for families to be correctly rendered, one has to generate custom IDs for items using Case tasks |
15.8.2. Simplified Previewer
Simplified Previewer is a close counterpart to our regular Previewer used to inspect items closely. To remove unnecessary clutter from the sight, we decided to support these tabs only:
-
Contents
-
Image (imported from load file)
-
Preview
-
Redaction
-
Near-Duplicates
These tabs work the same as their counterparts in regular Previewer.
Simplified Previewer allows reviewers to apply their own custom keywords to be highlighted in Contents and Redaction tabs. It’s possible to create a custom list of keyword searches and/or use one of Keyword Lists created in the main Search View. The full search syntax is supported.
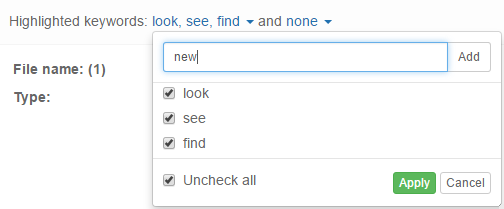
On the screenshot above one can see three custom keyword queries being highlighted and none Keyword Lists being used.
If currently previewed item has any attachments, then they will be displayed in a separate panel in the bottom of Contents section. Clicking on any of the buttons representing individual attachments will open up a new Previewer for this item. One can also see all attachments in a form of a list by clicking on See all button.

15.8.3. Coding Panel
Coding Panel is the centerpiece of the entire Review View. It consists of few main components:
-
Coding Form
-
Actions Panel
-
Navigation Panel
-
Notifications Panel
-
Comments Panel
Coding Form allows user to code items by switching appropriate Coding Fields ON or OFF. Whenever new item from batch is loaded this panel will automatically fetch all taggings from the server and initialize fields based on that information.
|
Coding Form is always fetching taggings information coming from all users, not just from the current reviewer. |
Changes in Coding Fields are not automatically sent to server. User must always make an explicit decision to apply these changes. This is where Actions Panel come in handy.
Actions Panel has several controls illustrated below:
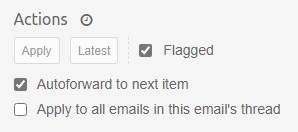
-
Applybutton - it will be enabled when changes in Coding Fields are detected (comparing to original taggings when item was loaded). This button commits the current changes to the server. -
Latestbutton - works the same asApply, but it reapplies the coding decision which was used last time. This button helps to quickly code similar items. To avoid any mistakes Coding Form will show an overlay (when mouse is hovered over it) with Coding Fields selected according to what was the "Latest" coding decision. -
Flaggedcheckbox - select this check box to flag the item. You might want to flag an item for organizational reasons. For example, to indicate that this item is of interest. -
Autoforward to next itemcheckbox - having this option ON means that as soon as item is coded the Coding View should navigate to the next item. -
Apply to all emails in this email’s threadcheckbox - with this option ON all items in this email’s thread including current item will be coded the same way. -
Show recent actionsbutton (clock icon) - clicking on this button invokes a modal dialog which will show actions recently applied to items from current review. You may also navigate to these items. This often comes in handy when you want to quickly go back to an item you recently coded, even if its no longer visible in the review queue.
Any action that would commit changes to Coding Fields triggers a coding layout validation first. Validation is a very simple process - it goes through every required field in the current coding layout and checks if such fields have been properly coded. A required Coding Field is considered coded properly if it has been set, in case it has no Coding Options assigned, or if at least one of its Coding Options is set.
|
Batch progress is computed based on the count of properly coded items. This is triggered only on two occasions:
|
|
It’s important to understand that applying coding decision to item might result in removing taggings from other users (only the ones which are used in a Coding Layout). That can happen if we had "Field" tag mapped as a radio Coding Field and "John" tagged item with "Field/OptionA". Afterwards when "Jane" codes it as "Field/OptionB" John’s tag would be removed as "Field" can have only one option sets. |
In case the Coding Form validation fails, the Coding Fields containing errors will be highlighted in red and additional warning will be presented in the Notifications Panel. This is illustrated below:
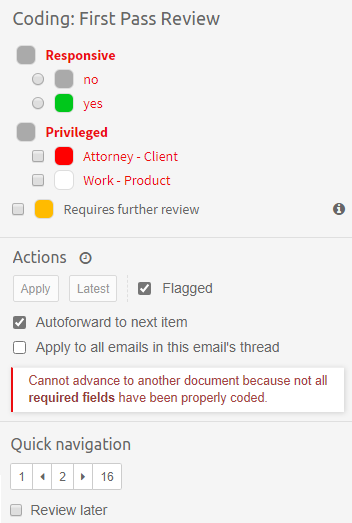
Another case of error you might encounter happens when Coding Form detects that tags have been assigned to currently displayed in an invalid way. It may be a result of tagging an item outside of Coding Form in a way which is not supported by one of Coding Fields. A typical example of this is to have a Coding Field of Radio type, which supports only mutually exclusive choices (ex. 'correct' or 'incorrect'), but item was tagged with both ('correct' AND 'incorrect'). In this case Coding Form cannot know which coding decision was right, and will render an error notification illustrated below. To get around this situation one must open a regular Previewer for item in question and manually fix tags causing problem. After going back to Review the message should be gone.
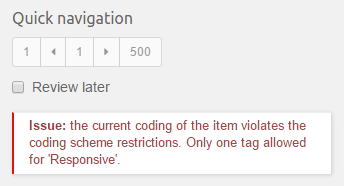
The "Review later" option allows skipping coding an item for the time being. When user reloads the batch, the items will retain their original sort order. User will simply be navigated to the next uncoded item as per the usual workflow. The "Review later" flag does not change the item sorting in any way. So when user opens the batch again to review it, then it will be automatically positioned at the first item that has not yet been coded. Once this item gets coded, then it will automatically move to the next uncoded item.
The simulation of applying latest coding decision onto current item is illustrated below. Note the semi-transparent overlay over Coding Form and the fact that some of controls become selected to reflect latest coding decision.
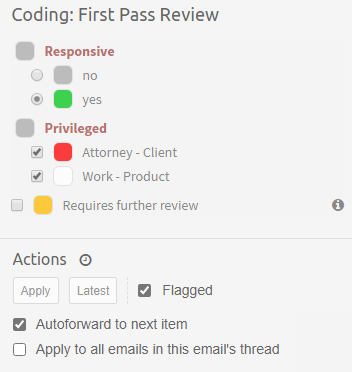
Comments can be added to item directly from Comments Panel. This works exactly the same as with regular Previewer, however editing or deleting comments is not allowed. In case it was needed one can still do that from Previewer.
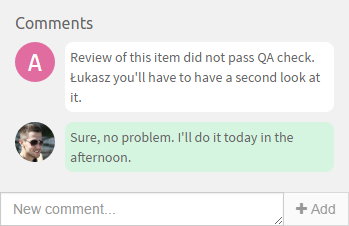
15.9. Read Only Mode for batches
It can happen that reviewer will be presented with the following notification:
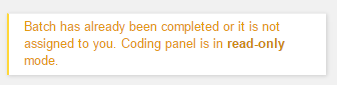
This prevents some potential mistakes by reviewers who could modify batch which is already completed or belongs to someone else. This message will be presented to reviewers if one of these four conditions is fulfilled:
-
batch is unassigned
-
batch is assigned to some other reviewer
-
batch has either COMPLETED or ARCHIVED status
-
batch has been DELETED while someone was reviewing it
15.10. Keyboard shortcuts
Coding View supports several keyboard accelerators which allows to review items faster. To see them, please press "SHIFT + ?" while in Coding View.
15.11. Best practices
-
Validate your workflow of using Batching and Coding before using it in production.
-
Prior to creating batches, make sure that the set of items that you wish to split contains everything you really need. Things you should take into account:
-
Should I include items families in my set (children, parents)?
-
Should I include conversation threads?
-
Should I or should I not include duplicates in my set?
-
Should I exclude irrelevant items?
-
Plus anything else that might be crucial for your review.
-
-
When you are sure that you have all the items that you need - create a tag for them. This might save you some valuable time if you wish to ever see what was the original result set before batches were created.
-
If you need to import any Coding Layouts to your case, do it right after you created it.
-
Do not modify Coding Layouts when they are being already used in some cases. Results of such actions are unspecified.
-
Try to avoid mixing tagging and coding. If you want your users to use Coding View, then do not simultaneously tag items manually if they are a part of the batch.
-
Allow experienced users to fix any potential coding mistakes manually by modifying tags.
-
Set up appropriate roles and permissions to keep reviewers duties separable. Giving too much power (like unassigning batches) to junior reviewers can hurt your process.
-
Whenever possible avoid changing batch assignee too often. This is allowed for cases when user cannot further proceed with batch and it has to be released for others to carry on the review.
-
Advice your reviewers to work with at most one batch at a time. That will allow you to track the progress better and avoid other workflow issues.
-
Be aware that using "CANNOT SEE TAGGED ITEMS" together with Batching and Coding is not supported yet. Do not rely on cooperation of these two features.
15.12. Advanced topics
15.12.1. Re-using Coding Layouts in other cases
Coding Layouts are stored globally in Intella Home folder and may be optionally reused between multiple cases. You can control if layout should be shared when creating it in Preferences window. Note that since Coding Fields are closely tied to the Tags model (which is specific to each case), one must perform one additional step to reuse a layout created in a different case. This step is called "Importing". Coding Editor and the batch creation process will instruct you if layout needs to be imported. This is illustrated below:
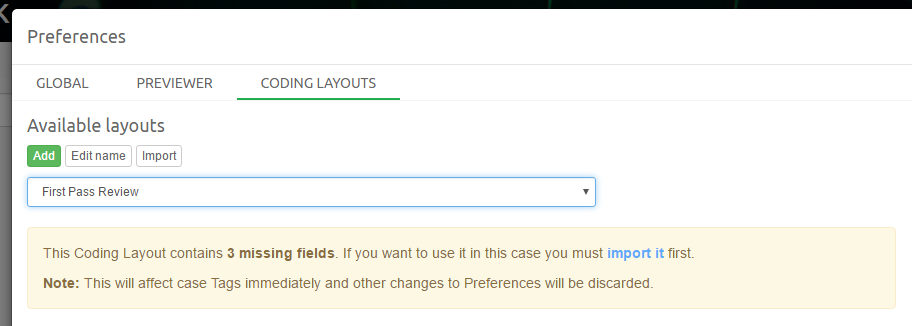
When user presses the Import button or "import it" link then Intella Connect will read fields from the selected Coding Layout and create appropriate tags in the current case. From now on this Coding Layout can be used like if it were created for this case.
|
After importing Coding Layout we recommend checking if the tags structure was correctly created. |
15.12.2. Default Coding Layout
While creating batches one must always specify a Coding Layout. However, there is one special layout called "Default". This one is automatically generated on the fly and it always contains fields mapped to all tags created in the current case. None of these fields are required.
15.12.3. Computing batch progress
Batch progress is initially computed based on the state of taggings applied to items. Therefore it might happen that the batch is already showing some progress right after it has been created. That is deliberate behavior, as it sometimes might happen that part of the review was already done prior to batches creation. Appropriate setting in batch creation dialog allows to suppress this initial calculation.
After batches have been created batch progress recalculation happens only after item is coded or when user invokes "Recalculate progress" action. So if tags were applied externally (via regular Previewer or Search View) then Coding Panel will reflect these changes, however batch progress will not pick this up automatically.
16. Predictive Coding
16.1. Introduction
16.1.1. What is Predictive Coding?
In order to understand Predictive Coding it seems justified to answer what Coding is in the first place.
Coding is the process of applying Tags to Items, using a pre-defined set of UI controls (a.k.a. Coding Layout). In most cases coding is performed to separate important items (usually called Responsive or Relevant) from the ones that are not important for your case (Non-Responsive or Not-Relevant).
Predictive Coding is a process in which Intella Connect analyzes how human reviewers code items. This lets it detect patterns common between Relevant items. It will then start pushing items likely to be Relevant to the case to the front of the review queue, and less likely or irrelevant items to the end of the queue. The items on which Intella Connect is uncertain remain in the middle, but over time the separation between those two categories will grow larger.
The process usually ends when the review queue no longer supplies Relevant items to the reviewer, when certain statistical criteria have been met, or when a satisfying number of Relevant items have already been identified. Intella Connect offers advanced statistics helping case managers in making that decision, but it is always up to the case manager to decide when is the right time to do so.
16.1.2. Benefits
There are many benefits of using Predictive Coding, comparing to other possible types of reviews.
The biggest advantages are cutting down on time and cost related to reviewing of all items in your dataset. Very often only small portion of items is Relevant for the case (ex. 8%, 10%, 15%, etc.), so it seems natural to employ some processes that would help to ignore or filter out Non-Relevant items from review. Predictive Coding helps you to do that by prioritizing and focusing the review on finding Relevant items first, allowing for the items of less interest to be ignored.
Predictive Coding can also help to identify and fix inconsistencies in coding decision applied to items. For example, if an item is scored very high by the engine, yet it was coded as Non-Relevant it may indicate that reviewer has made a mistake, either unintentionally (ex. clicked the wrong button) or his notion of responsiveness for that case is incorrect. In that sense Predictive Coding engine works like an independent arbiter, which may improve the overall quality of your review.
Predictive Coding can also be beneficial if you need to code new data set, ingested to the case just prior to the deadline. If the volume is too large to be handled by human reviewers, you could use Predictive Coding to train the engine using existing coding decisions and then reapply that knowledge to the new data.
16.1.3. When to use it?
Predictive Coding is an ideal solution for eDiscovery projects, where statistical significance matters. Although it hasn’t been created to find the "smoking gun", to some extent it could also do well in more forensic type of investigations.
It can be used on any case created with Intella or Intella Connect (older cases may need to be re-indexed, more details is provided later) that contains some textual content. Therefore it will work on documents, emails, OCRed images (like scanned documents), SMS messages, chats, etc.
Engine uses advanced language and text processing techniques to understand the contents of a document and then it tries to find patterns similar among Relevant items. Therefore it will work the best on items where certain terms, their combinations, co-occurrence contributes to relevancy.
Since those advanced processing techniques demand high computational power, running Predictive Coding on larger sets may be limited and will certainly require more culling and care. Read the rest of this manual for more details.
16.1.4. When to avoid?
As state before, avoid running one large Predictive Coding review on very large datasets. This is especially true if the expected or measured prevalence is low (< 5%). Low prevalence may not be a problem if Relevant and Non-Relevant items can be easily distinguished, but if relevancy is based on subtle nuances in how words were used, then the engine may have difficulties in separating those categories if the number of Relevant samples is low.
16.1.5. Can I trust its predictions?
It is never a subject of trust, but rather a careful analysis. The tool is giving you many statistical metrics, which should aid with making that decision.
The best case scenario is that it learns how to separate items quickly and will allow you to automatically code non-reviewed items with perfect accuracy. The worst case scenario is that the engine will appear to make random decisions on relevancy and that it never learns anything valuable. Statistical analysis (including a so-called Elusion Test) can help you to meet certain crucial criteria, with an acceptable level of confidence.
16.1.6. Comparison to a linear review
The most typical kind of review in eDiscovery projects is the linear review. Documents are being reviewed one after another, usually in chronological order, until all of them have been designated responsive or non-responsive.
This approach works well if you have small set of items, excessive time to finish your project, sufficiently large team of reviewers or you need to guarantee that every item in your set has been seen by a human. In practice this is rarely the case. Despite that, Intella Connect contains all the features needed for running a successful linear review project.
Since usually cases contain small amount of responsive items, an obvious downside of the linear review is that often reviewer will get to see many non-responsive items in a row before seeing any item of true significance. This is clearly not efficient way of reviewing large quantities of items, therefore a need for a more elegant workflow emerges.
Predictive Coding can help you to drive your project to success by optimizing the queue of items presented to reviewer, so that he gets to see items likely being more relevant sooner. It can also help you to finish your review faster when operating under limited time or strict deadlines.
16.1.7. Comparison to a batch review
Batch review is an extension of the concept of a linear review. Instead of all reviewers having access to one shared queue of items, each one of them is assigned with a smaller subset of this queue called a batch. Batches are created by the eDiscovery software and each one has an independent lifecycle. When the review of all batches has been completed, then the entire review is considered finished. Intella Connect contains all the features needed for running a successful batch review project.
Batch review is usually a faster and much more reviewer friendly way to handle your project. By dividing review into smaller batches you get all the psychological benefits of solving few smaller problems instead of a single large one. You also have a finer control over parts of the review.
However, batch review is still not ideal solution when it comes to efficiency, as there may be batches that contain hardly any relevant items and they still need to be reviewed entirely before one can consider them complete.
You may also run into problems if different reviewers having different concepts of what relevancy truly means. This may lead to a situation where coding decisions are inconsistent and more frequent situations where a senior reviewer needs to step in.
Once again, the Predictive Coding can help you to put the focus on likely relevant documents first, saving the time and improving the efficiency of the review in its early stages. The engine should also be immune to small mistakes in coding decisions applied by different reviewers, helping you to identify and fix coding mistakes early.
16.1.8. Using PC on existing cases to understand how it works
By newcomers the Predictive Coding engine is often considered being a magic black box, thus not completely trustworthy. On top of that - it is a complex, state-of-the-art, Artificial Intelligence mechanism, driven by human input and data, both of which change from case to case. Therefore we recommend learning how it works by testing it on existing cases first. This should eliminate the problem of potential initial lack of trust, help to learn the processes, advantages and its limitations. Follow the instructions below to make this process as safe and efficient as possible.
|
It’s recommended to read the rest of this guide before you start. |
-
Back up your case. Theoretically it is not required, but it’s a good precaution.
-
Reindex your case with Intella 2.4 or on Intella Node 2.4. This is required to enable the faster versions of algorithms used by the engine.
-
Create new coding layout which will have "PC - Responsiveness" field containing two radio options: "Responsive" and "Non-Responsive".
-
Open your case and find items which were reviewed by human reviewers before. This will be our review baseline for the test.
-
Cull this dataset down, as explained in "Data preparation" section of this manual.
-
Select roughly 1000 items in this set and tag them as "Review 1k".
-
Create review as described in "Creating a review" section of this manual. Make sure that the advanced option which allows the model to learn based on existing tags remains disabled.
-
Once review is created, start reviewing items one-by-one in the reviewing console. Get familiar with the user interface. Code items presented to you by the engine (your original tags will be a nice hint helping to do it quickly).
-
Occasionally verify produced charts and statistics.
-
When the time is right, run Elusion test and proceed with completion of the review or continue, based on its result.
-
Assess the final result and compare it with the outcome of human review. Things which you should take into consideration:
-
Are the decisions made by the engine in line with the ones made by human reviewers?
-
How far into the review the engine has started producing valuable items?
-
How far into the review the engine has stabilized enough and started showing only non-relevant items?
-
Can the disagreements be explained by reviewers' mistakes or inconsistency?
-
-
Go back to step 6 and extend the review with another 1000 items. See how it affects your server’s performance and the time needed to prepare the review and train the engine.
This experiment can and should be repeated on different cases, where different notion of relevancy is present. If you find that the model has not learnt well enough, you can try using the "more accurate" version of the algorithm. This, along with scenarios which describe how to assess the quality of your model, is described in the rest of this document.
16.1.9. Sending feedback
It was mentioned already that the success of the Predictive Coding review will depend on the data you run it on. The engine will self-tune itself to give you the best possible results in a reasonable period of time. That being said, there may be cases where it doesn’t learn well enough.
It is important to Vound to work on extending the quality and performance of this tool and for that to happen we will need to receive a lot of feedback from our clients. Please stay engaged on our official Support Portal as well as Community Forum. Let us know if your tests were successful, what limitations you run into and what more features and extension you need.
16.2. Successful PC review workflow
16.2.1. Review lifecycle
Each Predictive Coding project goes through different lifecycle phases. Concretely:
-
Data preparation – to cull down the review baseline to minimum
-
New review – when the review preparation is finished
-
Initial learning – when the engine looks for best items to kick-start the learning process
-
Active learning – when the engine is providing reviewers with items having highest relevancy score
-
Elusion test – when the user suspects that the engine is trained well enough and wants to assess its quality
-
Elusion test completed – when the user decides that the quality is acceptable
-
Completed – when the engine’s predictions are applied to the unseen items
The full workflow along with different transitions possible between phases is illustrated on the picture below:
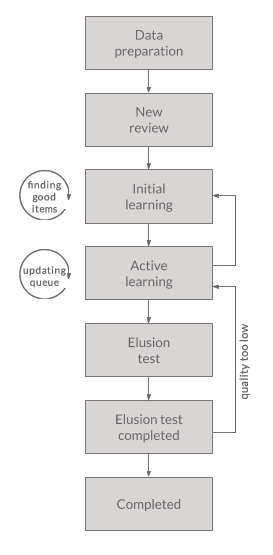
16.2.2. Data preparation
At certain stage in every project, there is a time to identify items which will require human review and coding. In a typical eDiscovery case this is the outcome of various filtering/culling procedures which vary on case-by-case basis and are outside of the scope of this guide.
In order to achieve success in Predictive Coding project one needs to take further actions to filter and prepare the data.
Although the Predictive Coding engine is designed to self-recover whenever it can, we cannot stress enough how important it is to be thorough with this filtering, as the more harmful documents end up in your review set, the more it can affect the quality of results or the time it takes to process them.
It might seem that this would require a lot of manual labor at first, but Intella Connect has many useful features which could expedite this process (like Faceted search, fast Previewer, various item specific fields, etc.).
Rule 1: exclude non-textual content
The first step should be exclusion of all items, which do not have valuable textual content. This includes both items which do not have textual content at all (for example: images, empty documents, archives, binary files, etc.) as well as documents that are not well suited for language processing (for example: spreadsheets, HTML or XML files, CSV files, source code, etc.). A rule of thumb is – if a document contains large quantity of text terms (words) that seem like a "noise" and you feel like you wouldn’t be able point any of those terms to be relevant to you, then likely this item (and similar) should be suppressed from the Predictive Coding review.
Rule 2: exclude items which are too big or complicated
We advise to scan your data and identify items which are very large documents or may be small in size but contain a lot of textual content. Such items can be usually quickly reviewed manually outside of the Predictive Coding review, but would generate a lot of extra work to the engine, if included.
Obviously how complicated an item is can be hard to judge and depends on the nature of data in your review. To get some intuition of how this works, think what time would it take to you to compare each sentence from particular document to every other sentence in the rest of documents. But sometimes just having a quick look at the name or header of the document could already tell you that it won’t be relevant in a particular case.
Rule 3: suppress other items in families
If you can, make sure that your review baseline contains only items which themselves may be responsive. If you later want to expand the scope of those items to families, it is best to accommodate this in a flow outside of Predictive Coding.
16.2.3. Creating a review
Once you have prepared your dataset according to instructions from the previous chapter, you can now create a new review by selecting your items and clicking on Predictive Coding button located next to Create Export button.
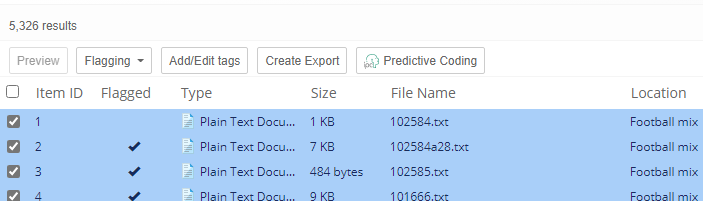
You can also invoke this action by right clicking on your selection in items table and selecting Predictive Coding from the contextual menu.
|
You need to be assigned with 'Can run Predictive Coding' permission in order to see those buttons and create reviews. |
The following dialog will appear.
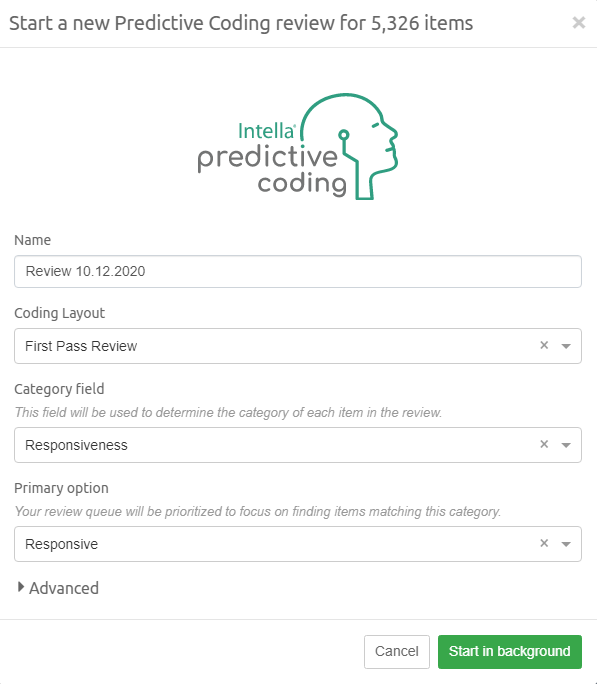
Required fields:
-
Name - the unique name this Predictive Coding review will be identified with
-
Coding Layout - the name of the coding layout you would like to be displayed in the review console.
-
Category field - the engine will use that field to categorized items in your review. It should have only two possible options. Available fields will be populated with using coding layout selected previously.
-
Primary option - option selected here will be considered as the category of your prime interest (ie. items of your interest; usually "Relevant"). It is important to select the right option here, as the entire review will be optimized to find items later coded with this option.
You can also configure the engine using following advanced settings:
-
Algorithm - allows to select one of two available algorithms. One is considered faster, but less precise. Reviews using the other one may have better quality, but they are three times as expensive to prepare and evaluate. You can read more about those in later chapters.
-
Max CPU cores - defines a limit of how many processor cores may be used during learning of the model. You can read more about performance in later chapters.
-
Use existing tags to teach the model - if you leave this option selected, then the engine will use existing tags assigned to items to train the model, skipping the "Initial learning" and going straight to the "Active learning" phase. Using this option with a handful of correctly coded items can expedite the learning process to a great extent.
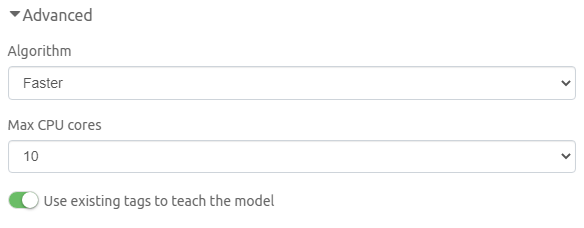
Once you press Start in background button, the Predictive Coding engine will prepare your review as well as create and persist the model which will be responsible for making future relevancy predictions.
|
This operation is very resource intensive and requires a considerable amount of processing power (CPU, RAM and disk). Details are provided in following chapters. |
|
Most of the settings used during creation of a review cannot be changed later. |
|
If choosing the |
You can track the progress of your review being created under Review > Predictive Coding view, as well as in Preferences > Background Tasks view. Both are illustrated below:


After the initial processing has been completed, a new panel in Review > Predictive Coding view will appear representing the newly created Review and informing you about its current state:
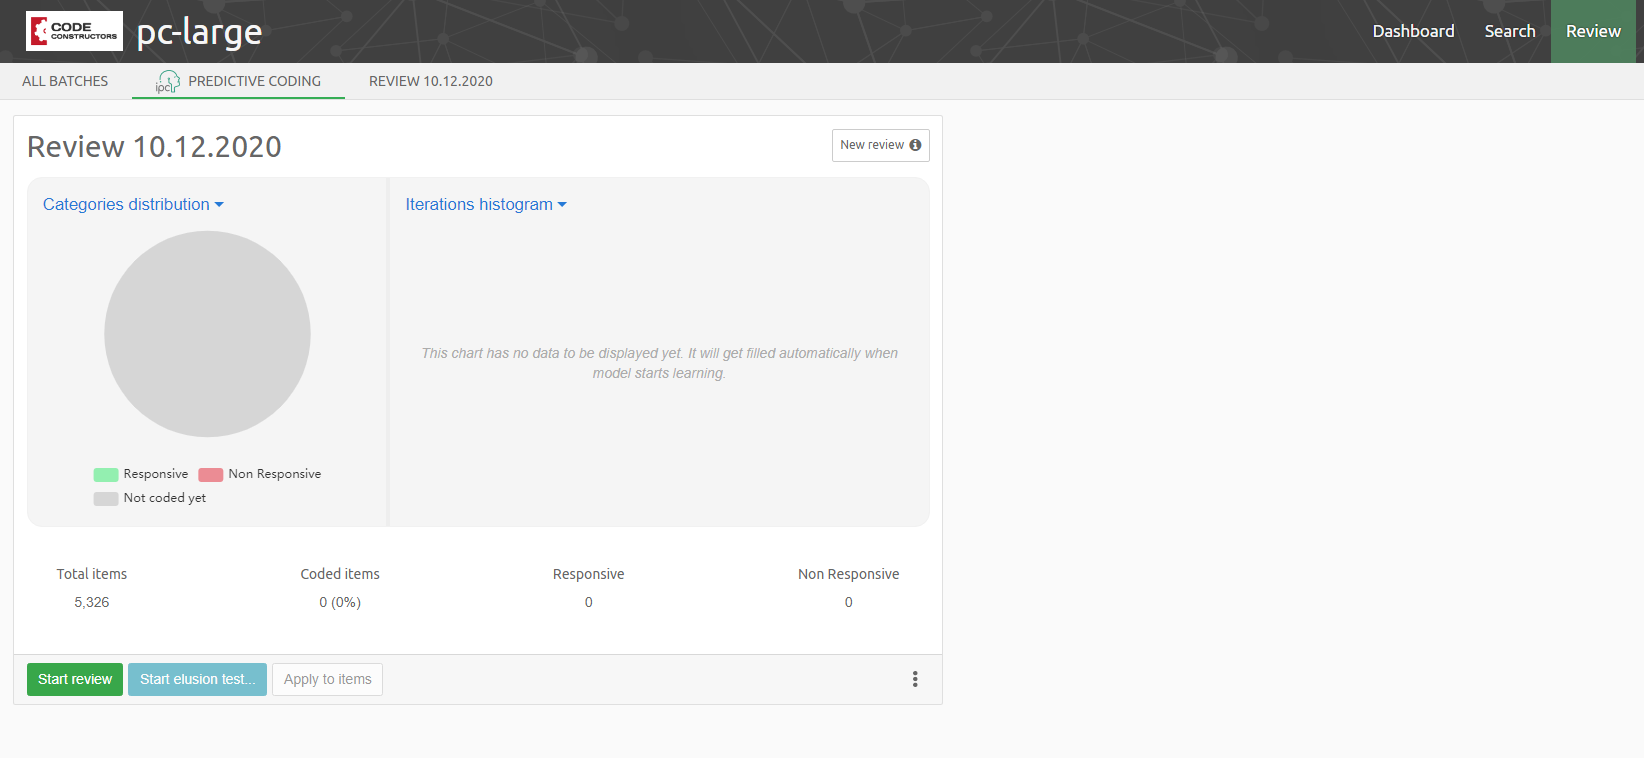
Each panel for an ongoing review contains the following information:
-
Review name - the name you assigned while creating the review
-
Current phase of the review lifecycle ("New review" in the upper right corner) - when clicked, this button will open a modal window showing you "Predictive Coding quick reference". This is meant to be an easily accessible documentation handy when learning how Predictive Coding works.
-
Two configurable charts - these charts show some essential information about the state of the review. They will be filled with data while review is under way.
-
Total items - shows the total number of items for which this review was created
-
Coded items - shows how many items have been coded in this review. This number includes the coding decisions made by human reviewers, as well as predictions applied by the engine when review has been completed.
-
Responsive (note: this field will match the Primary option which you selected when creating the review) - shows how many of coded items have been designated to be "Responsive"
-
Non Responsive (note: this field will match the opposite option to Primary option) - shows how many of coded items have been designated to be "Non Responsive"
In the panel’s footer one can see the following four buttons:
-
Start review / Continue review / Continue elusion test / Browse - this button allows you to access console for this review. Depending on the phase of the lifecycle it will render different labels, which makes it more intuitive what it actually does.
-
Start elusion test… / Finish elusion test… - this button allows you to start and finish elusion test. You can read more about elusion test in following chapters. The button will be disabled if action is not available at this phase of the lifecycle.
-
Apply to items - Allows applying model’s predictions to the unseen (not coded) portion of the review queue. The button will be disabled if action is not available at this phase of the lifecycle.
-
More (icon with vertical dots) - gives you access to additional actions:
-
Statistics - shows advanced statistics from the last iteration of training of the model associated with this review
-
Export CSV - exports the contents of the review queue (along with relevancy score and engine predictions) to a CSV file. This can be a lengthy process, depending on the items count.
-
Delete - permanently deletes the review from disk. After that action is confirmed and completed, there is no possibility to recover deleted review. The tags assigned to items in this process are never deleted though (so it does not behave like an undo operation).
-
|
In order to be able to delete Predictive Coding review, one has to have 'Can delete Predictive Coding reviews' permission. |
16.2.4. Reviewing items
After a new review has been created, every reviewer can join it by clicking on Start review button or by selecting the review in secondary navigation tabs in the application header.
The review console should already be familiar to any Intella Connect user, who has previously used Batching & Coding UI. It is illustrated on the picture below:
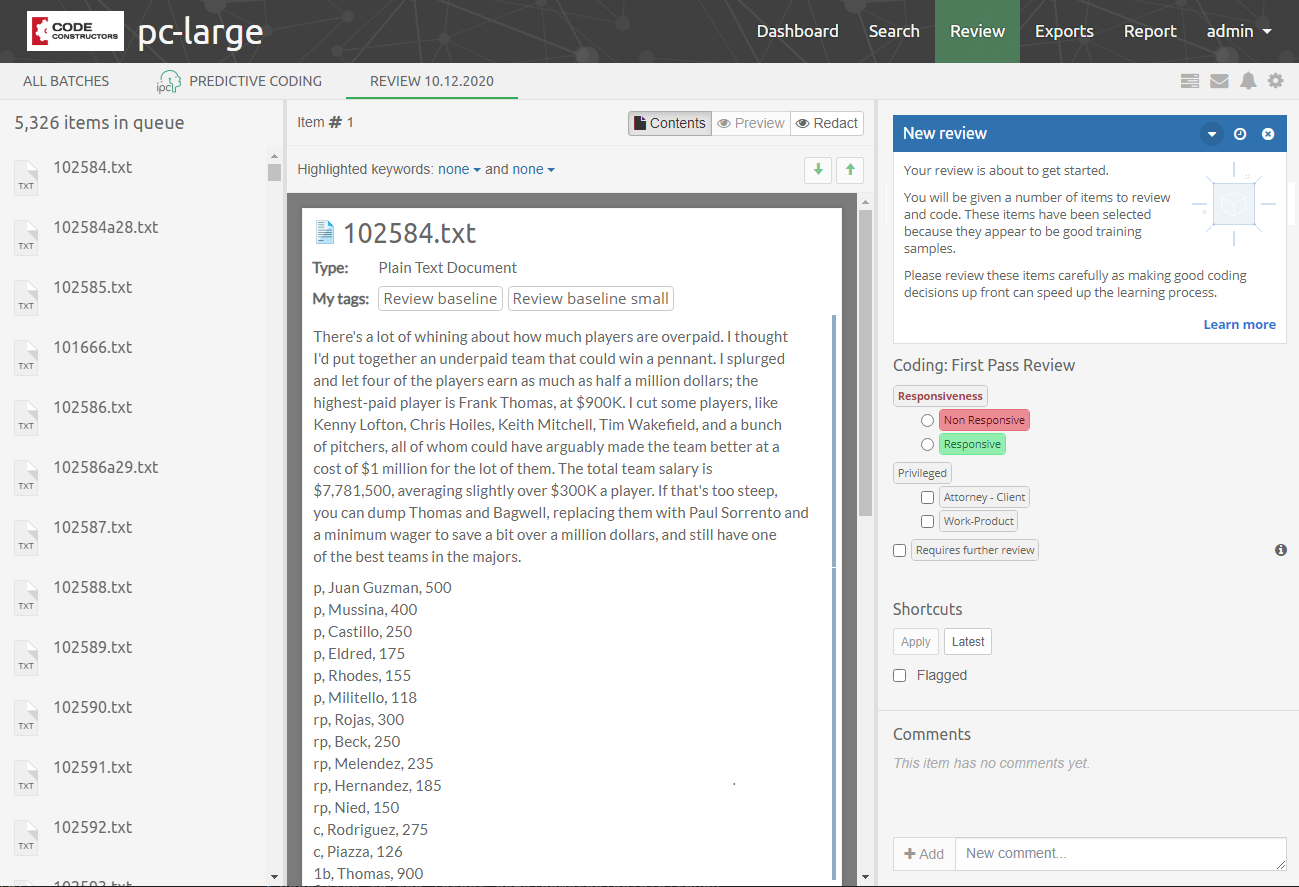
Although the UIs for the batch & Predictive Coding reviews are similar, there are few subtle differences worth pointing out.
Review queue on the left side is much more dynamic and allows for free navigation between items. It will be updated more often, when the model is changing relevancy scores for items or when other reviewers are coding items in the same review. The engine keeps track of which item is currently being reviewed by someone else, so it makes sure that the same item will not be presented to two reviewers. It will also render coding swatches, showing what kind of decision has been applied to an item. See an example below, where first item has been coded as Non Responsive and the second as Responsive:
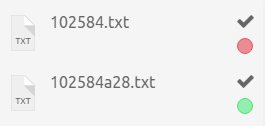
On the right hand side, above the coding layout, there is a panel which renders the current state of the review. It offers some brief explanation of what you may expect at this stage of the review. That panel can also be collapsed, hidden or snoozed. Snoozing will hide it temporarily until the model changes its phase again.
The rest of that panel, including how to apply coding decisions, work the same way as with Batching & Coding functionality, so feel free to read that section for more details.
After the very first item in the review has been coded, the model will change its phase to Initial learning.
16.2.5. Initial learning
As soon as the first item in the review queue is coded, our model starts meandering through the items space. It will present you items that are significantly different from one another and ask you to code them. If you find any relevant items, it will try to focus its search around those items as they are the most valuable learning material for the future.
It is worth mentioning that it is perfectly acceptable to see many Non-Relevant items at this point, as it highly depends on the ratio of relevant items in your case. However, there is already much more going on than just selecting random items for review. You get the benefits of artificial intelligence soon after the very first item has been reviewed.
After you have coded the 10th item, the first iteration of the learning process will take place. The model will self-assess if it already can give you any items that are likely to be Relevant. If it can - it will move to the next stage of the review. If not, then it may remain in Initial learning state for a few iterations.
16.2.6. Active learning
Typical flow
In this stage, the model evaluates all items in the review queue and will score them individually according to the knowledge inferred from previous coding decisions. Then, it sorts those items in descending order of predicted relevance, putting the ones scored the highest at the front of the queue. This is illustrated on the picture below:
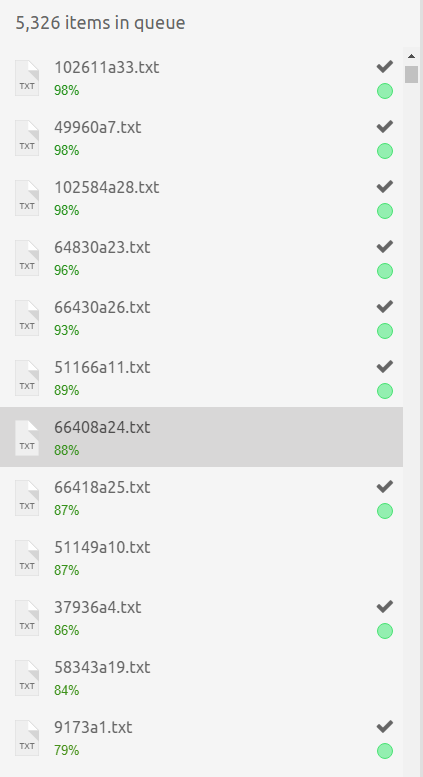
Then it asks you to code items from the front of the queue. Those have the highest probability of being relevant, so you should now start to see the value of using the Predictive Coding engine. Instead of reviewing random items, your queue is now optimized to find the most relevant items first.
The percentage score presented below item’s name indicates how certain the engine is that this particular item belongs to the primary category you selected for this review. Since this is typically Relevant then we are calling it Relevancy score. The lower this value gets, the more reddish the color will be used to render it.
Keep in mind that you can still see non-relevant items at the front of the queue. This is normal, as this is an iterative process and it may take several iterations until the model knows how to best separate relevant from non-relevant items. The more iterations you go through, the better it will get.
After a certain amount of items have been coded, the next iteration will start and the model will once again update your review queue. Over time you should see that the gap between the scores of the relevant and non-relevant items grows larger with each iteration. This is an indication that the model is getting better at separating these two categories.
If at some point in time the model goes back to the Initial learning stage, that is an indication that it cannot properly distinguish between relevant and non-relevant items based on the human coding decisions that it has analyzed.
Knowing when to stop
There is never a clear sign as to when to stop the review when it is in the learning stage, but there are a few indications when it may be wise to do it:
-
The model starts to present less and less relevant items in each iteration.
-
The gap in the scores assigned by the model is large (ex. the score of the last relevant item is 70% and for the first non-relevant item is 20%).
-
Model statistics are considered good on adequate number of items already coded.
-
You’ve achieved the desired recall level (Elusion test can be used for this)
-
You’ve met other metrics set for your project, e.g. allowed time.
When case manager decides that the time is right, he should move to the next stage of the process - Elusion Test.
Single vs multi reviewer
In the first release of Predictive Coding the review console has been adjusted to accommodate the fact that many reviewers may join the same review. It will make sure that users are not given the same item to review, but it doesn’t prohibit them to navigate the queue at will, effectively allowing to potentially "steal" an item which was assigned to someone else.
It should work well for small number of reviewers (1-5), but it certainly won’t be ideal for efficient cooperation of larger teams. In future releases we may change how it works so that each reviewer gets an independent queue of items to review.
16.2.7. Elusion test
What is an elusion test?
An Elusion Test is a process in which you verify how many relevant items are still left in the previously unseen (not coded) items space.
The elusion test will take a random sample of the non-coded items and will ask you to review them using the standard review UI. Once that is done, it will measure and estimate how many relevant items could potentially be left in the set of non-coded items. Based on this statistic, you can opt to either continue the review (go back to active learning) or accept the model.
A common misconception is that elusion test helps you to guarantee that the model is of good quality. In practice, this is not the case. Even if the model has a perfect accuracy and a high recall on a training set, the result of an elusion test can show that expected recall in a given case is anything between 40%-100%. Such situation can be easily explained by one of two possible reasons: either you haven’t reviewed too many items yet, or the fixed elusion sample was too small. So even that the model might have been perfect, the result is not clearly defensible yet. A very simplistic rule to remember is that elusion test outcome is driven by at least those three factors:
-
How far are you into the review (ie. How many items were already coded by human [ultimate truth])
-
How good the model is.
-
How large was the elusion test size (ie. How many random items you reviewed during elusion test)
The complex statistics governing the outcome of elusion test have been simplified in Intella Connect, so that it’s easier for you to understand how to adjust it to match the goals of your project.
Why do I need to run it?
An elusion test protects you against blind spots in the model. A low amount of relevant items in the last iterations may simply be due to the Predictive Coding not having seen a particular subtype of relevant documents yet. The elusion test will ensure that these are not overlooked.
Running elusion test
The only strong requirement for running an elusion test is that the model must be in Active learning phase. The button will remain disabled if that is not the case.
However, running an elusion test at the very early stage of the review is not advised as well. There is simply no sense in doing this at this point. It is wise to wait until a considerable amount of items have already been coded, the model was presenting you with relevant items and stopped doing so and the relevancy score shows a gap between items. In short - start elusion test when you get a feeling that the remaining review might not produce many relevant items anymore.
You initiate the action by pressing Start elusion test… button on the panel showing ongoing review. The following dialog will appear:
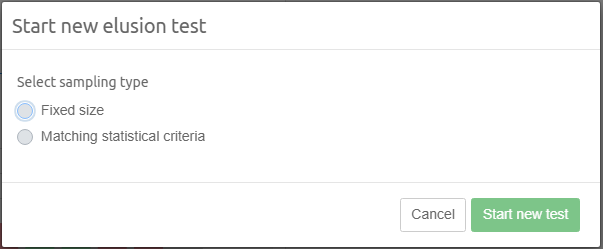
The first step is to select one of two sampling types. This will determine how large the elusion test size will be.
When selecting fixed size, you can provide the actual number yourself. You can use that option to get acquainted with the elusion test flow, or do occasional checkups of the unseen portion of the queue every few iterations. For final elusion test, it’s recommended to base the size on statistical criteria.
Selecting the second option will cause two more sliders to appear:
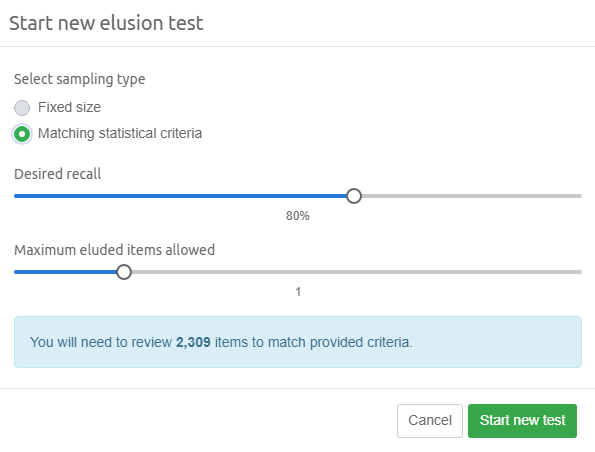
Desired recall helps you to set the minimum recall for items matching Relevant (the primary option). The larger value you provide, the more items you will be asked to test. You should set this at least to the minimum recall you think is defensible for your project.
Maximum eluded items allowed tells the engine you how many Relevant items you would allow to be found during your elusion test. A perfect Predictive Coding model would make no mistakes so this value would be zero. However, in a real world projects achieving perfect accuracy is rarely the case and usually not possible, so some mistakes are to be expected. If you set this value a bit higher, then this states that even if you find that many Relevant items (or less) during elusion test, then you will still meet the minimum recall criteria set before. Obviously, lowering this value will cause the elusion test size to shrink, but if you find too many Relevant items then the test will never reach the minimum recall.
When you click on Start new test the following set of thing change:
-
Continue review button on the review panel changes to Continue elusion test
-
The queue of items in review console gets populated with items randomly taken from the unseen (not coded) part of original review queue. The total amount of items is equal to the size you set in the modal dialog before.
-
The phase of the review changes to Elusion test.
Reviewers should now carry on with coding items in elusion test. The statistics of that part are gathered in background and will be presented to the user once all items gets coded.
After the last item in elusion test has been coded, the reviewer will be informed about this fact and offered redirection back to Predictive Coding reviews list.

Elusion test statistics
After an elusion test is completed, one can click on Finish elusion test… button to evaluate its statistics. The following dialog will appear:
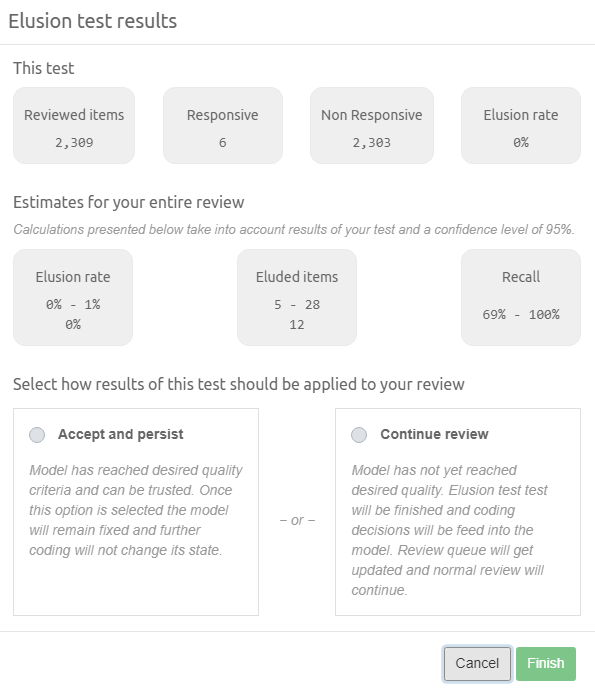
Three main sections can be identified:
In first section you will find all important information about how items got coded during elusion test and how big that test was. The last statistics, the elusion rate, is a percent ratio between coded items and all items in this test.
Based on those results, we can calculate point estimates and ranges for other important statistics for your entire review. All take into account a confidence level of 95% calculated for Wilson Score Interval.
The first one is Elusion rate. The value in the lower line shows the same elusion rate we described before, it’s repeated here for convenience. The range displayed above shows you a range of expected elusion rate in the rest of unseen items. The example we use here shows a range of <0%, 1%> which is very low.
The next box of statistics shows to how many items these percentages would translate to. You can expect anything between 5 and 28 Relevant items to be missed in this example, with our point estimate being 12.
The last statistics is the most important one – it shows you how large recall you can expect in your case. Remember that in this example we set our elusion test to aim for 80% recall with maximum of 1 eluded item expected to be found. We actually found 6 instead of 1, so we failed to meet our minimum recall range as the lower range is 69%. If we were unlucky and the random sampling yielded more Relevant items by accident, then there is some chance that we could still produce a higher recall (up to 100%, which is the upper range). However these statistical calculations clearly show, that 69% lower bound is too risky and in this example you failed to meet your elusion test criteria. You should continue your review.
Here is how it would look like if we found 1 eluded item, just like we were hoping for:
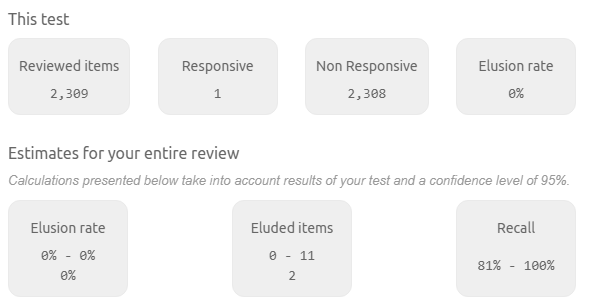
Elusion rate is close to zero (standard arithmetical rounding), which means we can expect maximum of 11 eluded items with 2 being our point estimate. This translates to expected recall being in range of <81%, 100%>. The lower bound is higher than our initial criteria, so we can accept our model as it is statistically sound.
The last section of this dialog requires you to make a decision as to how proceed with the review.
Accepting the results
If you decide to accept the model in its current shape, then the model will get into a fixed state where it can no longer alter the knowledge it has internally built thus far. The review will get into "Model accepted" phase and no further coding will be possible using the coding form in the review console. Reviewers can only browse the review queue or apply model predictions to the unseen items (see next chapters).
Rejecting the results
If you opt to continue the review, we will take the items coded in the elusion test and combine that knowledge with the model to learn new information about your items. A next iteration of learning will occur and you will go back to the Active learning phase.
It is completely acceptable to run several elusion tests this way, until you get the level of quality that meets your requirements.
16.2.8. Applying predictions and finishing review
Once the model is accepted and its state cannot be changed, another option in the UI will unlock - you will be able to apply the model’s predictions to the remainder of the review queue.
Applying the model to non-coded items is a pretty straightforward process. Since our model can tell us the relevancy score of each item in that pile, your job is to indicate what the threshold value is above which we qualify everything as relevant, and below which we qualify items as non-relevant. The UI built for this will help you to select the right value and explain the resulting item counts. See the picture below:
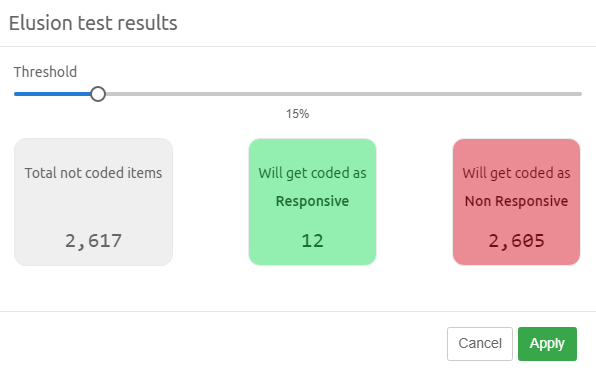
In this example 12 items had a relevancy score higher than 15% and 2, 605 were below it.
After you click Apply all codings will be applied and the review is Completed.
16.3. Defensibility
Given the nature of eDiscovery, adherence to the principles of Rule 26(g) is critical at every step of the process when technology-assisted review is used to discover the relevant documents from a case.
The Rule 26(g) requires from the counsel to exercise greater care in the collection of ESI. Consequently, the reasonable search and inquiry standard of the Rule will require counsel to evaluate both the effectiveness and the associated proportionality considerations of the review techniques before certifying the results of a TAR.
To ensure that a statistical validation protocol meets counsel’s duty of reasonable inquiry, there are two factors that need to be considered. First factor for consideration is the measure that will be evaluated, e.g. Recall and Elusion. The second factor for consideration is the extent to which the sample can be considered as representative of the entire collection - which is reflected in the confidence level and confidence interval associated with the sample.
In this application these two factors are implemented as important information and factors as critical to demonstrating whether a reasonable search was conducted under Rule 26(g). To proof reasonable search, we use these two factors to calculate estimate Recall. For this has been implemented Elusion test which estimate of the number of relevant documents that the model missed. To determine this estimate, a statistical sample of categorized non-relevant documents is coded to find out how many relevant documents appear. If the elusion is acceptably low, the administrator justifiably ends the project, and the estimate range of Recall is calculated. If the elusion is too high, the administrator resumes review for model improvement.
16.4. Statistics
16.4.1. Charts
Categories distribution
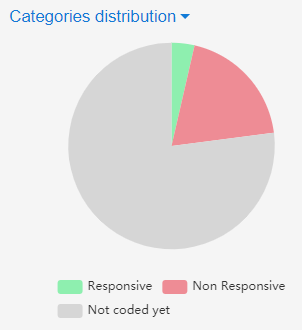
This chart presents the distribution of how items got coded in the context of this review. The gray area presents the part of the review queue which was not coded yet. After the user applies the model’s predictions to the not coded items, the chart will also show two additional categories representing model’s predictions.
Iterations histogram
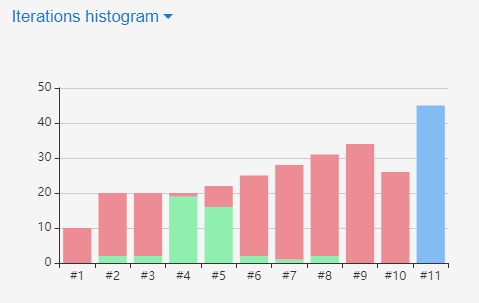
Each bar on this chart represents one learning iteration of the model, showing the relation of Responsive to Non-responsive items. The vertical axis shows how many items were coded during each iteration. That number may be different for each iteration, depending on how active your reviewers are and how long does it take to train the model. This chart will also render bluish bars to represent Elusion test conducted during the review.
Optimized queue barcode
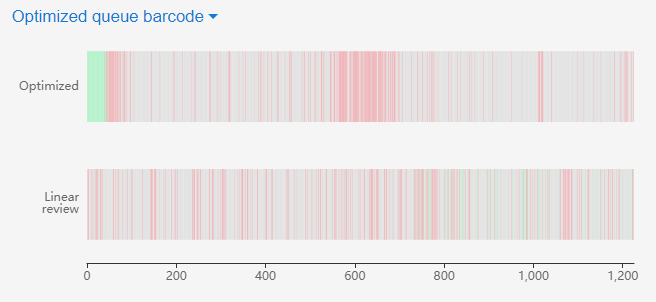
This chart allows you to compare the efficiency of a regular, linear review queue to the one optimized by Predictive Coding engine. In a linear review responsive items will likely be spread randomly across the entire chart. For an optimized review, those items will have a higher relevancy score and therefore show at the beginning of the queue.
16.4.2. Model statistics
Statistics presented here always relate to the last training performed on the model.
-
Precision - tells us that out of the results classified as Responsive by our model, how many were actually Responsive.
-
Recall - tells us the fraction of items predicted as Responsive to all items which were Responsive.
-
F1 - is a metric which takes into account both, precision and recall, and tell us about the balance that exists between those two.
-
Specificity - tells us the proportion of actual Non-responsive items that were correctly predicted as such by our model.
-
Accuracy - the ratio of correct predictions to total predictions.
-
Kappa - this ratio measures the degree of agreement between the true and predicted relevancy.
-
Error - the ration of incorrect predictions to total predictions. This is equal to: 1 - Accurracy.
16.5. Quality assurance and troubleshooting
In this chapter we will try to focus on few common scenarios when running Predictive Coding review, offering some interpretation of results.
16.5.1. Scenario: engine has learnt well
The biggest question arising during the review is always – has the model learnt well enough already? Therefore we are focusing on this one first.
As stated before, there are few indicators which may help in judging that the model is of good quality.
The first one is – the model has rather quickly moved from Initial learning to Active learning phase. It may take a few iterations to get this done (depending on the prevalence and the structure of your dataset), but it should eventually happen. If that is not the case, then the model is not even sure how to start categorizing items.
The next thing to expect is that model is starting to suggest more Relevant items, comparing to what one could expect based on the expected prevalence in this case. As an example if expected prevalence rate is around 10% then for 1000 items you should see one item every 100th being relevant (on average). If the model is giving you one every 60 then one every 40 then almost all relevant, that is a clear indication that it is learning well. Obviously, sometimes you don’t know even the expected prevalence. But the general rule should hold – the more items you code, the better the model should be in presenting Relevant items first.
A common pattern to observe is that when model is retrained, the review queue is updated and after you code an item, the engine will sometimes select an item in the top of the queue among other Relevant ones. That is a good indication that model has found some items which were not coded yet, but they have a high relevancy score and therefore should be reviewed now.
After a few iterations you should see that the front of the queue does not change that radically and majority of updates happen in the middle and bottom part of it. This is a good sign that the model is stabilizing slowly.
You will likely start getting more Non-Relevant items too. This usually means that most of the Relevant items may already be discovered. The "Iterations histogram" is a nice way to spot such patterns. See on the example below how a huge spike in Relevant items can be observed for iterations #5 and #6, then there were none found in next five:

This can be a good indication that we may have found everything which was Relevant. At this point you should scan your review queue and focus on items relevancy scores. The better the model gets, the larger the score gap between Relevant and Non-Relevant item should become. Here is an example:

As you can see the last Relevant item has a score of 81% (with its predecessors being scored as high as 92%-98%) and immediately after it we have a long list of Non-Relevant items scored 3% or less. This can be considered an ideal situation, as the there is a clear separation between those two categories of items. In most of the cases, the gap won’t be that large, but it should definitely be visible.
What if it’s not? Then it’s likely too early to talk about a well-trained model and more human review is justified.
So at this point we have established that we are no longer given anything which seems to be Relevant and also the gap seems to indicate that the model is separating categories nicely. But we may still have a large portion of items not coded yet at all. What if some "patterns" are also present there, and we were unlucky enough to miss those? In such case all items where this "pattern" can be observed could be missed, because the model hasn’t seen any of them yet. To guarantee that this doesn’t happen – we should now run the elusion test. It will make sure (with certain level of confidence) that the remaining portion of documents doesn’t have anything which would drastically change the state of our model. If that is true, you could apply the model’s predictions to the rest of the review queue.
16.5.2. Scenario: engine is struggling to learn
There are also few indicators that can help you to assess that a model is struggling to separate Relevant and Non-Relevant items.
The first warning sign can be the fact that the model constantly stays in "Initial learning" phase, despite having plenty of items coded using both categories. This is illustrated on the following picture:
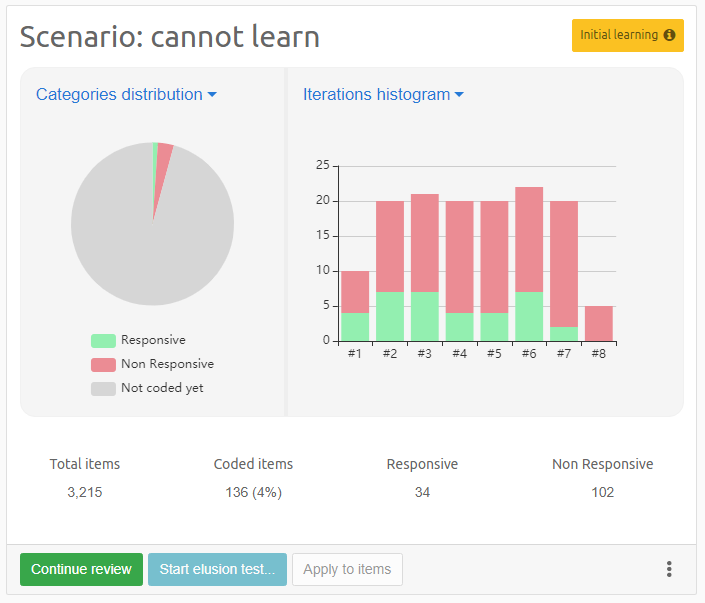
One can tell that each iteration has contributed a good mix of Relevant (34 in total) as well as Non-Relevant (102) items. Yet, the model remains in the "Initial learning" phase. Usually there are three explanations of such behavior:
-
The coding decisions were inconsistent, so the model couldn’t find any patterns identifying Relevant items.
-
Patterns representing both Relevant and Non-Relevant items are too similar so the model cannot make proper distinction between them yet.
-
Model may not have seen sufficient amount of Relevant items yet.
One potential solution of this situation may be to rely on the variant of the algorithm, which is "more accurate" (see: "Creating a review" chapter). This one is more thorough in finding subtle differences between textual structure of documents, so it may perform better. You should also check if coding decisions are applied consistently by your human reviewers. Also, you can try to adjust one of engine’s settings described in a different chapter.
Another example of a model which has not learnt well is when model reached "Active learning" stage, but you see a lot of mixed Relevant and Non-Relevant items in the front of the queue. This is illustrated below:
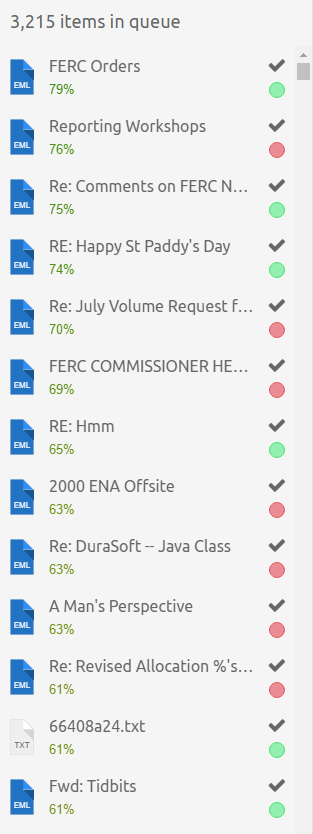
There are few other warning signs here:
-
The highest relevancy score is just 79%
-
The relevancy score drops off rapidly to 61% (and lower off the screen)
-
There is no visible gap between Relevant and Non-Relevant items (scores are spread uniformly)
-
Items with low scores (ex: 20%) were coded as Relevant by human reviewers
This situation can happen during initial few iterations and may be normal temporarily, but it should clearly not be the case further into the review.
A potential solution would be to run few more iterations to see if it starts straightening itself out, but if that’s not the case then it may be better to use more accurate algorithm or modify engine’s settings.
16.5.3. Scenario: review preparation has crashed
For now we have established two scenarios where the model is performing good or poorly in separating Relevant and Non-Relevant items, but there is also a chance it may not be created at all.
As described in the following chapters, model creation is rather complex and resource intensive operation. Therefore there is a risk it may fail in the preparation stage. Possible reasons are:
-
The process didn’t have enough free physical or virtual memory to complete
-
The review baseline was too big for the algorithm to handle
-
I/O or data processing issue had occurred
-
Process was killed externally
If the process has failed and you can still navigate the case, then try opening "Preferences > Background Tasks" and see if the preparation of your review is still there. If it is, it’s best to remove it from there, if the UI allows it. You can also delete the review from "Review > Predictive Coding" view, as described in earlier chapters.
|
If you don’t remove corresponding Background Task then review will be recreated when the case starts again. |
|
If you cannot remove a Background Task using the UI, you should first try to remove it from |
Most of the crashes are related to lack of hardware resources due to running Predictive Coding on sets of items which are too big for current machine to handle. In such cases there are few things you can do to troubleshoot that:
-
Make sure you followed all guides from "Data preparation" chapter.
-
Try running it on a smaller set of items.
-
Try adjusting settings.
-
Try splitting your whole review baseline into smaller chunks.
The last mentioned alternative is certainly not an ideal solution, but it may sometimes be the only choice for running Predictive Coding on larger sets.
If you run into such issues, please contact support, as your feedback may help us improve this tool in the future.
16.6. Technical description
16.6.1. How the engine is learning
Intella Predictive Coding engine is combined from state-of-the-art data processing tools and techniques, which take its origin in Machine Learning and Artificial Intelligence. It uses a unique, proprietary mechanism which extracts valuable information from cases created with Intella and Intella Connect and then builds a prediction model which is able to classify items into selected categories, based on the human input. Internally the model uses Support Vector Machine, an industry standard Machine Learning classifier to make its predictions. It is also equipped with self-tuning machinery, which tries to make this process scalable to larger sets while sustaining top level quality.
Here is the process of creating a new prediction model, in a nutshell:
-
A set of items and settings (including the algorithm) are selected by the user.
-
Based on those, appropriate filtering methods are selected.
-
For every item, a set of "features" (describing the nature of the document) is established.
-
Feature filtering occurs, leaving only the ones which match preliminary criteria.
-
To achieve better performance, feature reduction follows, simplifying features space without sacrificing its internal structure.
-
Features are transformed into a binary model, which will later be used for making predictions.
After the model has been created, it’s ready for training. The input is provided by reviewers in form of coding decisions they are applying to items. Once appropriate number of inputs is recorded, a training iteration occurs. Several parameters are evaluated and selected to fine tune the model, so that it can express the newly acquired knowledge to the best of its capabilities. Then it is persisted and used to update the review queue of items presented to the reviewer. This training-prediction process is repeated until user decides that the quality of the model is sufficient for its purposes.
As stated before, the engine will analyze the set of provided items and analyze their textual profile to select some features it thinks are the most representative. To visualize this step, one can think of a large table, where rows are items feed into the engine and the columns are features contributed by each of those items. This is illustrated below:
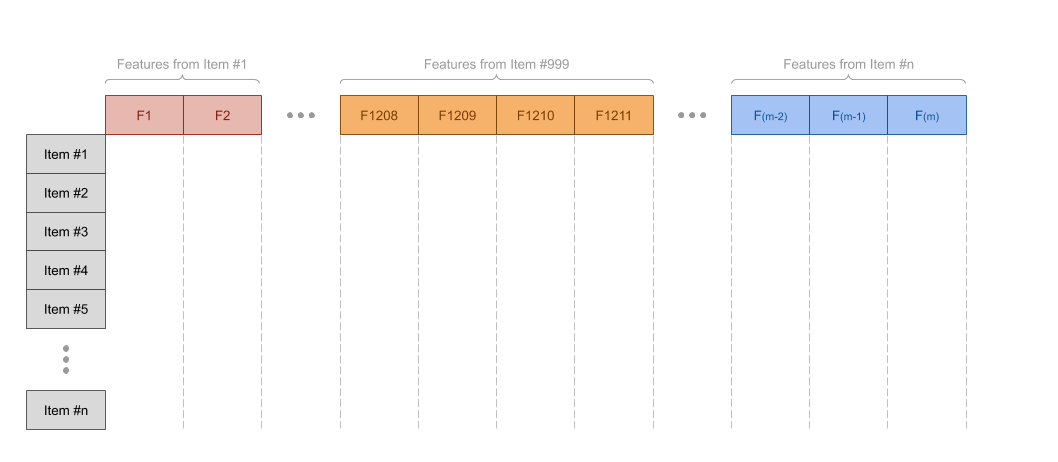
Predictive Coding engine will run sophisticated Machine Learning algorithms to discover patterns in this table and that process requires a lot of sophisticated mathematical calculations.
16.6.2. Limitations
Predictive Coding engine has been optimized so that it can self-tune itself so that it runs efficiently while not sacrificing too much of its quality. However, in its initial version there are few limitations that one has to take into account.
After understanding how features table is constructed (see the previous section for details) it should be apparent that adding another item to the Predictive Coding review makes the table grow in two dimensions:
-
New row is added (because we have a new item)
-
New columns are added (because that item contributes new features)
This is not a linear growth, as even a single item can introduce many new features, previously unknown to the model. It is especially true for large documents, or "junk items" that may accidentally slip into the review. This is also why proper culling and sanitizing of your data set is so important before the Predicting Coding review is created – it helps to eliminate a lot of features that may pollute or bloat the model.
To give you some context – our test showed that running Predictive Coding on complex documents (large PDFs and DOCs) can make the model to require 2-5 times more calculations, comparing to running this on same amount of items, all being emails of an average size.
Creation and model training will require considerable amount of hardware resources (more details are provided in following chapters) and requirements will grow with larger reviews being conducted. It should be perfectly fine to run Predictive Coding reviews of 5-10k items on a standard class PC with 20-32GBs of RAM, but scaling it up to larger sets will require more powerful machines, or longer processing times.
Taking all this into account, you may see a decrease in performance or model creation taking excessively long time, when you run Predictive Coding on larger item sets. Our test were successful on sets as large as 40.000 items, but as pointed out before this highly depends on the dataset you are processing and may require some customization through settings.
|
We appreciate if you report the results of your successful Predictive Coding reviews with us. It will allow us to improve this feature later in time. |
16.6.3. Settings and customization
Intella Predictive Coding engine can be configured with many settings, which may affect its performance and quality. Some of them are configurable directly in the User Interface, and some of them have to be set in case preferences file. Below we are providing a table covering all possible settings:
| Setting | Specified in | Default value | Description |
|---|---|---|---|
PcInitialTrainingIterationSize |
case.prefs |
10 |
Specifies how many items have to be coded first before the first training occurs. |
PcCalTrainingIterationSize |
case.prefs |
20 |
Specifies how many items have to be coded in every CAL iteration before model is retrained. |
PcTermsMinLength |
case.prefs |
4 |
Defines the minimum length of a term which can be included while creating text profile of a document. If term is longer than this value, then it will be skipped when processing. Providing large values can improve the speed of processing, but may reduce quality. |
PcTermsMinOccurrence |
case.prefs |
3 |
Specifies the frequency threshold for items which ought to be included in the model. Terms with occurrence lower than this value will be ignored from processing. If the default value is used and PcTermsMaxCount is not specified, then the value if this threshold is determined automatically. |
PcTermsMaxCount |
case.prefs |
0 |
Specifies how many total terms can be included when building the model. This will effectively cap the total terms which may be included, removing the ones which are most frequent. Lower values will improve performance but may reduce quality of the model. This capping is not used by default. |
PcDataSetSplit |
case.prefs |
0.7 |
Specifies how training and test sets should be split during SVM model training. |
PcInitialTrainingRandomness |
case.prefs |
true |
Specifies if random seeding should be used while Initial Learning phase. |
PcEngineAllowedLinearC |
case.prefs |
Defines a list of possible C values for Linear kernels in SVM model. Not used by default. |
|
PcEngineAllowedPolynomialC |
case.prefs |
0.0001,0.001,0.01,0.1,1.0,10.0,100.0,1000.0 |
Defines a list of possible C values for polynomial kernels in SVM model. Providing different values may speed up training of each iteration, but may reduce quality of the model. |
PcEngineAllowedPolynomialGamma |
case.prefs |
0.0001,0.001,0.01,0.1,1.0,10.0,100.0,1000.0 |
Defines a list of possible Gamma values for polynomial kernels in SVM model. Providing different values may speed up training of each iteration, but may reduce quality of the model. |
PcEngineReductionVariance |
case.prefs |
0.8 |
Specifies a minimum variance which must be maintained for the model, while optimizing features. Allowed range is (0,1>. Higher values will improve quality, but will increase complexity of the model and decrease performance. |
PcMaxThreadsCount |
UI (during review creation) |
6 |
Specifies how many CPU cores can be used while training the model. It does not affect creation phase of the model. |
PcMemoryMappedFilesLocation |
case.prefs |
Allows to offload memory intensive calculations to a file on disk. This may allow to process larger sets of items more efficiently, or even enable processing of sets that wouldn’t otherwise fit into physical or virtual memory. This option is disabled by default. To enable it, you must set it to a valid location on a file system, ex. "D:/tmp-files". It’s not advice to be using it, unless specified by support team, due to the fact that it may cause crashes of Java Runtime Environment, effectively killing the process sharing the case. |
16.6.4. Performance
Hardware considerations
Creation, training and evaluation of Predictive Coding models is performed on the same server which is sharing a case. Therefore it’s strongly recommended to run it on a dedicated server with good hardware specification.
It’s also important to know that when a running Predictive Coding review occupies server resources, then this may impact overall server’s performance – especially other actively shared cases. Therefore it’s best to limit creation of larger reviews to periods of low reviewers' activity.
Statistics
The time necessary to prepare Predictive Coding review will vary depending on three factors:
-
Items count
-
Data complexity
-
Hardware specification
To give you an idea how this behaves on a real data, we have prepared a table showing statistics from a real world case. These experiments were conducted on a mix of emails and documents, using default settings (including the faster version of algorithm) and running on a typical hardware: 32GB of RAM, 3.5GHz CPU, 12 cores, regular spinning disk.
| Items count | Review creation time |
|---|---|
1.000 |
29 seconds |
5.000 |
13 minutes, 53 seconds |
10.000 |
2 hours, 9 minutes |
20.000 |
2 hours, 49 minutes |
37.000 |
4 hours, 24 minutes |
50.000 |
7 hours, 47 minutes |
100.000 |
22 hours, 19 minutes |
CPU
Installed processor should support AVX and AVX2 instructions set, like most modern processors do. This improves the speed of review creation, which in most part is single threaded. Therefore review creation shouldn’t occupy more than 1 of available virtual cores, although occasionally spikes may occur.
Processor is much more heavily used during active learning, where it will use as many cores, as allowed in the UI when creating the review (see Settings section for more details). By default we allow up to TOTAL_CORES – 2 to be used in this stage.
Memory
Memory is definitely a limiting factor for how large the review can be. The most memory hungry part of the Predictive Coding is the data preparation and review creation. To do its work the process will try to claim as much memory as needed and available in the operating system. If that will not be enough, you may decide to try using Memory Mapped Files to offload some of required memory to disk. One has to be careful, though, as using Memory Mapped Files is not considered stable yet and may lead to case crashing (Operating System killing the process).
Disk
Through the process disk is not heavily used. Predictive Coding database is stored on disk in a case folder, so it’s normal to see cases getting larger when it is used. To cut down on required disk space, you may want to delete reviews which were already completed. Keep in mind, though, that this operation cannot later be undone.
When Memory Mapped Files are being used, a considerable amount of disk space may be occupied by interim files. Their size is related to the size and complexity of the dataset for which the review is being created. One must make sure that the available disk space is sufficiently large for the map to be created, otherwise the creation may crash or spill the memory into the main process.
16.6.5. Glossary
| Term | Description |
|---|---|
Coding |
Coding is a form of tagging, governed by some rules defined by the user. For example, the rule may be that an item may be tagged as Responsive or Non-responsive, but not both. |
Confidence interval |
Defines a range of plausible values of an unknown parameter, based on provided confidence level. |
Confidence level |
A confidence level refers to the percentage of all possible samples that can be expected to include the true population parameter. |
Continuous Active Learning (CAL) |
One of many forms of TAR, where the review of items is focused on finding items with highest chance of being responsive first. |
eDiscovery |
A strictly regulated, legal process aimed for discovering information stored in electronic formats. |
Elusion test |
A phase of Predictive Coding lifecycle, where the goal is to understand the quality of the current model through analysis of statistics. It also helps to find blind spots that the Predictive Coding model could miss. |
Elusion rate |
A ratio of responsive items in the non-coded part of the review. |
Iteration |
Captures the numbers of Responsive and Non-responsive items between each training of the Predictive Coding model. Elusion test is also considered an iteration, although usually it’s much larger than regular iterations. |
Model |
The model represents the knowledge (patterns) discovered by Predictive Coding engine, affecting relevancy of items in a review. It can be persisted on disk and used to make predictions of relevancy scores on items. |
Point estimation |
A single value estimated as the best guess, based on analysis of known samples. |
Predictive Coding |
One type of TAR tools, backed up by Machine Learning and Artificial Intelligence models and algorithms. It uses past coding decisions provided by human reviewers to predict relevancy and optimize the unseen portion of the review queue. |
Relevancy Score |
Represents a prediction on how likely it is that a given item is truly Responsive. |
Responsiveness |
Informs us if an item is responsive to the discovery request. |
Review queue |
All items for which review has been created. |
Tag, tagging |
Tag is a label defined by the user in order to group individual items. The process of applying a tag to an item is referred to as tagging. |
Technologically Assisted Review (TAR) |
A set of tools and techniques allowing to conduct a more efficient and accurate review, comparing to traditional methods relying on linear review. |
Training and prediction |
Both form one learning cycle (iteration) of Predictive Coding model. The input of training is formed from existing coding decisions applied to items within a review. Predictions are used to update relevancy score for all items in review and optimize the review queue. |
17. Exporting
Intella Connect supports a number of exporting formats, each focusing on a different use case.
17.1. Downloading original item
If the item has been OCRed, decrypted or has a load file image associated with it, an additional dialog may be shown when downloading that item in Details panel, Previewer or Coding panel. It will allow to select which content needs to be downloaded.
17.2. Exporting a list of results
To export a collection of items that have been returned by a query, you can use the following procedure:
-
In the Details panel, use Ctrl-click or Shift-click to select multiple items.
-
Alternatively, use the checkbox in the first column of the Details table header to select all items in the table.
-
Right-click and in the context menu choose “Create new export”.
-
Alternatively, click on the "Create Export" button in the Details table header.
This opens the Export Wizard. This wizard lets you choose the export format and its settings and start the export process.
|
Access to the original evidence files is only necessary when you want to export the original evidence files themselves and the “Cache original evidence files” option was disabled when the source was added. If access to the original evidence files is not available, then a warning message is shown in the Export Wizard when choosing export format. To change the evidence paths, see section Sources > Editing Sources in Administrator’s Manual.. |
After pressing the Start Export button in the last step, a new export
package will be created. You can manage export packages through the
Export View
.
|
When exporting a single result or a list of results, the maximum length of the file name is 120 characters on any operating system different from Windows 10. There is no limitation on the file name length when using Windows 10. |
|
Every export in Intella Connect is done by exporting selected items to a temporary directory first and then compressing it into a ZIP archive. Please refrain from previewing temporary files on file system, as this can intervene with creation of the archive. |
17.2.1. Export formats
The first wizard page lets you choose an export format:
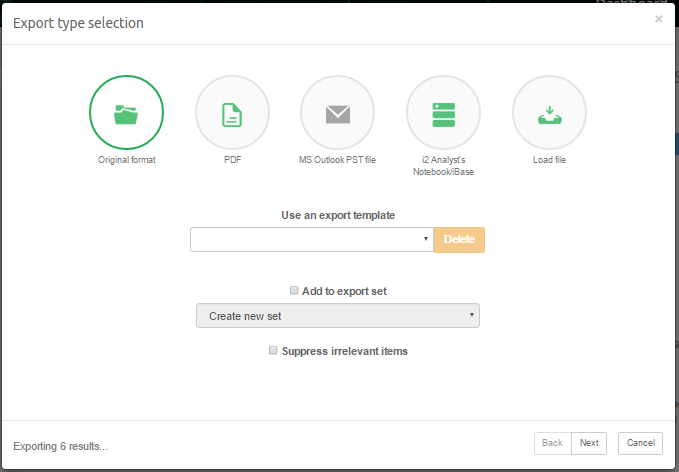
-
Original format exports a file into its original format, i.e. a Word document attached to an email is saved as a Word file. All emails from mail sources (e.g. a PST or NSF file) are exported as EML files. Emails that are already in EML, EMLX or MSG format are exported as such. All contact items from PST/OST files are exported as vCard (.vcf) files. All calendar items from PST sources are exported as iCalendar (.ics or .ical) files. The exported files can be opened with the program that your system has associated with the file extension used.
-
PDF converts every item into a PDF document, containing the content of the original item and a configurable set of properties.
-
PST lets you export items to a MS Outlook PST file. The main purpose of this option is to use the PST file as a carrier for transport of emails, but other item types are supported as well. The receiver can open the PST file in Microsoft Outlook or process it in another forensic application.
-
i2 Analyst’s Notebook/iBase exports the results in a format that can easily be digested with i2’s Analyst’s Notebook and iBase applications. All metadata of all items, all attachments and all email bodies can be imported into these tools, allowing rapid social network analysis and all other analytical abilities of these applications on email and cellphone evidence data.
-
Load file will export the items in a format that can be imported into Summation, Concordance, Ringtail and Relativity.
-
Report produces a nicely formatted report, containing a configurable set of item properties and optionally the extracted text of the item. The report is composed of sections that can be defined and further customized by the user.
Only one format can be chosen per export run.
17.2.2. Export templates
The current configuration can be stored as a user-named template in the last wizard sheet. In the first sheet all stored templates are listed in a drop-down list. Selecting one restores the state of the Export wizard to the one stored in the selected template.
|
All templates, even those created by Intella 100, Intella 250, Intella Professional (Pro) or previous version of Intella TEAM Manager are automatically available across all cases on the same machine and user account. |
Administrator’s note
Export templates are stored in the following folder:
C:\Users\<USERNAME>\AppData\Roaming\Vound\Intella\export-templates
17.2.3. Suppressing irrelevant items
You can use the "Suppress irrelevant items" checkbox to automatically exclude all items from the export that have been classified as “Irrelevant” during indexing. See the Features facet section for a definition of irrelevant items. The number of irrelevant items in the current item set will be shown in parentheses.
17.2.4. Export sets
When a set of items is exported, they can optionally be added to an export set. This is a named set that captures information about the export. When a specific item is about to be exported, the file name and number is recorded in the export set. Furthermore the current export settings are stored as part of a set. When the export set is later selected again when exporting another set of items, this will affect that export run in the following ways:
-
All export settings such as the chosen export format, file naming and numbering schemes, etc. will all be the same as in the first export run. On other words, the export set works similar to an export template.
-
File numbering continues where it left off, rather than starting at 00000001 again.
-
Items that have been exported before with this export set selected will get the same name and number as the previous time(s) they were exported.
When an export set is specified, the resulting export ID (typically based on subject, file name and/or consecutive number) can be made visible in the Details column by adding desired Export set column. The Export IDs can also be searched for using keyword search and keyword list search.
17.2.5. Preferred content type options
The options in this sheet allow to select the preferred content type for the original format items. Intella Connect will export the first available content in the order specified in the table. The following content types are available:
-
Original. Original content of the item.
-
Decrypted. Decrypted content is available for the items that have been decrypted during the indexing.
-
OCRed. OCRed version of the original document. Note that this content type is not available for items where the OCRed content was imported as plain text.
-
Load file image. Image associated with the item imported from a load file. Note that the load file image is always exported in PDF format.
17.2.6. PDF file options
The first wizard sheet on PDF options lets you decide whether to export to individual PDF files, one for every selected item, or to export all items into one single concatenated PDF file. When exporting to a concatenated PDF, the resulting PDF can optionally be split in chunks of a given size. This is recommended for performance and stability reasons.
17.2.7. File naming and numbering (original format, PDF, load files)
This wizard sheet consists of three sections:
-
File naming defines how to compose an exported file name (original format, PDF) or page (load file export).
-
File numbering defines how exported files are numbered.
-
File grouping defines how exported files are grouped into folders.
File naming
By default, exported files will be named using the original evidence file’s name or the subject of an email. Alternatively, you can choose to number the files using consecutive numbers. These options can also be combined: a number followed by the file name or subject.
Load file naming offers more elaborate numbering style, whose parts can be further configured in the File Numbering section.
When using a numbering style, you can also define a prefix. Anything you type here will be added to the beginning of the filename. E.g. the prefix “export-” will result in the first email being named export-00000001.eml, when you combine it with consecutive numbering.
Use Custom ID option can be used to use custom IDs generated via Generate Custom IDs task. If page numbering is used, each page will be numbered based on the custom ID plus a page number suffix. Number of digits for page option determines the number format that will be used to number pages.
Using "Advanced" mode you can define a file name template that will be a base for exported file name. The template may include the following fields:
-
%num% – A counter value will be added. You can also define a number of leading zeroes in the counter using the following format: %000num%. The number of zeroes defines the number of digits used in the counter. The default number format for the counter is to use 8 digits.
-
%group1%, %group2% – Group counters used with load file export only. See the "Export as a load file" section for details.
-
Any Intella column identifier surrounded by the '%' symbol, like %md5%.
-
%Best_Title% – One of the following fields: File name, Subject, Title, Contact Name or "Untitled"
-
%page% - page number that starts from 1 for each document.
In order to insert any field in the template you can either type it
manually or select the field from the drop-down list and press
Add field.
File numbering
Using the "Start at" option you can define the number to start counting with. By default exporting will start counting at 1. A typical reason to use a different start number is when you want to combine the exported results with another set of already exported files.
Numbers are always 8 digits long.
“Folder”, “Page rollover” and “Box” are only relevant when using load file naming.
When exporting to PDF the "Number pages" option can be used to number individual pages instead of files. So the numbering would work the same way as when exporting to a load file.
File grouping
Select the option "All in one folder" to put all exported files in one folder.
Select the option "Keep location structure" to preserve the original folder structure that the items have in the evidence files. A folder will be created for every source, in which the original folder structure of that source (as shown in the Location facet) will be recreated.
File name examples
On the right side you can see a live preview of how the exported file names would look based on the current settings, using items from your current item set as examples.
17.2.8. PDF rendering options (PDF, load files)
|
When exporting a load file, this sheet is called “PDF or image rendering options”. |
The options in this sheet only apply to non-redacted items; the exporting of redacted items is governed by the “Redacted items” sheet.
For all types of items, you can indicate whether to include a basic item header, properties, raw data and comments in the PDF:
-
The item header is shown at the top, above a black line, and shows the email subject or file name.
-
The properties include typical metadata attributes such as titles, authors, all dates, hashes, sizes, etc. By default all properties are included, but you can remove some of them in the "Select properties…" dialog.
-
The raw data varies between item types. For example, for PSTs the low-level information obtained from the PST is listed here and for vCards the actual content of the file is listed. This field may reveal properties that Intella Connect does not recognize and are therefore not to be found in the Properties section.
-
The comments refer to the ones made by Intella Connect user(s) in the Comments tab in the Previewer. They are not to be confused with comments that can be made in, for example, a Word document. These are part of the Properties section. Note that the reviewer comments may include sensitive information such as evidence file names, investigator insights, etc.
Furthermore, the item’s content can be exported in its original format, as the extracted text, or both. The following file formats can be exported in their original view:
-
Emails with a HTML body.
-
MS Office (doc, docx, xls, xlsx, ppt, pptx)
-
Open Office (Writer, Calc, Impress)
-
WordPerfect
-
RTF
-
HTML
-
PDF
When you select "Original view", you will also be able to define a list of item types that should be skipped for this. You can use this to e.g. prevent native view generation of spreadsheets, which often are hard to read in PDF form. An optional placeholder text can be added to make clear that original view generation has been skipped on purposes for this item.
Select the "Append file type to placeholder text" option to add the type of a skipped file to the end of the placeholder text, so it would look like: "Document rendering skipped (Microsoft Excel 97-2003 Workbook)".
When you also select the "Export skipped item as native file" option during load file export, the resulting load file will not contain the corresponding native file. By selecting "Also skip extracting text" you can skip generating the extracted text as well. This includes extracted text added to the resulting PDF and extracted text exported as a separate file as part of a load file.
The Configure Original view button allows to configure which content
type needs to be included in the Original view of the item. See the
section Preferred content type
options for more details about which content types are available.
If you uncheck "Include item metadata", the resulting PDF will not contain any additional information except for the actual item content (in its original format and/or as extracted text), the document title/subject and the headers and footers defined in the next sheet. Most of the options on this sheet will then be disabled.
For emails, the following information can optionally be included:
-
- The message body.
-
-
A separate checkbox is provided that controls whether the HTML or plain text body is preferred. This option is only available when the “Content as” setting is set to a value that involves original view generation, i.e. anything other than “Extracted text”.
-
-
The full email headers.
-
A list of all attachments, as a separate page. The file name, type and size of each attachment will be listed.
-
The actual contents of the attachments. The original view (described below) will always be selected by default, with the extracted text used as a fallback.
For loose files and attachments that are not emails, the following options are available:
-
List all embedded items, e.g. images found in the document.
-
- The file body.
-
-
The "OCRed text for images" checkbox controls whether to include the OCRed text when the file is an image.
-
The "Imported text" checkbox controls whether to include text that was imported using importText option in Intella Command line interface.
-
It is possible not to include the lines that separate the headers and footers from the content by unchecking the "Draw header and footer line separators" checkbox. Section names such as "Image", "Original view", "Extracted text" etc. can also be excluded from the resulting PDF by unchecking "Include section names".
17.2.9. PST options
Enter a file name to use for the generated PST.
Enter a display and folder name. After opening the exported PST file in MS Outlook, you will see the names you entered. They help you to locate the PST file and its contents in MS Outlook. When a folder name is not specified, the items will be exported directly to the PST root folder.
Select the option “Keep location structure” to preserve the original folder structure during the export.
The resulting file can optionally be split into chunks of a given size. This is highly recommended for larger result sets that would make the PST grow beyond the default suggested file size, as Outlook may become unstable with very large PST files. The produced files will have a file size that is close to the specified maximum file size (usually smaller). The export report will list for every item to which PST it was added.
Item types that can be exported directly to a PST file
Besides emails, the following item types can be exported directly to a PST file:
-
Contacts
-
Calendar items:
-
Appointments
-
Meetings
-
Meeting requests
-
-
Tasks
-
Journal entries
-
Notes
-
Distribution lists
-
Teams chat messages extracted from another PST file
Limitations:
-
iCal recurrence rules (RRULE property) are not exported.
-
PST Distribution lists are exported, but their list members are not.
These limitations may be removed in a future release.
Please note that non-email items will be exported to a regular PST folder under the Mail section, so not in e.g. the Contact section.
How to export other item types to a PST file
Items such as Word and PDF documents cannot be exported directly to a PST file. As such items may be attached to an email,
Intella Connect
can be configured to export the parent email instead.
You can choose to either include the top-level email parent or the direct email parent. An example would be an attachment contained within an email message within another email message. With the top-level parent selected all parent items of the attachment (both emails) would be included in the PST, one nested within the other. The second option exports the nested email to the PST. You can also choose to simply skip non-email attachments.
Although this option only mentions parent emails, it also applies to e.g. PDF files attached to a meeting request or any of the other exportable items. In this case, enabling this option will export the meeting request instead. This option may therefore be renamed in the future.
| Files in a folder source lack a parent email and therefore cannot be exported to a PST file, except for mail files like EML, EMLX and MSG files, or files of the types listed above. |
| For stability reasons, items which size exceeds 5MB excluding attachments will not be exported to a PST. It can be changed via "ExportPstSkipLargeItemsEnabled=False" property in the case.prefs file. The property "ExportPstMaxItemMetadataSizeMB" can be used to change the upper limit. For example, to increase the limit from 5 to 10MB use "ExportPstMaxItemMetadataSizeMB=10". |
How to export attached emails
The last setting controls what happens with emails that are selected for export and that also happen to be attachments. These are typically forwarded messages. Such emails can technically be exported to a PST without any restrictions, but the investigation policy may require that the parent email is exported instead, to completely preserve the context in which this email was found. That can be done by choosing the Replace with its top-level parent email option. Alternatively, use the Export attached email option to export the attached email directly to the PST.
17.2.10. iBase and Analyst’s Notebook options
At the moment the Analyst’s Notebook and iBase export does not provide any configuration options.
Templates, import specifications and instructions are provided for Analyst’s Notebook and iBase. Please contact support@vound-software.com for more information.
17.2.11. Load file options
You can select one of the following load file formats:
-
Summation.
-
Concordance.
-
Relativity.
-
Ringtail.
-
Comma Separated Values file.
Each load file export consists of several parts:
-
The main load file, containing the selected fields.
-
Native files, representing the items in their original format.
-
Image files, containing metadata and content as configured in the “PDF or image rendering options” sheet.
-
Text files that contain the extracted text.
The first part is mandatory; the others can be turned off.
The main load file name can be changed using the “File name” text field. It is also possible to specify the main file encoding when the Summation format is selected.
The "Export native chat content as PDF" option can be used to export native content of chat conversations and messages in PDF format instead of plain text. This was primarily designed for direct Relativity export due to certain limitations of that platform.
By selecting “Use custom date/time formats” you can override the date and time format used in the load file. Please see this document for the date/time format syntax details: http://docs.oracle.com/javase/8/docs/api/java/text/SimpleDateFormat.html
The Size column can be optionally exported in kilobytes, megabytes or gigabytes instead of bytes, by using the “Size unit” option.
To control the quality of the exported images, one can use the “Image DPI” parameter. It defines the number of dots (pixels) per inch. A higher DPI setting results in higher quality images, but these will take more time to produce and consume more disk space.
It is also possible to adjust the TIFF compression type. Note that the image will be converted into black-and-white variant if one of the “Group Fax Encoding” compression type is selected.
The “Also include PDF version of images” option can be used to additionally export PDF version of images if the image format is different from PDF. The PDFs will be exported to the folder specified in the Folder option.
If the “Opticon Page Count field contains number of pages of entire document” option is turned on, in the Opticon file the 7th field of the first page record (NEW_DOC_BREAK=Y) will contain the total number of pages of the entire document. The 7th field of all the other page records will contain an empty value. If the option is turned off, the 7th field will contain the number of pages of the current page record only. That means it will always be “1” for any single page format like JPEG or PNG.
The extracted text can be configured by clicking the “Configure” button. In the “Configure extracted text” dialog you can choose which components to include and change their order. Different components can be configured for emails (including email-like items: instant messages, conversations and phone calls) and files. The Properties component can be configured by clicking the “Configure” button below the table. You can choose which properties to include.
When you need to embed the extracted text directly into the load file itself (the DII, DAT or CSV file) instead of exporting it into a separate file, you can use the checkbox “Embed extracted text into load file”. A custom field of type EXTRACTED_TEXT should be used to insert the text as a field in this case.
When exporting to Summation the checkbox “Include Summation control list file (.LST)” can be used to generate a plain text file that lists all document IDs along with the extracted text files. The “OCR Base” field controls the prefix used for the extracted text files.
The “Exclude content” option can be used to completely exclude the items tagged with a specified tag. For every excluded item, only the metadata will be added to the load file. The text and the images will contain the text specified in the “Placeholder text” field. Native files will also not be generated for such items.
| Export sets must be used when one needs to be able to create an overlay load file later. Adding the load file to an export set during the initial export will create an Export ID field that can be used as a Document ID later in overlays. |
Numbering with load files
The numbering used for load files differs from the other export formats. When exporting to a load file, every exported page has its own unique number. The number of the first page is usually used as a number of the document. Please note that pages are numbered only if image files are included in the export.
On the “Headers and footers” sheet you may choose a special field PAGE_NAME which is available only with load file export. This will put the current page name as it was configured on the “Naming and numbering” sheet.
Another difference is that by default all export files are grouped into folders and optionally boxes. The “Page rollover” option defines a maximum number of pages that a folder can contain. The maximum number of folders in a box is fixed to 999 (at the moment, it can be changed via an export template XML file only). Additionally, you can set a starting number for the page (“Start at”), folder and box.
By default, the page counter starts over when switching to the next folder, so the first page in the next folder will have the number “1”. This approach can be changed when using the “Continue page numbers from previous folder” option. When it is selected, the page counter will continue page numbering from the last page of the previous folder. In other words, page numbers will be unique among the entire export set.
Additionally, the “Advanced” numbering mode can be selected when exporting to a load file. In this case, you will be able to set a custom file name template. Please see the file naming and numbering section for details. Note that %num% means a page number, not a document number in this case. Also, there are two new fields that can be used:
-
%group1%– folder counter -
%group2%– box counter
You can also use the %000group1% syntax to define the number of leading zeroes in the counter (similar to the %000num% syntax). Thus, the default load file numbering schemes can be expressed using the following templates:
-
PREFIX.%group2%.%group1%.%num%= Prefix, Box, Folder, Page -
PREFIX.%group1%.%num%= Prefix, Folder, Page -
%group2%.%group1%.%num%= Box, Folder, Page
When using the “Advanced” mode it is important to set a file grouping: “All in one folder” or “Load file mode”. When the “Load file” grouping mode is selected, the exported files will be grouped by folders and, optionally, boxes in exactly the same way as it is described above.
Field chooser
The “Field chooser” sheet contains a table of the fields that will be included in the load file. By default, the starting set of fields depends on the selected load file format.
The “Name” and “Comment” columns in this table are used only for managing the fields within Intella and are not included in the load file. The “Label” column value is used as a column label in the load file. The “Type” column can be one of the following:
-
SUMMATION – It can be used only with Summation load file format and cannot be modified.
-
RINGTAIL – It can be used only with Ringtail load file format and cannot be modified.
-
CUSTOM – User-created field. It can be used with any load file format.
You can include an additional custom field by pressing the “Add custom field…” button. Next, enter the name, label, and comment. Select one of the following types:
-
Fixed value – Fixed value as specified in the “Value” field.
-
Intella column – One of the Intella columns.
-
Best title – One of the following Intella columns: File name, Subject, Title, Contact name or “Untitled”.
-
Start record ID – Name of the first page of the document.
-
End record ID – Name of the last page of the document.
-
BEGATTACH - First record in family – Name of the first page of the first document in the current family (“parent-child” group).
-
ENDATTACH - Last record in family – Name of the last page of the last document in the current family (“parent-child” group).
-
Parent record ID – Name of the first page of the parent document.
-
ATTACH_RANGE: BEGATTACH-ENDATTACH – Names of the first page of the first document and the last page of the last document in the current family (“parent-child” group). In other words, the BEGATTACH and ENDATTACH fields separated by a hyphen.
-
Number of pages in record – number of pages of the record (document).
-
Path to native file – relative path of the original format of the document to the base folder.
-
Path to image file – relative path of the first image of the document to the base folder.
-
Path to text file – relative path of the extracted text file of the document to the base folder.
-
Extracted text – extracted text directly embedded in the load file body. See the “Embed extracted text into load file” option described above.
-
Email Internet headers – full Internet headers of the email.
-
Attachment IDs – The list of attachment IDs.
-
Number of attached documents in family – The number of attachments that belong to the current family (“parent-child” group).
-
Is email – “True” if the document is email, “False” otherwise.
-
File extension – The file extension of the document.
-
Direct parent ID – ID of the document’s direct parent.
-
Direct children IDs – The list of IDs of the document’s direct children.
-
ID of first email attachment – Name of the first page of the first attachment document in the current family (“parent-child” group). Empty if there are no attachments in the current group. Used for emails only.
-
ID of last email attachment – Name of the last page of the last attachment document in the current family (“parent-child” group). Empty if there are no attachments in the current group. Used for emails only.
-
Has extracted or OCRed text – “True” if the item has any extracted or OCRed text, “False” otherwise.
-
Raw data – One of the raw data fields. Use the “Value” option to specify the name of the raw data field that is to be exported.
-
Duplicate Locations (excl original item) – The locations of all duplicate items in the case, excluding the item itself.
-
All locations (incl all duplicates) – The locations of all duplicate items in the case, including the item itself.
-
Duplicate custodians (excl original item) – The custodians of all duplicate items in the case, excluding the item itself.
-
All custodians (incl all duplicates) – The custodians of all duplicate items in the case, including the item itself.
When exporting to a load file, all documents are grouped by their parent-child relationship. For example, an email and its attachments form a single group. The columns “RECORD_ID_GROUP_BEGIN” and “RECORD_ID_GROUP_END” denote the start and end page numbers of such a group.
When adding a date column as a custom field, it is possible to choose the way how the date is formatted: show date only, show time only, show full date and time, timezone offset, or timezone name. Note that you can add the same date field more than once and use different formatting options. For example, you can add two custom fields: DATE_SENT (“Sent” column, show date only) and TIME_SENT (“Sent” column, show time only).
Click the “Select default fields” button to select only those fields that are part of the default field set for the selected load file format.
17.2.12. Relativity options
| This functionality was tested with Relativity 8.2. Other supported versions are 9.7 - 10.3. |
Intella can export items directly into a Relativity database, i.e. without the need to manually handle load files. Note that this functionality requires Microsoft .NET and the Relativity SDK to be installed. See the Installation section for further details.
On the “Relativity options” page you can specify a service URL, user name and password. Please ask your Relativity administrator for the correct settings. The Relativity service URL usually looks like this: https://host/relativitywebapi. You should use the same service URL as you use in Relativity Desktop Client.
Click the “Get list from server” button to get a list of Relativity workspaces. Select the workspace you want to export the items to. You should also choose an identity field which is used as a key field in the selected workspace (it’s usually “Control Number”).
The rest of the settings are the same as you can use during an export to a load file. You can include natives, images, and texts.
Please note that when you use a field chooser, you can choose an existing field from the selected workspace. The field editor will also show a little warning icon near the field label if you enter an incorrect field name.
Current limitations:
-
The Overwrite mode is currently fixed to “Append”. An option may be added in a future release.
-
To export a folder structure, the “Location” field should be added to the list.
-
To export natives, the field
FILE_PATHshould be added to the list. -
To export texts, the field
FILE_TEXTshould be added to the list. -
Items are exported to the workspace root folder. An option may be added in a future release.
17.2.13. Headers and Footers (PDF, load files)
You can set headers and footers for the generated PDFs and images. For each corner you can select one of the following fields to display:
-
EMPTY – Nothing will be displayed.
-
EXPORTED_FILE_NAME – A file name as it was configured on the "File naming and numbering" sheet.
-
PAGE_NAME – A page name as it was configured on the "File naming and numbering" sheet. Note: this option will work only with load file export. For other export types this will be replaced with EXPORTED_FILE_NAME.
-
PAGE_NUMBER – A page number within the current document starting from 1. By default, the format is "Page XYZ", where XYZ is the current page number. It is possible to change the default format. To do that, edit the "pageNumberFormat" field in the template XML. We might add a UI option for that in a future version.
-
BEST_TITLE – This is one of the following fields: File name, Subject, Title, Contact name or "Untitled".
-
DESIGNATION – one or more textual labels, e.g. "Confidential" or "For Attorneys’ Eyes Only". Tags control the presence of the labels. After selecting DESIGNATION, click on the gear icon next to the field chooser to specify the controlling tag and the text that should be shown on items that have that tag. It is possible to specify multiple tags here. If an item has multiple tags, the designation will be a comma-separated list of the corresponding designation labels.
-
Any Intella column – This will be exactly the same value as it is displayed in the result table.
Also you can type any static text instead of selecting one of the fields.
17.2.14. Report – Title page
This wizard sheet controls what the cover page of the report will look like. The options are divided into two sections:
-
Report Title
This is where one can specify the title of the report and choose whether the Vound and Intella logos should be included. One can also choose custom logos to be shown. -
Custom Fields
This part controls the addition of custom fields that will appear on the cover page. In order to add a new field, press theAdd fieldbutton and enter the values to show as the field name and field value. To remove a custom field, press theRemovebutton next to the field that needs to be removed.
17.2.15. Report – Sections
In this wizard sheet, the sections that make up most of the report can be defined. Each section is defined through a row in the table. The table columns have the following meaning:
-
# – Sequence number of the section.
-
Title – Title of the section.
-
Category – The type or tag whose items will be shown in this section.
-
Display – The type of layout that will be used for this section.
-
Items – Indicates the number of items that will be shown in this category.
-
Sort by – The item attribute used to sort the items.
-
Orientation – the page orientation that is to be used for this section.
To add a new section, click the Add section button to the right of the table. A dialog will be shown where you can select either a type or a tag of items. The items corresponding with that type or tag will appear in the newly defined section.
To change the type or tag of an existing section, click the Change category button.
After clicking the Ok button, a new section will be added to the Sections table. It will be automatically selected. The selected section can now be further configured in the Section details section:
-
Title – This can be any text. The title will be displayed at the top of the section.
-
Description – a description of the section. This will be rendered beneath the title in the report.
-
Display as – the type of layout that will be used for this section. Possible layouts are:
-
List
-
Table
-
Image Gallery
-
-
Sort by – the property that will be used for ordering of items.
-
Page Orientation – the orientation of the pages in this section: either Portrait or Landscape.
-
Thumbnail columns – The number of thumbnail columns, when the Image Gallery layout is used.
-
Include original format files – This controls whether the original item should also be exported to its original format. Note that items that are exported in this way will be linked from the report.
-
Include extracted text – This controls whether the extracted text of the item should be included in the report.
-
Selected columns – The columns that you wish to appear in the section. Note that the initial set of suggested columns is based on the selected Section Category type. To edit this list, click on the
Edit columnsbutton. You will be presented with a column selection dialog.
The ordering of the sections can be modified by dragging sections in the Sections table.
17.2.16. Report – Other Settings
Setting that can be configured on this wizard sheet are:
Headers and footers
-
Show report title in footer – Controls whether the report title should be shown in the page footer.
-
Show page number in footer – Controls whether the page number should be shown in the page footer.
Table of contents
-
Include table of contents – Controls whether a Table of Contents should be included in the report.
Summary
-
Include summary section – Controls whether a summary section should be included into the report.
-
Include sources summary – Controls whether basic source information summary should be included.
-
Include types summary – Controls whether basic item type information summary should be included.
-
Errors
-
Include error report (CSV) – Controls whether an error report in CSV format should be produced.
Output format
The item report can be exported to these two formats:
-
Portable Document Format (PDF)
-
Microsoft Word Document (DOCX)
17.2.17. Redacted items
This wizard sheet controls how Redacted items are to be handled when they are part of the set of items to export.
-
When the option “Ignore redaction color (render all redactions black or white)” is selected, exported redacted items will have all redaction marks rendered in either black or white instead of the color which is shown in preview.
The options below depend on the chosen export format.
When exporting to Original format or PDF:
-
When the option “Use redacted images when available” is selected, any redacted item will be exported in its redacted form.
Note that for Original format export a PDF will then be generated, rather than the item being exported in its original file format.
When exporting to Original format, PST or i2 iBase/ANB:
-
When the option “Suppress redacted items” is selected, then any redacted item will be skipped.
When exporting to Load file or Relativity:
-
When the option “Use redacted images when available” is selected, then the image will be exported in its redacted form.
-
When the option “Suppress natives for redacted items” is selected, then exporting of the native file will be skipped when the item has been redacted.
-
When the option “Also suppress natives for family items” is selected, natives from families containing redacted items will be skipped.
-
When the option “Suppress text for redacted items” is selected, then exporting of the extracted text will be skipped when the item has been redacted. The text can optionally be replaced with the specified placeholder text.
17.2.18. Reports and ordering
You can indicate whether you want to create an export report for this export. The report can be formatted as a PDF, RTF, CSV and/or HTML file.
For PDF, RTF and HTML reports you can also add a comment that will be displayed on the first page of the report.
Export reports link the original files to the exported files, by listing identifying information about the original item (e.g. source evidence file, MD5 hash) and linking to the exported file. Also the export report may contain information that is lost during export, such as the evidence file’s last modification date; like any copy, the export file has the date of export as its last modification date.
|
If the export of a specific result resulted in errors, you will be notified with an error message in the application. You can find the error notifications at the end of the PDF and RTF report or in the last column of the CSV report. |
Additionally, you can specify in what order the items are to be exported:
-
Use Intella default – Items will be sorted first by Hierarchy, followed by Sent date, followed by File Name.
-
Use Family Date – Sorts items by Family Date before exporting.
-
Use Custom ID – sort items by Custom ID before exporting.
-
Use current table row order – Uses the current order used in the Details table.
| When exporting items to a load file with the current table row order option, the order needs to be load file compatible. Otherwise, incorrect families might be produced. |
| Custom ID sort order is recommended to use with Custom ID numbering only. Otherwise, it might produce unexpected results in terms of parent-child groups in load file export. |
17.2.19. Skipped items
Not all items are inherently exportable to the chosen export format(s). Examples are:
-
A file inside an encrypted ZIP file may be known to Intella Connect but it cannot be exported to Original Format if Intella could not decrypt the ZIP file. Exporting to PDF is possible though, with the information that is known.
-
When using the default PST export settings, Intella Connect will try to replace nonexportable items with their parent email. If there is no parent email, the item is skipped.
-
Folder results are always skipped.
|
All skipped items are listed in the export report. |
17.3. Exporting to a CSV file
You can export results to a comma separated value (CSV) file. A CSV file contains all information listed in the table. CSV files can be opened in a spreadsheet application such as Microsoft Excel and can be processed through scripting, which opens up new analytical abilities. This functionality can also be used to generate MD5 lists.
To export results to a CSV file:
-
Right click on the results view and click “Export table as CSV…”.
-
Mark the names of all columns that you want to include in the CSV file.
-
Use the "Include raw data fields" option to include arbitrary raw data fields. A comma separated list, such as PR_MESSAGE_CLASS, PR_MESSAGE_FLAGS, can be used to include more than one field.
-
Press
Export.
The contents of the Senders and Receivers columns are configurable to show either the contact name(s), the email address(es), or both.
Columns with dates can be configured to contain time zone always, only when it is from different source or never.
The maximum text length of a value inside a cell can optionally be trimmed to 32,000 characters. This is often necessary when one wants to open the CSV file in MS Excel. When opening a CSV with longer texts in Excel, these long texts are typically broken up and roll over to the next row, breaking the table structure.
By default Intella uses the comma character to separate cells and uses a double quote character to escape values containing commas or other special characters. Those can be changed using the Column delimiter, Quote character and Escape character drop-down boxes.
|
The CSV format is not a formal standard; different applications may have different conventions on how to separate cells and escape special characters. Intella Connect uses the comma character to separate cells and uses a double quote character to escape values containing commas or other special characters. |
|
To import such files in MS Excel 2010, select Data > From Text in the ribbon. Next, select the file with the file chooser. In the wizard that opens next, choose “Delimited”. Set the Delimiters option to “Comma” and set the Text Qualifier to the " character. Click Finish. |
17.4. Exporting queries
The number of hits per search query can be exported by right-clicking in the Searches list in the upper-right corner and selecting “Export queries as…” CSV/XLS. This produces a CSV/XLS file with the following columns:
-
Facet – e.g. Type or Keyword Search.
-
Result – The textual representation of the search, e.g. the entered search terms or selected facet values.
-
Total Count – The total number of items that matched this query.
18. Keyword Statistics
The Keywords tab gives detailed statistics about the keywords in a
keyword list. The workflow is as simple as choosing a keyword list,
specifying several calculation options, and clicking Calculate. This
will produce a table showing the keyword list and several statistics for
every keyword query in the list.
The nature of the information shown here potentially goes beyond what can be established in the Search tab.
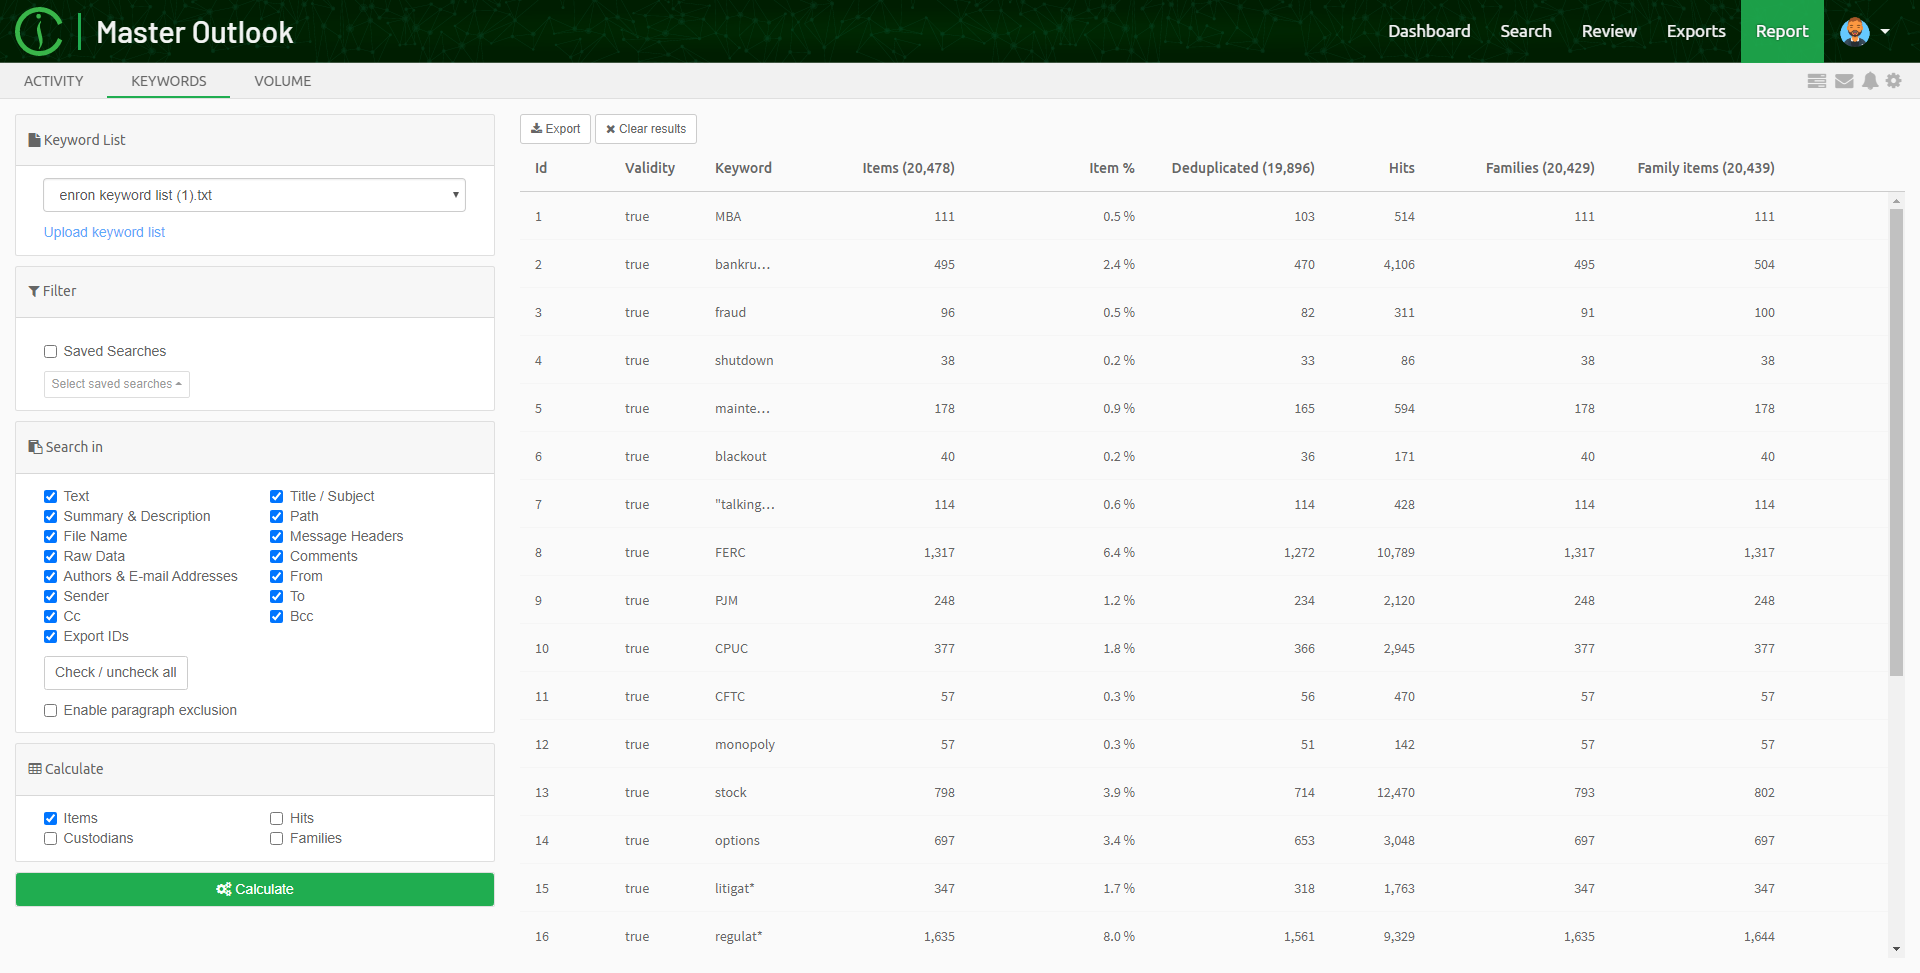
18.1. Configuration
All controls for configuring the calculation are placed on the left side of the tab. The options are divided into four groups:
-
Keyword list to use.
-
Filter to be applied.
-
Document fields to search in.
-
Statistics to be calculated.
At the top, the user can choose a previously uploaded keyword list or add one here. This uses the same collection of keyword lists as the Keyword Lists facet in the Search tab. Any list added in the facet can be used here and vice versa.
The second panel allows the searches performed to calculate keyword statistics to be filtered. When saved search is chosen as a filter, then the saved search is evaluated and its result is intersected with the result of each keyword search. For example, having keyword "letter" and saved search containing OCR search, including PDF documents and excluding a custodian would result in statistics calculated for items on which an OCR was done, containing the keyword "letter", which is a PDF document and does not come from the custodian.
Although we call this functionality "keyword statistics", the user can use the complete full-text search syntax here: wildcards, Boolean operators, phrase queries etc. are all available. Field-specific searches are also possible. When used in a query, these overrule the field settings set in the third panel.
The third panel offers the available search fields. These are the same as offered in the Search tab. By default, all fields are searched, but the user can choose to restrict searches to e.g. the document text, email headers, etc. Any combination of fields can be used.
The last panel offers five checkboxes that determine what information the table will contain:
-
The Items option adds columns indicating:
-
number of items containing the keyword,
-
corresponding percentage of items,
-
deduplicated number of items, and
-
exclusive items of a keyword, i.e. the deduplicated amount of items not returned by any of the other keywords. It shows how many extra items are returned when a keyword is added, or how many items are lost if it is removed. This can be used to measure the impact of a search keyword on the length of the review process.
-
-
The Hits option counts the number of occurrences of the search term in the texts. For example, when a keyword produces a document that contains the keyword 3 times and another document that contains the keyword 5 times, this column will show 8. The hits are counted across all the selected search fields, but only on the deduplicated items.
| If you use keyword lists with advanced search query syntax, please be aware that hits counting is supported for a limited set of query types. |
-
The Custodians option adds a column for every custodian in the case. Each custodian column indicates how many of the matching items originate from that custodian.
-
The Families option adds two columns: "Families" and "Family items". A family is an item set consisting of a top-level item (e.g. a mail in a PST file) and all its nested items (e.g. attachments, embedded images, archive entries). Families are detected by traversing item’s location upwards in the hierarchy tree and finding family root. Items with the same family root are part of the same Family. Certain types of items are skipped when determining the family root, namely all folders, mail containers, disk images, load files and cellphone reports. The meaning of the two columns is then as follows:
-
The Families column shows in how many families the keyword occurs. For example, if a mail and two of its attachments all contain the keyword, that counts as a single family.
-
The Family Items column shows the total number of items that are contained in these families. This may (and usually will) include items that do not contain the keyword at all; they just belong to a family that has a hit in one of its other items. In cases where you are not directly exporting search results but rather their top-level parents (i.e. the default setting when exporting to PST), this will tell you how much of the case is conceptually being exported this way. This may give an indication of how well a certain search filters items in a case.
-
18.2. Calculation
When the Calculate button is clicked, Intella Connect will populate the table after finishing all calculations.
The time required for the calculation is dependent on several factors, including the size of the keyword list, the hardware, the chosen search options and the storage location and size of the case. While most options can benefit from indices that make the calculation fast regardless of case size, the Hits option will have a considerable impact on the search speed.
The progress of the calculation will be shown in the status panel above the table.
During calculation, the Calculate button will change into a Stop button, allowing for manually terminating the process.
When clicking Calculate again, the previous results will be discarded and the table will be populated from scratch, using the (possibly changed) configuration options.
18.3. Results
The table order is the same as the order in the keyword list.
The last row shows total amounts for each column. Columns Exclusive and Hits will show total amount as a sum of all rows.
Each table header also shows the total value that can appear in that column on that case. These maximums are not yet filtered by any saved searches that may have been selected. Only the totals at the bottom of the table take the saved searches into account.
The rest of total amounts are calculated from union of results of all keyword searches. It is important to note that they are not sum of all rows.
After a row is selected, one can click on the “Query” button to see matching items from that result set in the Details view in the Search tab.
To query the exclusive items of a keyword, select a row and click on the “Query Exclusive” button. The exclusive query will be shown in the Search tab. Note that the results table needs to be in deduplicating mode to see the exact same set of items as in the Keywords tab’s table.
18.4. Exporting the results
Once calculation has completed, the table can be exported by clicking on the Export button above results table.
This will show optional description field related to PDF and DOCX export along with 4 buttons with the following action:
-
CSV and XLSX - export the table as comma separated values or as table into an Excel document.
-
PDF and DOCX - create a PDF or DOCX document containing keyword statistics report.
18.5. Keyword statistics report
The keyword statistics report contains information that can easily be given to general counsel.
Each page has a header composed of case name, keyword list name, date and time on which this report was created. Optionally, a description can be added. Description can be anything that the user wants to disclose in this report.
First page contains overview in form of bar chart of how the keyword list compares to all items in the case.
It contains following values:
-
all items that contain any of the keywords
-
deduplicated amount of all items that contain any of the keywords
-
deduplicated amount of all items that contain any of the keywords including the total number of items that are contained in how many families the keywords occur.
-
items without hits - equals to all items feature facet search result minus all items that contain any of the keywords.
Following pages contain bar chart(s) showing Deduplicated and Exclusive values for each keyword from the list.
Last pages contain table showing the following:
-
keyword
-
number of items containing the keyword
-
deduplicated number of items
-
total number of items that are contained in how many families the keyword occurs
-
deduplicated amount of items not returned by any of the other keywords
19. Volume
Volume view allows case managers to generate reports that show them how tags relate to each other in a context of a case. It could be used to create an overview of:
-
document culling process
-
review progress
-
evidence buildup
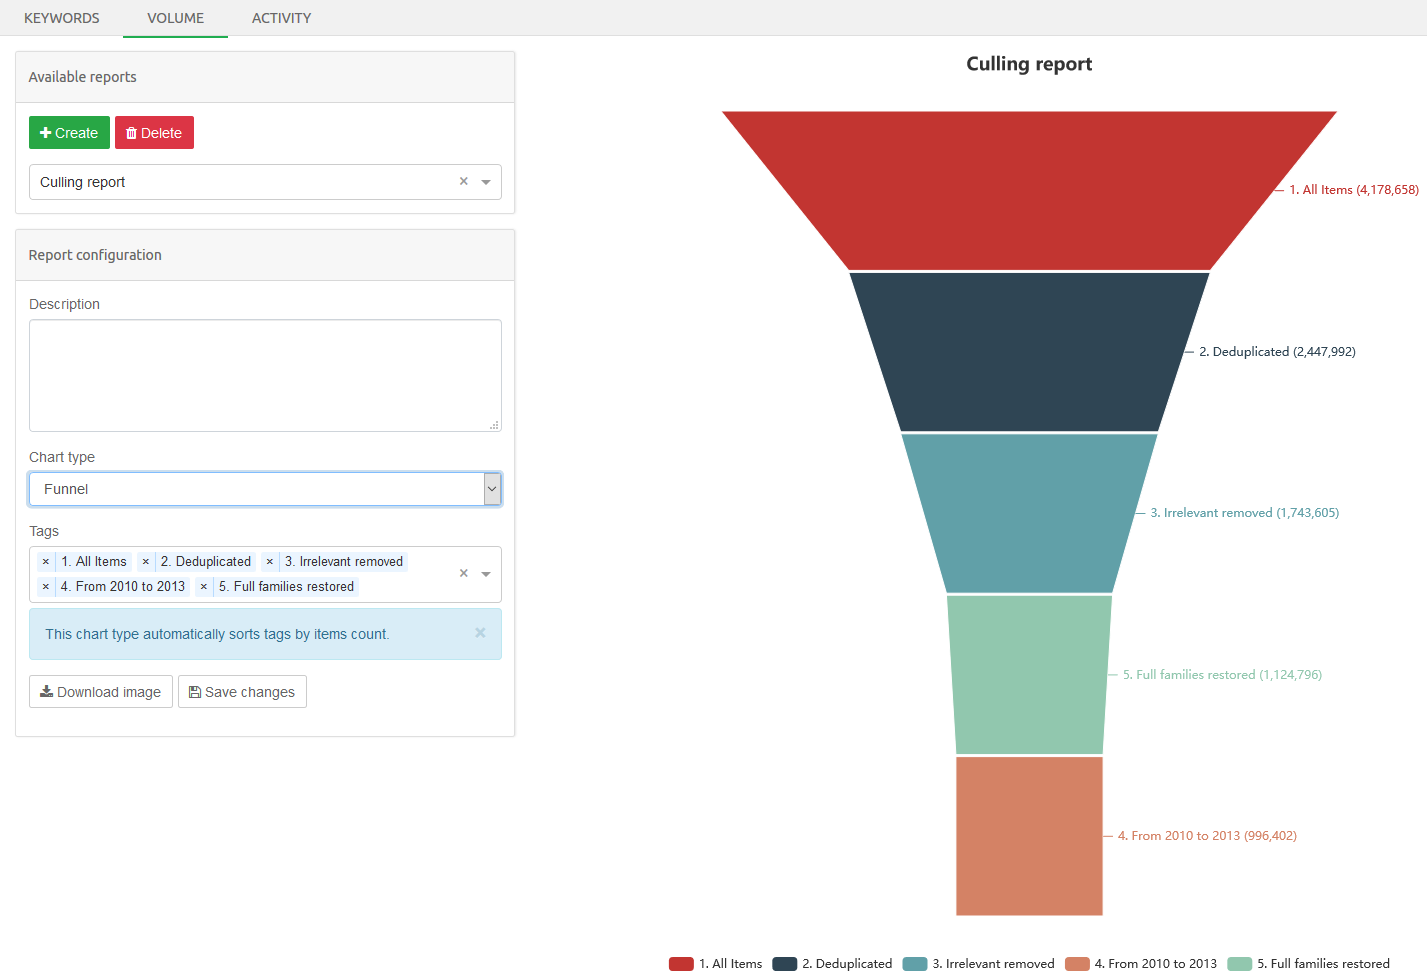
The process of building such report consists of either creating new report or choosing an existing one and select tags from the ones available in the case.
Optionally, a description can be added and chart type can be changed to one of following:
-
bars
-
doughnut
-
funnel
-
pyramid
When changes are made to a report, it can be saved for later use by
clicking on Save changes button.
To export the report, click on Download image button, which will cause
the browser to download it into browser’s download folder.
20. Activities
The Activity view gives detailed view about the activities performed by users logged into a case. By default, all activities are shown in list shown below the top panel. The list of activities can be filtered using the filtering options provided in the top panel. Activities currently shown in the list can be exported into a CSV or XLS file.
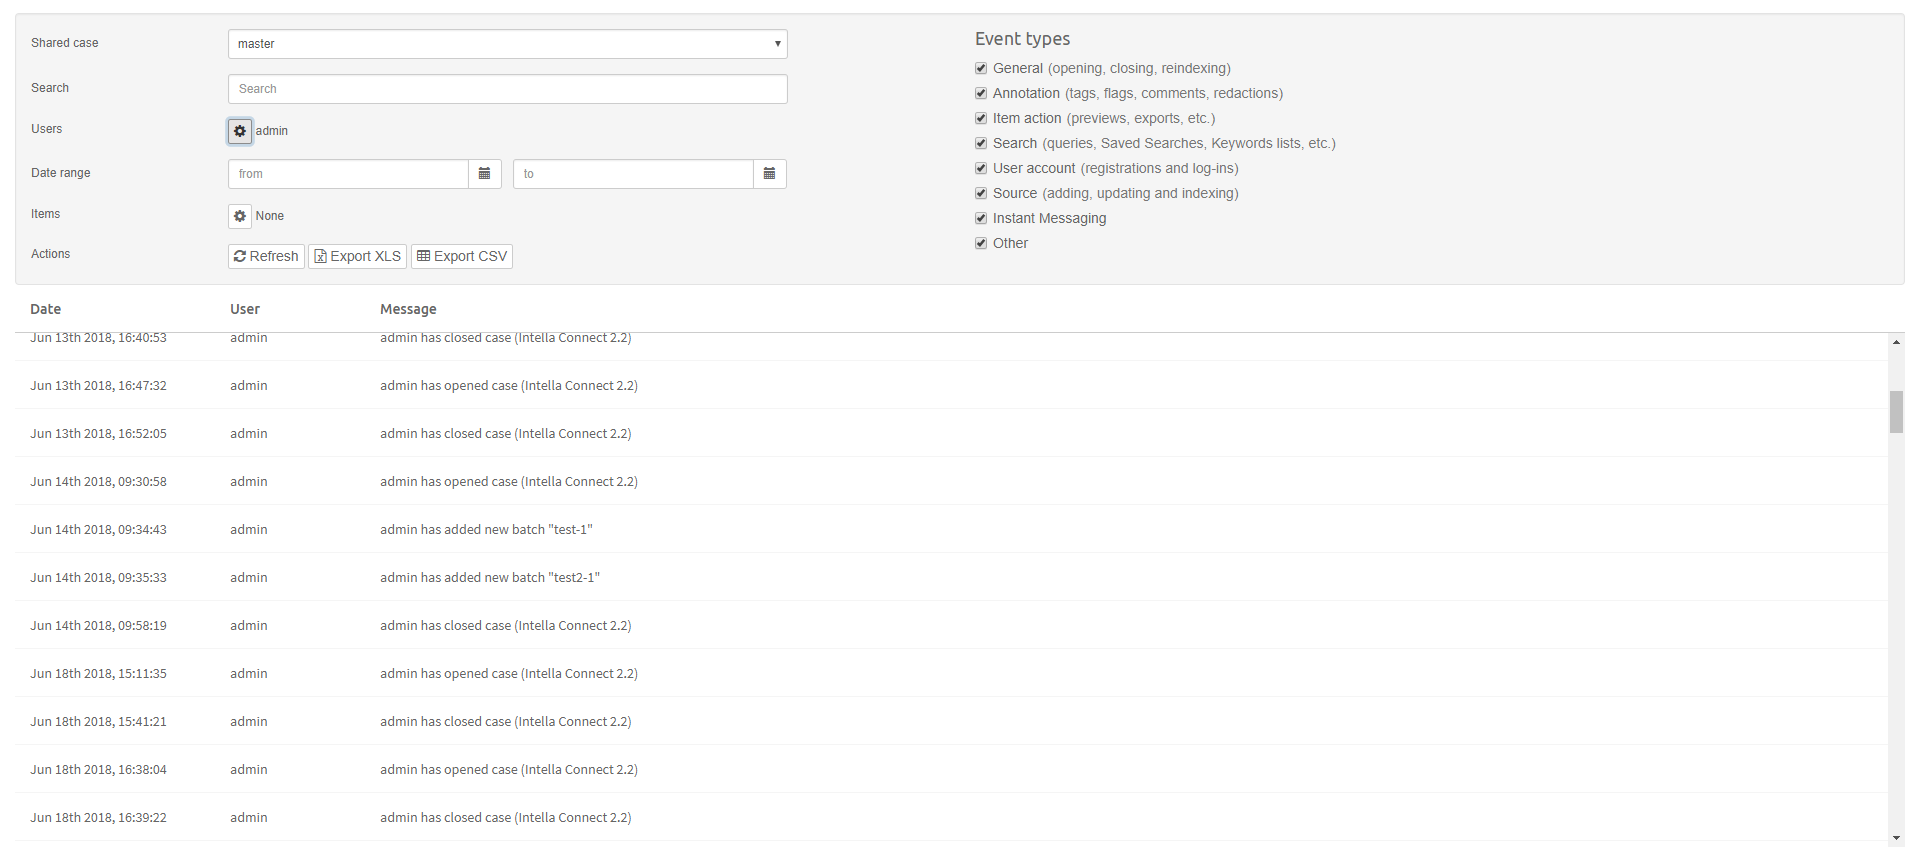
20.1. Configuration
Options for filtering are the following:
-
Shared case - only visible in administrative section of Intella Connect - searches for activities in selected case.
-
Search - searches for text in the message column.
-
Users - filters by users in the users column.
-
Date range - filters by the date range.
-
Items - searches for activities referencing any item IDs.
-
Event types - shows activities of selected event types.
Actions that can be performed on the list of activities are the following:
-
Refresh - loads the latest activities. Note that the list contains activities from the time of opening the Acitivity tab or changing the options and it does not add activities that happened since that time to the list.
-
Export XLS - downloads the current list as Excel spreadsheet file.
-
Export CSV - downloads the current list as comma separated values file.
21. Redaction
Redaction is the process of concealing part of an item’s text, graphics and/or metadata in order to conceal that content part from unauthorized view. A typical use case of redaction is the concealing of legally privileged information in information that is produced for an opposing party in an eDiscovery matter, e.g. because of attorney-client privilege. Other scenarios are hiding person names, birth dates, social security numbers, credit card numbers, etc. due to privacy laws or when they are not relevant to the matter at hand.
21.1. Workflow
When redacting an item, Intella Connect first creates a temporary PDF representation of the item and then lets the user mark the sensitive areas in it. This PDF and the added redactions are stored in the case. The original evidence item is not changed, nor is any information removed from the Intella case. At any time the redaction marks can be reviewed, edited and removed.
Only when the item is exported to the final PDF or to a load file, are the redactions “burned in”: all pages in the temporary PDF are converted to images in which the sensitive part is literally blacked out. The result is a PDF that is guaranteed not to contain the sensitive information.
Redaction affects the results of the regular PDF export and the PDFs and TIFFs that are created as part of a load file. For the sake of brevity, the remainder of this section will only refer to exported PDFs when both are meant.
Creation of a redaction PDF can be a time-consuming process, depending on the item’s file type and complexity. This can get in the way of a smooth and efficient review. To alleviate this, one can choose to pre-generate the redaction PDFs, or to queue the items for redaction.
21.2. Redacting an item
It’s possible to redact an item by opening it in the Previewer and clicking on the “Redaction” tab.
Intella Connect will render the item based on the preferred redaction profile which can be changed by selecting another profile from the profiles dropdown located above the rendered document on the right side.
|
Profile can be changed only when there are no redaction marks applied to the document. |
More information related to Redaction Profiles can be found in the Redaction profiles section.
Redaction tab contains a PDF rendering of the item and offers various controls for adding and editing redactions. As the PDF is generated on demand, the tab may take some time to appear, depending on the type and complexity of the item. The item is now ready to be redacted.
To redact a part of the content, simply select the rectangular area in the rendered item that needs to be hidden. The selected area will now be covered with a rectangle. You can repeat this step to conceal additional parts of the item. The redactions are stored automatically; Manual save action is not needed. The rectangle is semi-transparent so that the reviewer can still see what content has been redacted without having to move it. In the final exported document the rectangle will be a solid color, optionally with a text within it.
Color of new rectangle, text within the rectangle, color and font of that text is defined in Redaction Template. Redaction Template can be set by selecting a template from the templates dropdown located above the rendered document on the left side. Template of existing rectangle can be changed by selecting a different template from the templates dropdown, which will change the template of the selected rectangle resulting in change of color of the rectangle, text within the rectangle, color and font of that text.
More information related to Redaction Templates can be found in the Redaction Templates section.
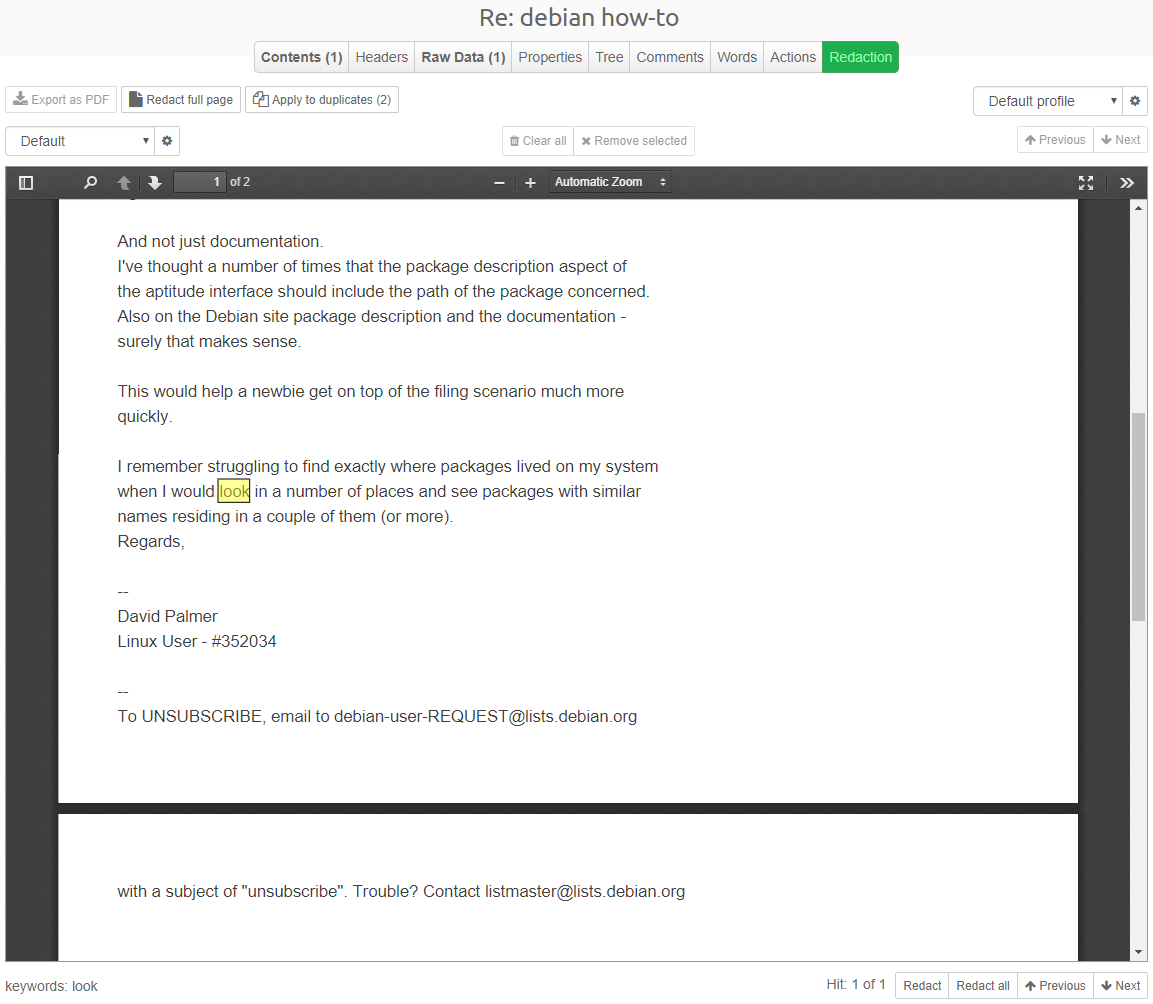
To move or resize a redaction mark, click on the rectangle. The rectangle will become selected and can then be moved or resized with the mouse.
To remove a redaction, select it and click the Remove selected button
or press Delete key.
Current amount of redaction marks is shown at top of the redaction
editor. To iterate between redaction marks, click on Previous or Next
button, located close to current amount of redaction marks.
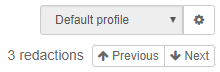
To remove all redactions of this item, click the Clear all button.
To place a redaction mark on whole page(s), click on Redact full page
button. This will show the following window:
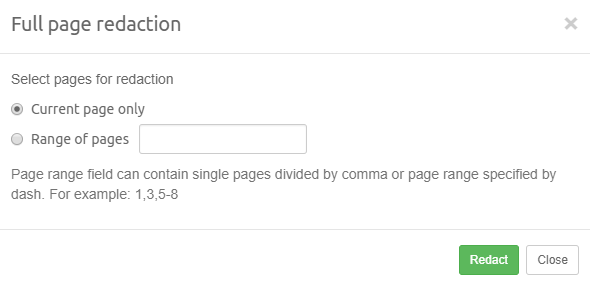
After selecting which pages to redact, i.e. current page only or a range of pages, the specified pages will have redaction mark applied which will cover the whole page. Due to limitations of applying redaction mark to whole page in Intella Connect, it may not cover the whole page. This shortcoming will be addressed in a future Intella Connect version.
To place the same redaction marks as current item has on duplicates of
current item, click on Apply to duplicates button. The number of
duplicates that the redaction marks will be applied to is shown on the
button in parenthesis.
|
When applying redactions to duplicates, then if these duplicates will have redaction marks applied with different redaction profile than the profile of current item, then such redactions with different redaction profile will be removed, redaction profile will be switched to current and finally the redactions will be applied to this duplicate. |
|
Redactions can be applied only to items with the same MD5 hash due to requirement that the PDF views of those items must be identical. This can be seen on items which show as having duplicates, but button to apply redactions to duplicates is disabled. |
When you close and reopen the item, the Previewer will immediately show the Redaction tab again with all previously made redactions, as the PDF is cached. Only when no redactions are added will the PDF be discarded. Redacted items can easily be found using the Redacted category in the Features facet.
21.3. Exporting
When exporting an item to PDF, Intella Connect will by default use the redacted version if there is one. More specifically, it will convert the temporary PDF into a final PDF that contains only images, and will burn in the redactions in these images so that the sensitive content is concealed permanently.
Exported load files containing PDFs or TIFFs will undergo a similar process. The result of this last conversion step is a PDF that has no regular machine-processable text. To verify this, simply open the PDF in a PDF reader like Acrobat and try to select the text. That makes this redaction method very safe (as opposed to removing the sensitive text from the source file) as all information is in plain sight; there is e.g. no hidden metadata that could still leak the sensitive information. The downside is that the PDFs can have a large file size as all text is represented as images, and that they would need to be OCRed to make the non-concealed text accessible again for text selection, keyword search, etc.
As the final PDF is derived from the temporary PDF, the PDF export
settings entered in the Export window will only have any effect on the
non-redacted items in the export set. The redaction tab in the Previewer
also has an ![]() button, to
export the current item as a redacted PDF. This PDF will be the same as
when it is exported as part of a collection of items to PDF, i.e. all
pages will be converted to images with their redacted parts showing as
black rectangles. This option is useful when only a few redacted
documents are necessary or to verify the redaction export.
button, to
export the current item as a redacted PDF. This PDF will be the same as
when it is exported as part of a collection of items to PDF, i.e. all
pages will be converted to images with their redacted parts showing as
black rectangles. This option is useful when only a few redacted
documents are necessary or to verify the redaction export.
Errors such as redaction rectangle placed outside of page or having negative values of position and/or width and/or height are detected and reported. Such errors will be reported:
-
in previewer when exporting redacted items directly from previewer
-
in export report when exporting from the Details table
It is highly recommended to check for redaction errors when exporting redacted items.
21.4. Border around white redaction mark
If redaction mark with white color was applied on white background of a page, then the boundary of such redaction mark or the whole redaction mark will not be visible to the recipient of such redacted document. In some cases it might be the desired effect. In cases when it’s important to note the portion of the document that has been redacted, then this can be achieved by using border around white redaction marks.
The border around white redaction marks can be turned on or off in Preferences. See section Preferences > Global for more information about where to toggle border around white redaction mark.
21.5. Text within redaction mark
To add or modify text that will be shown on top of redaction mark, but
within its bounds, select a redaction mark by clicking on it and click
on button Edit redaction text. A popup window will be shown in which
the text can be added or modified and clicking on Ok button will put
that text on top of the redaction mark.
Note that such text added to redaction mark has preference over text defined in redaction template. This method can therefore be used to apply single or few descriptors to special redaction marks. It is not possible (and that is by design) to add or modify text added with this method in multiple redaction marks as such functionality is reserved to redaction template. If there is such a need to add or modify text in multiple redaction marks, then see Redaction Templates section.
21.6. Redacting keyword search hits
A common redaction method is to search for a company or organization name and to review and optionally redact the search hits. Intella Connect can assist with this process: when the Redaction tab is viewed while Intella Connect’s search interface shows one or more keyword queries, the keyword search hits will be highlighted in the Redaction tab and can be redacted with the click of a button.
Note that this highlighting works best on single term queries. It does not work reliably or even at all for more advanced queries such as phrase searches, wildcard queries, etc.
The currently used keyword(s) will be shown beneath the item content.
Use the arrow buttons to move from one keyword hit to another. Click the
![]() button to redact the
currently highlighted occurrence, or click the
button to redact the
currently highlighted occurrence, or click the
![]() button to redact all
occurrences in the current item.
button to redact all
occurrences in the current item.
Please see the subsection on Caveats below when using the
![]() button.
button.
21.7. Redaction related background tasks
Following background tasks aid with preparing faster initialization of redaction tab, applying or removing redactions from multiple items:
-
Redaction PDF pre-generation
-
Process queued items
-
Remove redactions
See section Preferences > Background tasks for more information about these background tasks.
21.8. Redaction Templates
Defining templates can be done in Redaction Templates window which can be accessed by pressing a Gear icon next to the templates dropdown.
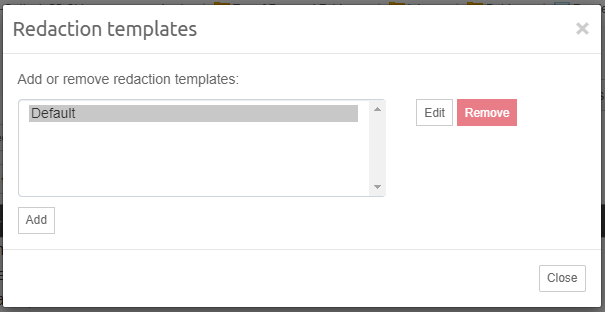
To add a redaction template to the list, click the Add button. The window that opens allows the reviewer to enter a template name and select the color of a rectangle, text within that rectangle, color and font of that text which will be used when this redaction template is chosen.
The Draw border around white redactions option generates a thin black border around those redaction marks that have a white color. Such redactions would otherwise not be visible as redacted areas in documents with a white background.
The template text is optional and if left empty, then the rectangle will not contain any text within it.
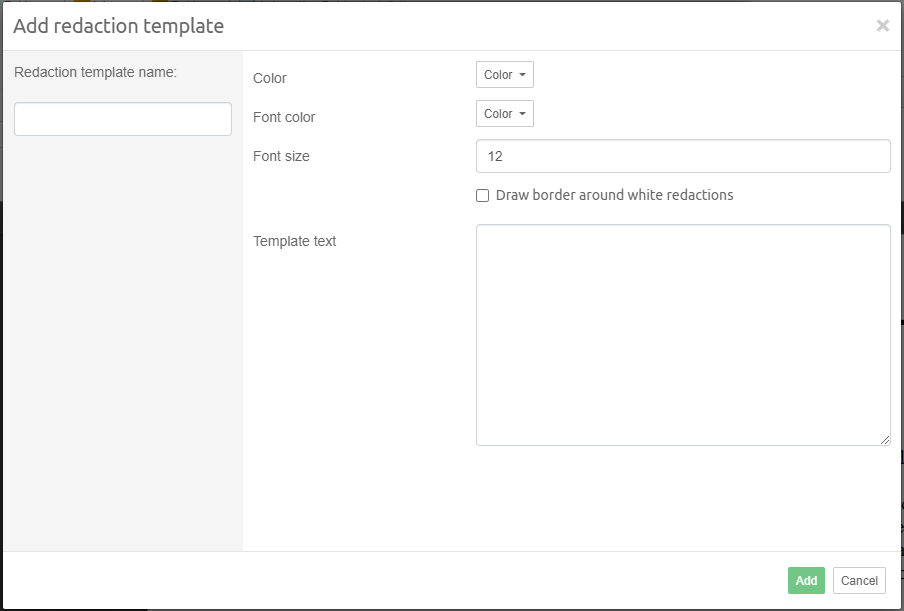
21.9. Redaction Profiles
When the Redaction tab in the Previewer is clicked, a PDF that is generated will consist of a limited set of content and metadata properties. For example, e-mails will show their most important headers (e-mail sender and recipients, subject and sent/received dates) on the first page, followed by the e-mail body. The full SMTP headers of the e-mail are printed on one or more separate pages, followed by the list and content of the e-mail’s attachments. When this default set of content and metadata properties is not suitable for a specific case, or different settings are desired for different types of items or different audiences, the user can define one or more redaction profiles for the case. Such a profile defines the set of content and metadata properties to be used in the redacted PDF. Defining additional profiles and/or selecting preferred profile can be done in Redaction Profiles window which can be accessed by pressing a Gear icon next to the profiles dropdown.
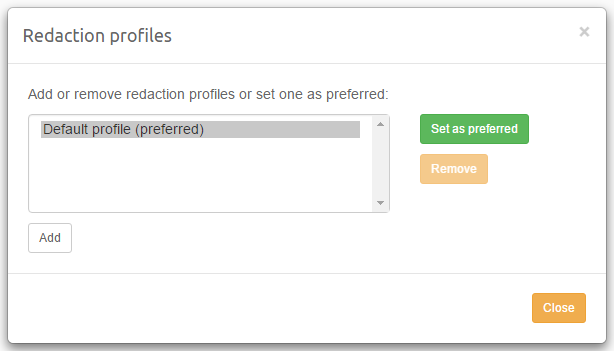
To add a redaction profile to the list, click the Add button in the Redaction tab. The window that opens allows the reviewer to enter a profile name and select which content and metadata properties should be used when this redaction profile is chosen. For a detailed description of the available properties see the Exporting > PDF rendering options section.
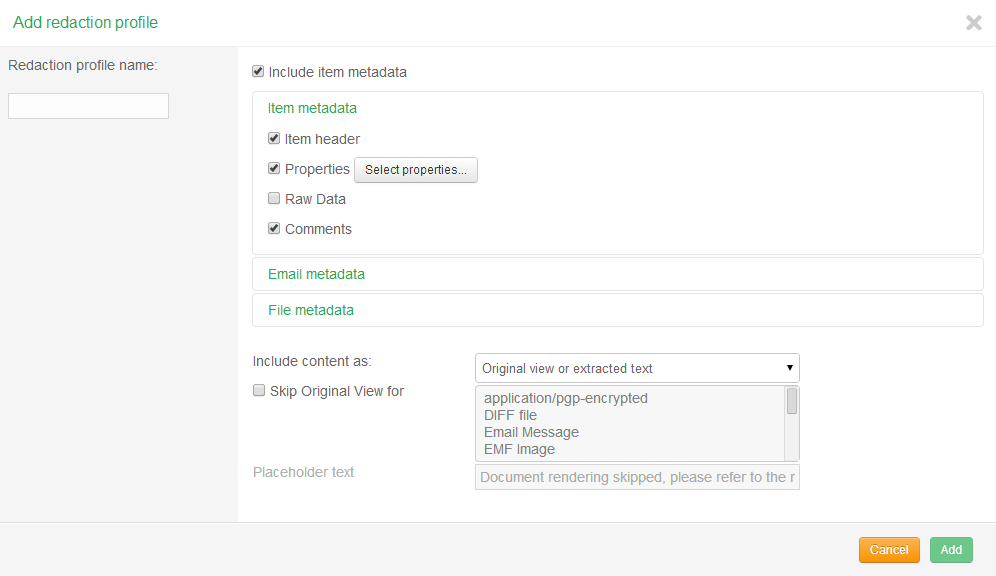
21.10. Caveats
As the purpose of redaction is to conceal sensitive information, it is vital that the reviewer takes notice of the following caveats on the redaction functionality.
First, there are a number of issues to be aware of when using keyword Hit Highlighting to control the redactions. When highlighting the search hits in a PDF, the highlighted area may not exactly cover the responsive text in the PDF. The redaction rectangle then needs to be manually moved and resized. Whether this happens depends on the fonts used in the PDF: PDFs that Intella Connect has generated using texts from its own databases are fine (e.g. pages with e-mail bodies and headers), but text in existing evidence PDFs or in Word documents that are converted to PDF may be a different story. We have no control over the font characteristics used in those documents and therefore cannot guarantee correct placement of the redaction rectangle.
Another important aspect is that Hit Highlighting may not find all occurrences of the text that is searched for. For example, words that are misspelled, use a spelling variation or are hyphenated may not be found. Texts inside graphics will also not be found. Note that OCR software that is used to combat this can also introduce spelling errors.
Finally, tables and graphs may require extra attention. When creating a redacted PDF rendering of an item, the PDF is only associated with that specific item, not with any duplicates of that item. We may introduce that functionality in a future version.
22. Tasks
Tasks can be executed not only as a post-processing operation , but also straight from a shared case.
22.1. Listing available Tasks
Tasks panel can be opened by clicking on the Tasks icon inside the Secondary Navigation Bar:
![]()
The list will contain Tasks created by any user, regardless of the fact if they have been created during the process of adding a source or afterwards.
|
Managing and running Tasks is governed by the 'Can manage and execute case tasks' permission. Users who are not granted with it will not see the Tasks icon in the Secondary Navigation Bar. |
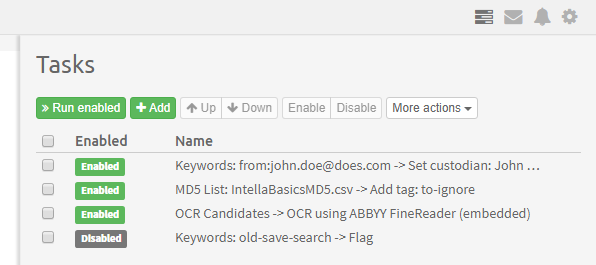
The process of managing list of available Tasks is the same as described in Sources > Post-processing > Tasks .
22.2. Running tasks
To run a click on the Run enabled button in the menu above the Tasks
list. Only Enabled tasks will be run, and the ones which are disabled
will be completely ignored.
Since each Task can be a lengthy operation it will be run in a Background Tasks framework described in Preferences > Background tasks . The progress of each Task can be monitored there and for convenient Intella Connect will show standard notifications whenever the progress of the task changes.
Please note that tasks are executed in the order they are listed. You can change the ordering and status of each individual task by selecting them and using the buttons from menu available atop.
23. Instant Messaging
Intella Connect provides Instant Messaging functionality out of the box so each user can send messages to or receive messages from other users that are working on the same case. In addition, a user can share queries with other users.
23.1. Instant Messaging panel
The Instant Messaging panel can be opened by clicking on the Instant Messaging icon (envelope) inside the Secondary Navigation Bar:
![]()
|
The Instant Messaging panel will be visible only to users with "Can send and receive Instant Messages" permission. |
|
The same envelope icon can also be used to close the Instant Messaging panel. |
After clicking on the envelope icon, all the users that are assigned to the same case will be shown.
Note that the total number of unread messages (if any) will be indicated by the red counter on the icon.
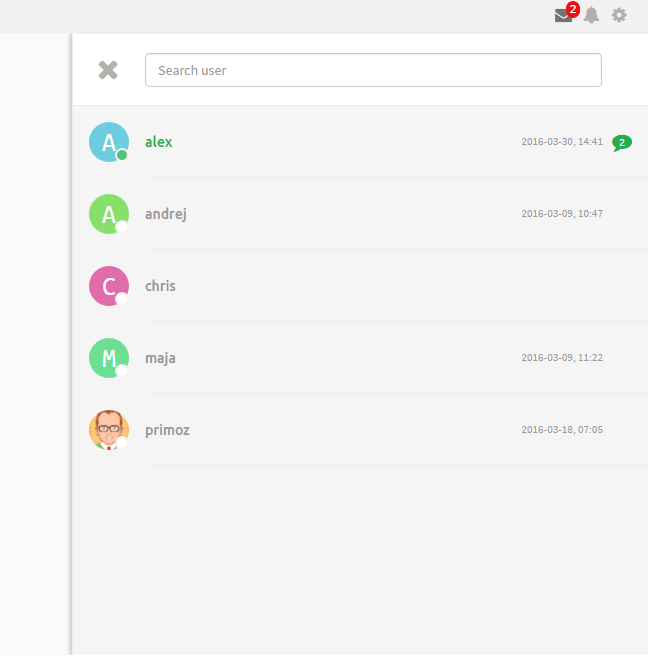
- Each user entry in the list has the following information
-
-
user status indicated by green/white circle in the right bottom corner of the avatar image - green circle represents active user
-
the last received message
-
the number of unread messages sent by a specific user is shown as a number inside the green icon on the right
-

After clicking on any of the users, an Instant Messaging conversations panel with the last 10 messages will be shown:
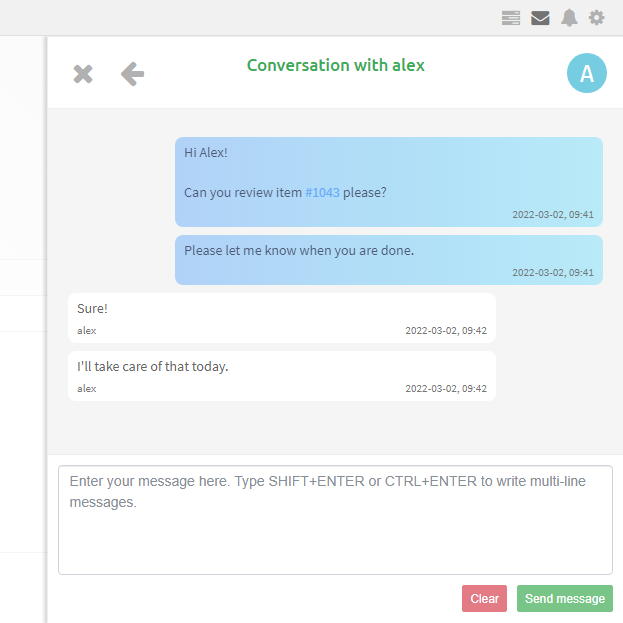
Typing a message into the preselected text area and clicking on the
Send message button will send the message.
If a message contains numbers that are preceded by the hash character (#), then they will be interpreted as item ID references and turned into hyperlinks. Clicking on them opens the item in a Previewer tab. Please note that item IDs change after re-indexing the case, which means that such hyperlink will point to different item after such re-index.
Pressing the left arrow on the upper left corner will bring you back to the Instant Messaging Users list. Pressing the cross icon will close the sliding panel.
24. Simplified activities
The simplified activities panel can be opened by clicking on the Activities icon (bell) inside the Secondary Navigation Bar:
![]()
It contains records related to user activities like viewed items, tagging, flagging, exporting, etc. An Activity entry consists of the user profile picture, a description of activity and the date and time of when the activity happened.
New activities are added in real-time. It is possible to view older
activities by clicking on the More activities button.
|
In order to prevent too much information to appear in the Activity stream those events are not shown:
|
25. Preferences
Intella Connect Preferences can be accessed by clicking on the gear icon in the Secondary Navigation Bar.
![]()
Preferences window allow one to manage various settings related to Intella Connect.
25.1. Global
Global preferences are further divided into following sub-sections:
- Search view
-
-
Show timeline - section where Timeline can be turned on and off
-
Show searches editor - section where searches editor can be shown or hidden - this allows viewing geolocation map without any portion of it being obstructed
-
- Table view
-
-
Visible Columns - section where Visible Columns of the Details table can be added or removed.
-
Rows height - allows to select between two possible heights of rows. This helps with making the table look more concise or easier to read.
-
Show row numbers - by default each row has an incremental counter associated with it displayed in the second column. This helps with easily finding the rows of interest. This option can be turned off.
-
Render full tag paths - when using complex tag hierarchies the full tag paths can be rather long. By default tags listed in Table View will only show only the last segment of the tag path (the name of the tag). This option can be changed to render entire tag path, ex.
Issue > Confidentiality > Private.
-
- List view
-
-
Keywords Hit Highlighting - turning Hit Highlighting on or off.
-
- Redactions
-
-
Draw border around white redactions - when checked, any redaction that has white color will have black border drawn around it. This applies to redaction tab or view as well as exported redacted documents.
-
|
These setting are saved in your browser’s cache. Therefore, if you use few browsers simultaneously, few computers (devices) or you have cleaned your cached data, then you might need to change those settings again. |
25.2. Facets
This sheet allows you to manage various settings related to Facets:
- Location facet
-
-
Automatically expand root sources - whether or not automatically expand root sources. Having this option disabled can reduce facet initialization time on large cases with multiple data sources.
-
Sorting - controls how root items in Location are sorted (default by date added).
-
- Email thread facet
-
-
Sorting - controls how items in Email thread facet are sorted (default name of a thread). It’s also possible to sort by the count of nodes present in a graph representing a thread, or the count of items referenced by a thread.
-
25.3. Previewer
This sheet allows you to manage various settings related to Previewer:
-
Automatically load entire document text - when this option is enabled Previewer will automatically expand truncated text. This can speed up review as users don’t have to perform this step manually, but should be used with caution as it can seriously affect case performance.
25.4. Coding Layouts
This sheet allows you to manage your global Coding Layouts.
The first set of controls allows to select an existing layout from the dropdown in order to modify it. Clicking on the Add button allows to create a new layout. After layout is selected additional set of controls is shown on the left, and a Live preview pane is shown on the right. By adding, modifying or changing fields on the left one will immediately see results of his actions in the panel on the right.
|
Fields list supports dragging its elements, which changes the order of Coding Fields as they appear in the layout. |
Each Coding Field has the following options:
-
Tag - specifies a tag from the current case to which the Coding Field will be mapped.
-
Type - specifies how the field will be rendered and how will it work. Possible options are:
-
CHECKBOX (default) - field is rendered as a checkbox control. Hierarchical tags will allow for many Coding Options to be selected.
-
RADIO (requires a hierarchical tag) - field is rendered as a set of radio buttons. Each Coding Option will represent one radio button. This component will force user to select just one of available choices.
-
DROPDOWN (requires a hierarchical tag) - field is rendered as a dropdown (also known as "Select" or "Combo box"). Each Coding Option will represent one element in the list. This component will force user to select just one of available choices.
-
MULTI SELECT (requires a hierarchical tag) - field is rendered as a box showing all selected Coding Options. When the box is clicked, a dropdown is shown with all options available for selection. This component can be considered a cleaner, simplified version of a long list of checkboxes.
-
-
Required - if this option is ON then reviewer will be forced to make a coding decision about this field.
-
Show hint - if this option is ON then a small icon will be rendered next to the field in the Coding Form. Hovering mouse over this icon will show a tag’s description in a tooltip. This can be some auxiliary text for reviewers.
-
Optional parent (works only with checkboxes and hierarchical tags) - if this option is ON then this field will also render a checkbox next to the top-level tag.
25.5. Background Tasks
|
The Background Tasks sheet will be visible only to users with "Can manage background tasks" permission. |
This sheet allows one to manage Background Tasks. Those are long-running tasks executed in the background which means that the case can be reviewed at the same time.
- Currently supported Background Tasks are
-
-
PDFs pre-generation - generates PDFs in order to speed up native previewing in Previewer
-
Redaction PDF pre-generation - generate redaction PDFs in order to speed up Redaction tab loading
-
Process queued items - process queued items for redaction
-
Remove redaction - removes all redactions
-
Thumbnails pre-generation - generates thumbnails in order to speed up Thumbnails view loading
-
OCR - allows running Optical Character Recognition on selected items
-
Case Tasks - created for every instance of Case Task created by a reviewer (these type of Background Tasks cannot be created from Preferences panel)
-
Only one Background Task per case is executed at once. When a new Background Task is
created it is added to the queue. Any task can be removed by using the Delete button.
If task is in progress while Delete button is pressed it will be stopped before being
removed from the list.
If task is still remaining in the scheduled tasks queue or ended its execution it becomes
possible to permanently delete it. You simply need to select it and click on the Delete
button to do so.
For most kinds of Background Tasks Processed items column will show an
accurate progress informing user about how many items have already been
processed and what is the total number of affected items. Exception
column will show a link which can be used to download error report in
case any errors have occurred. Both of those information are not
available for Case Tasks though.
25.5.1. PDFs pre-generation
Cases that rely heavily on viewing of documents will benefit from pre-generating of the PDFs for native view previewing.
To pre-generate native view PDFs, click on the "Add new" button. The dialog for adding new Background Tasks will be shown. Select the desired tag, "PDF pre-generation" task type and press "Ok".
The "PDF pre-generation" background task will be added to the queue.
The PDFs generation process can be cancelled at any point by deleting already added Background Task. The PDFs that have been generated will be kept.
25.5.2. Redaction PDF pre-generation
Redaction PDFs can also be pre-generated. This will result in the Redaction tab initializing a lot faster, as it can immediately load this PDF from disk.
To pre-generate redaction PDFs, click on the "Add new" button. The dialog for adding new Background Tasks will be shown. Select the "Redaction PDF pre-generation" task type, desired tag, redaction profile, optionally check "Include duplicates" option and press "Ok".
The downside of pre-generating redaction PDFs is that you may end up generating PDFs for items that will turn out not to need any redactions. For a large case, the cost of generating all PDFs up-front may be prohibitively time-consuming.
25.5.3. Process queued items
Items may also be queued for redaction. This workflow starts with gathering the items to redact via a keyword search, e.g. using a person name. The user reviews the search hits using the Content and Preview tabs, which are generally quick to load. When the user determines that redaction is appropriate for the current item’s keyword search hits, the user can click the “Queue for Redaction” button in the Previewer.
Clicking this button stores the item in the so-called redaction queue, together with its currently highlighted search terms. The user can let Intella Connect process this redaction queue later, at a time when the case is not being worked on. Intella Connect will then generate the redaction PDFs for the queued items and determines the visual areas where these hits appear in the PDF.
To process the redaction queue and generate the redaction PDFs with their redaction marks, click on the "Add new" button. The dialog for adding new Background Tasks will be shown. Select the "Process queued items" task type, desired tag, redaction profile and color that will be applied to redaction marks created as result of running this task. Optionally check "Auto-redact duplicates" option which would apply the same redaction marks to duplicates of items being redacted. By default, items which already have redaction marks applied will be skipped. This can be changed by choosing "Replace existing redactions and switch items to the current profile" option, which would first remove redaction marks, then switch redaction profile to the one chosen and finally apply the redaction marks. Press "Ok" to start the processing.
The benefit of queuing items for redaction is that no redaction PDFs are generated before or during the actual review. This means that reviewing for the purposes of redaction can start right after the case has been indexed. Additionally, redaction PDFs will only be generated for those items that need to be redacted, potentially saving a lot of processing time.
The downside of queueing items for redaction is that an additional manual review of these PDFs is still needed afterwards, as the visual output of the PDF rendering may be different from what is shown in the Contents and Preview tabs.
|
When the queue is processed and Intella detects for an item that there is a difference between the hit count in the redaction PDF versus the hit it had when the “Queue for Redaction” checkbox was selected, it will put these items in the “Missing keyword hits” in the Features facet. It is strongly recommended to review the redaction PDFs of these items afterwards. |
|
When "Skip items with existing redactions" options is chosen, then the items which already have redaction marks will be skipped, which will result in decrease of items to be processed. If all items will be skipped this way, then zero processed items will be shown. This is expected behaviour. |
25.5.4. Remove redactions
It may turn out to be necessary to remove all redactions, e.g. because of a change in policies.
To do this, click on the Add new button. The dialog for adding new
Background Tasks will be shown. Select the Remove redactions task
type, desired tag and press Ok.
Note that it is currently not possible to revert this operation.
25.5.5. Thumbnails pre-generation
Cases that rely heavily on viewing collections of images in the Thumbnail view will benefit from pre-generating the thumbnail images in advance, especially when dealing with digital camera images that each are multiple megabytes in size.
The time needed to generate the thumbnail image can make the Thumbnails view loading appear sluggish. When the thumbnails have been pre-generated, the time needed to populate the view will be a lot faster and it will be constant with regard to the number of visible images, i.e. the file size of the original image is no longer a factor.
To pre-generate the thumbnail images, click on the Add new button. The
dialog for adding new Background Tasks will be shown. Select the desired
tag, Thumbnail pre-generation task type and press Ok.
The Thumbnail pre-generation background task will be added to the
queue.
The thumbnails generation process can be cancelled at any point by deleting already added Background Task. The thumbnail images that have been generated will be kept.
25.5.6. OCR
Since Optical Character Recognition can be a resource demanding process, it will be performed as a Background Task. Intella Connect supports three types of OCR process covered in details in the next section . When running OCR via ABBYY Recognition Server as a Background Task it’s important to make sure that ABBYY has been properly configured in Admin’s manual > Intella Connect Dashboard > Settings > ABBYY
25.6. Review
This sheet allows you to manage various settings controlling the Review phase:
-
Render coding layout fields in - this option controls how coding fields are rendered inside a coding form. The default view organizes fields in one column. This works well for smaller forms, especially when tag names are long and descriptive. The second option allows rendering of coding fields in multiple columns, making better use of available horizontal space. This will work better for wider screens, but could require a change in ordering of fields in the coding layout.
-
Show Predictive Coding guide - this setting controls when the Predictive Coding guide component should be displayed to the user. Using the second option will show it only when a significant change to the review state is detected, for example: moving from "Initial learning" phase to "Active learning".
26. Optical Character Recognition (OCR)
Cases often contain images with human-readable text in them, e.g. web page screenshots. These images can be embedded in documents, e.g. a scanned or faxed document is packaged as a PDF containing TIFF images, or a chart is embedded as a picture in a Word document.
The techniques for identifying the text in such images (embedded or not) is called Optical Character Recognition, commonly abbreviated to OCR. Application of such OCR techniques can make the textual contents of these images available for keyword search.
Some modern scanners already apply OCR techniques during scanning and add the extracted text to the PDF. If this is the case, Intella Connect will pick up the text automatically during indexing. Often this machine-accessible text is missing though, or it contains too many recognition errors to be useful for keyword searching. Also, loose images do not come with such text at all.
To overcome this, Intella Connect offers OCR support, letting you improve your case index.
Note that there can be some limitations with OCR processing:
-
OCR quality can be affected by several factors, including the quality of the original item, the way the original item is structured, the quality setting used in Intella Connect, etc.
-
The OCR text may not be displayed in the same order as shown in the Preview tab.
-
Certain characters may not be OCRed correctly. E.g. a
1may be read as anl, and a0may be read as aO. -
Handwritten documents, or handwritten comments in documents, may not be OCRed.
26.1. Starting OCR
| OCR is available only for item’s original content. Other types of content such as load file images are not supported at the moment. This may be improved in future releases. |
Intella Connect’s OCR support is currently a post-processing step, performed manually by the case admin after indexing has completed or as a post-processing task. In the future, we may make this part of the indexing process.
To OCR a collection of search results, you can use the following procedure:
-
Use Ctrl-click or Shift-click to select multiple items in the Details pane, using the table, list or thumbnails view.
-
Right-click and choose "Add Tags…". Tag the items you wish to OCR with a new tag, ex. ocr-1. You can skip this step if you wish to OCR items based on some existing tag.
-
Open "Preferences" and navigate to "Background tasks". Click the "Add new" button. This will open a dialog allowing you to further customize new Background Task.
-
In the left panel locate the section labeled "OCR" and choose appropriate method of OCRing (they are described in the next section).
-
Regardless of the selected method, the first step is to pick the tag you created in step 2. in the "Select tag" dropdown located in the panel on the right. Intella Connect will use this tag to find items that will be a subject of further OCR process.
-
Carry on with the OCR process.
The "OCR Candidates" task condition can be used in order to automate OCR. See the section Admin’s manual > Sources > Post-processing > Tasks for more detailed information on running OCR as a post-processing task.
You can also use the OCR button in the previewer to OCR the current item using the embedded ABBYY FineReader engine.
26.2. OCR methods
Intella Connect currently supports three OCR methods:
-
ABBYY FineReader (embedded)
This method allows to OCR the items using an engine embedded into Intella Connect. The method is fully automatic and doesn’t require any additional software or licenses.
-
ABBYY Recognition Server
This method consists of sending the files to a Recognition Server for processing, automatically incorporating the received results into the case. This method is fully automatic and requires a licensed and configured instance of ABBYY Recognition Server available over the network. Make sure that your system administrator properly sets up ABBY Recognition Server configuration before using this feature.
-
External OCR tool
This method consists of exporting the items as loose files, processing them with the user’s preferred OCR software, and importing the OCRed files back into the case.
26.3. Using ABBYY FineReader (embedded)
This method is fully automated and doesn’t require to install any additional software or licenses. The method utilizes the ABBYY FineReader engine embedded into Intella Connect.
As stated in the Intella Software License Agreement, the use of the embedded OCR functionality must be in conjunction with the supply of results for eDiscovery and services that are normally related with the Intella software. Please see the licenses\intella-license.rtf bundled with Intella for more information.
|
Steps to OCR selected items with ABBYY FineReader (embedded): - Specify the profile that allows to set the balance between speed and quality:
-
Accuracy: OCRing may take longer time, but produce better quality output.
-
Speed: OCRing may be faster, but produce less quality output.
-
Specify the languages that are used in the items. Note that adding more languages will make the process slower.
-
Specify the number of workers. It should match the number of logical CPU cores on your machine in order to achieve the best performance. This value has fixed upper limit set at 64.
-
Specify the output format: Plain Text or PDF. If the PDF format is selected Intella Connect will store both OCRed text and searchable PDF version of the document.
-
Use the "Detect page orientation" option to automatically rotate an image if its orientation differs from normal.
-
Use the "Correct inverted images" option to detect whether an image is inverted (white text against black background).
-
Use the "Skip OCRed items" checkbox to skip items that have already been OCRed before. Otherwise, Intella Connect will replace any existing OCRed text.
-
Click the "OK" button to start the OCR process.
26.4. Using ABBYY Recognition Server
When you have access to an ABBYY Recognition Server, you can utilize it to OCR selected items in the case fully automatically.
|
ABBYY Recognition Server 3.5 or 4.0 should be used. |
Steps to OCR selected items with ABBYY Recognition Server:
-
Make sure with your administrator that the ABBYY Recognition Server integration in Intella Connect has been properly configured.
-
Start creating a new Background Task with type "ABYY Recognition Server", as described above.
-
Optionally, you can skip OCR process for items which have already been OCRed.
-
Click the "OK" button to start the OCR process.
The selected documents are will now be send to the Recognition Server. The results that it sends back will be processed automatically, similar to how the external method works.
Please make sure that your ABBYY Recognition Server is configured correctly:
-
A separate document should be generated for each input file.
-
The output format is a format that Intella can index.
-
The following parameters need to be set correctly in the following file (suggested parameters allow for processing files up to 30 MB): C:Program Files (x86)ABBYY Recognition Server 3.5RecognitionWSweb.config
Parameters:
<?xml version="1.0" encoding="UTF-8"?>
<configuration>
 <system.web>
 <httpRuntime maxRequestLength="409600" />
 </system.web>
 <system.webServer>
 <security>
 <requestFiltering>
 <requestLimits maxAllowedContentLength="300000000" />
 </requestFiltering>
 </security>
 </system.webServer>
</configuration>
26.5. Using an external OCR tool
To OCR the selected items with an external OCR tool, you initially need to create an export package (ZIP archive). Once you click the "Ok" button, Intella Connect will export the items in their original format to the ZIP package. Every file will be named after the MD5 of the item – note that this means that unique items are only exported once! You can download that package from the Background Tasks list (download link will be shown in "Download" column once the relevant Background Task is completed).
Download and unzip the export package. Next you can use any OCR tool to process the exported files.
To import the OCRed files back to Intella Connect, the tool and its configuration should comply with the following requirements:
-
The OCR tool must be able to create a single OCRed file for each input file. Put these files in a separate folder.
-
The file name of the OCR output must match the original file name, but it may have a different file extension, per the file type produced by the OCR tool. For example, if the original file name is
6345b60187d08be573133376d7543c54.tif, then the OCRed file name can be6345b60187d08be573133376d7543c54.txt. -
The OCRed file format must be of one of the Intella Connect supported formats, e.g. plain text, PDF, MS Office, etc.
Use the "Skip OCRed items" checkbox to skip items that have already been OCRed before. Uncheck the "Skip OCRed items" in order to replace any existing OCRed text with the new one. The "Import as" option can be used to specify the format for the OCRed files, otherwise Intella Connect will try to detect it automatically. Click on the Import button to import the files.
After you have OCRed the files, ZIP all of them to a single ZIP archive and go back to the Background Tasks list. You will now have to create a second Background Task, but this time using "Import OCR package" option. Use the file upload box to drag and drop the package file or press "Select" button to open a file chooser. Click "Ok" to start importing the package.
Intella Connect will analyze every file in the specified package, extract the text and link it to the original item and all its copies. The imported OCRed text can be found under a separate OCR tab in the previewer.
26.6. Reviewing OCRed items
To find all items in a case that have been OCRed, you can use the OCRed category in the Features facet. This attribute is also reflected in the Details table in the OCRed column. When an OCRed item is previewed, this will be shown as an additional property in the Properties tab.
When importing OCRed documents Intella Connect will extract text, add it to the index and store searchable (original view) version of the document. The text can be found in the OCR tab of the previewer. The original view can be found in the OCR Preview tab. Note that the original content of the item will not be replaced. See the Exporting section for more details about exporting OCRed text and original view.
|
When converting an old case created with Intella Connect 2.0.1 or older to the 2.1 format, the OCRed text will NOT be transferred. It will appear under the Contents tab instead of the OCR tab. |
27. Email Threading
The linear review of emails is often a time-consuming and expensive task to perform. One factor is that emails may quote the text of previous emails in the thread, resulting in a lot of redundant text. Take for example these three emails:
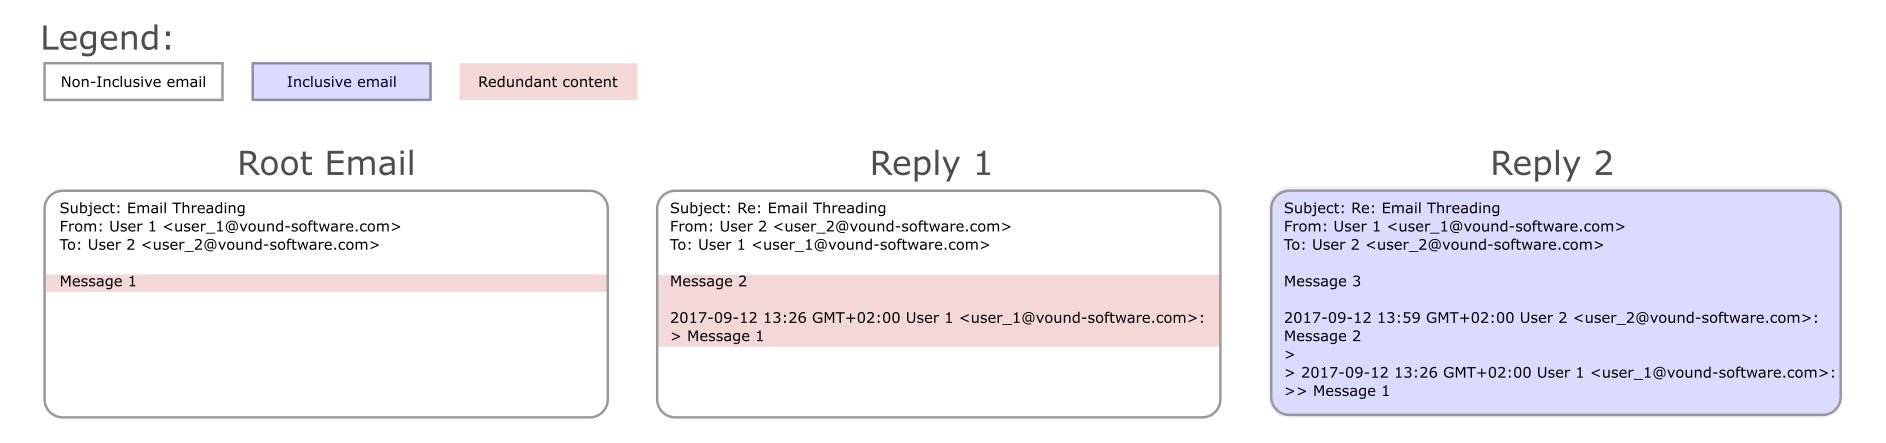
Marked in red is the redundant text. The text of the first two emails is quoted in full in the last email. When a reviewer reads the last email, he or she has read everything there is to read in this thread. The reality is often more complex, e.g. because people respond to the same root email, remove part of the quoted text, forward it to new recipients, or even alter the quoted text to cover up certain facts. Therefore, it is not always as simple as reading the last email in the thread.
Intella Connect helps with this type of review through the process of email threading. First, it identifies the emails that belong to the same thread. Within each thread, it links the replies and forwards to their parent emails, constructing a graph of how the conversation unfolded. All duplicates of a mail will be represented by the same node in this graph. Next, it compares the emails within the thread and determines the set of “inclusive” and “non-inclusive” emails. By default, a mail will be marked as inclusive. When Intella Connect detects that one of the follow-ups of a mail (a reply or a forward) contains all its text and attachments, it will be marked as non-inclusive, as reading the latter email implies having read the first as well. Reading all the inclusive emails and their attachments in a thread implies having read everything there is to read in the thread. This can greatly reduce the time needed to review a large collection of emails.
Besides separating inclusive from non-inclusive emails, email threading enables several other functionalities:
-
Sort the emails in a thread in the Details view, to read the entire email thread sequentially.
-
Group the emails in the Details view by thread.
-
Visualize a specific email thread in the Email Thread tab of the Previewer. This shows how the previewed relates to the other emails in the thread, e.g. what email did it reply to, what replies did it trigger, are there different branches in the thread, how was its content forwarded, etc.
-
Tag all emails in a thread at once.
-
Identify missing emails in a thread. These are emails that are referred to in the email headers or in the metadata embedded in an email body, but that cannot be found in the current evidence data. This may indicate missing evidence data that an investigator may still be able to acquire, e.g. from other custodians or from a backup. If additional evidence becomes available later, it can be added to the case. The email threading processing will then attempt to use the new emails to resolve the missing emails.
-
List the normalized subjects of the email threads in the Email Thread facet.
Each email item that was processed by the Email Threading analysis is assigned the following properties:
-
Threaded - Indicates whether the item has been subjected to email thread analysis.
-
Inclusive - Indicates whether the email is inclusive.
-
Non-Inclusive - Indicates whether the email is non-inclusive.
-
Missing Email Referent - Indicates that the threading process has detected that the email item is a reply to another email or a forwarded email, but the email that was replied to or forwarded is not available in the case.
-
Email Thread ID - The unique identifier of the thread that the email has been placed in.
-
Email Thread Name - The normalized subject of the thread that the email has been placed in.
-
Email Thread Node Count - The number of nodes in the thread that the email has been placed in.
Furthermore, the algorithm establishes for each follow-up email if it is a Reply, Reply All, or Forward. This status is derived from the sender and receiver information, rather than from e.g. the Subject line. A loose but conceptually practical definition is:
-
If the set of participants of the response email is the same as the email that it is responding to (the previous email in the thread), it is a Reply All, unless this is a conversation between only two people, in which case it is a Reply.
-
If the response email is going to one or more people, and none of them was involved in the original email, it is a Forward.
-
In all other cases, it is a Reply.
|
Performing email threading analysis is governed by the 'Can perform email threading' permission. Users who are not granted with it will not see the Email Threading action in the contextual menu. |
As email threading is a computationally expensive algorithm, it requires an explicitly triggered post-processing step. To start the Email Threading procedure, select one or more items in the Details view and select “Email Threading…” in the right-click menu. This will open the dialog shown below:
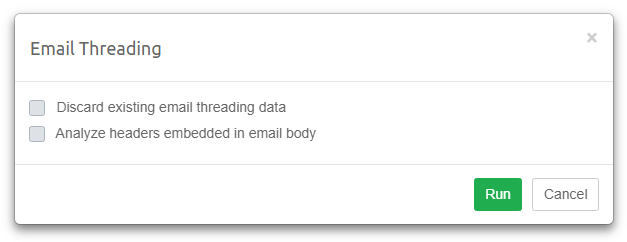
Select Discard existing email threading data if you want to clear the
Email Thread facet and all the data generated as part of previous runs
of Email Threading procedure.
Select Analyze headers embedded in email body if you want the
algorithm to take the headers embedded in the email body into account.
Such headers are typically placed above the quoted text, referencing the
original author and time of the quoted text and sometimes other
metadata. This can be used to link emails together when the SMTP or mail
container-specific metadata is missing or incomplete. This option may
produce better results but is computationally expensive. When speed is
not of the essence, we recommend turning this feature on.
Click the Run button to start the email threading process.
Once the process is done, the Email Thread facet will be populated and the email items that were part of the threading analysis will be augmented with the threading-related information.
Besides processing the selected items, Intella Connect will automatically process all duplicate items and parent items as well.
|
The “Analyze paragraphs” indexing option is a prerequisite for determining the inclusiveness of emails. If this option was not used during indexing, all emails will be marked as Inclusive. |
|
By default, the maximum depth of an email thread that Intella Connect can process is limited to 500. Email threads which depth exceeds this value will be split into smaller ones. This is to avoid too long processing times. It can be changed via "EmailThreadMaxDepth" property in the case.prefs file. Note that setting the property to a too high value (especially more than 1,000) might result into processing errors. |
|
Email threading analysis is a heuristic process, particularly when the analysis of headers embedded in email bodies is used. In some cases, this may lead to incorrect results, such as grouping emails together that do not belong to the same thread. We advise users to use this functionality with care and always validate results before relying on them. |